
saproType Client (Typist) User Guide
Powered by
Version 4
Client |Typist User Guide
SA Professional Typing Services Online cc
Telephone:
011 023 2323 | 011 887 1056
Cellular:
083 375 0312
Facsimile:
086 570 9651
E-mail:
info@saprotype.co.za
Web:
www.saprotype.co.za
1
st
Floor | Autoparks House |Glenhazel | Johannesburg | South Africa
P O Box 92726 | Norwood | 2117 | Johannesburg
saproType Client Guide 4 | Page 1
2 WinScribe Client User Guide
Copyright
©
2009 WinScribe Inc Ltd. All Rights Reserved.
Portions of the software described in this document Copyright
©
Microsoft Corporation. All Rights Reserved. Information in this document is
subject to change without notice. The software described in this document is furnished under a license agreement or nondisclosure agreement.
The software may be used or copied only in accordance with the terms of those agreements. No part of this publication may be reproduced,
stored in a retrieval system, or transmitted in any form or any means electronic or mechanical or photocopying and recording for any purpose
other than the purchaser's personal use without the written permission of WinScribe Inc.
WinScribe® is a registered trademark of WinScribe Inc in New Zealand and other countries. Microsoft is a registered trademark, Windows NT
and Windows is a trademark of Microsoft Corporation. Dragon NaturallySpeaking® is a trademark of Nuance, Inc. and is used here under
license. Other brands and their products are the trademarks or registered trademarks of their respective holder and should be noted as such.
Visit our web page: http://www.saprotype.co.za
saproType Client Guide 4 | Page 2

WinScribe Client User Guide 7
Welcome to WinScribe Client. In WinScribe Client, you and other transcriptionists are known as typists. As a typist, you can:
Connect to a WinScribe server via the Internet / Intranet and work online or offline.
Preview (play) the first few seconds of a job in your My Jobs folder.
Configure your foot pedal to suit your own requirements.
Depending on how WinScribe is set up at your organization, these options may also be available:
Select a job or jobs and move them into your My Jobs folder.
Sort your work in a variety of ways.
Search for a particular job or group of jobs.
Basic Features of WinScribe Client
WinScribe Client is a transcription management and collaboration client that helps you organize and share work with other
transcriptionists. Each transcriptionist may be a member of one or more typist groups, determined by the WinScribe System
Manager.
Getting Assistance While You Work
Press the button to open the online help file. To scroll through a table of contents for Help, click the Contents tab. When you
want to search the index, click the Index tab. When you want to search for specific words or phrases, click the Search tab.
Getting Started with WinScribe Client
saproType Client Guide 4 | Page 3

8 WinScribe Client User Guide
Working Online or Offline
With WinScribe Client working online means you are connected to a WinScribe server either via:
Your internet connection using a modem or DSL (Digital Subscriber Line); or
Via your company LAN / WAN (Intranet) connection.
To use WinScribe Client, you must logon using a valid user id and security code. See your System Manager for assistance.
When Working Online or Offline You Can
Work on a job in your My Jobs folder.
Move a job into your My Jobs folder and then work offline.
Return one or more jobs to your Shared Jobs folder (if your permissions allow you to).
When online, allocate one or more jobs to another typist (if your permissions allow you to).
Manually refresh your folders to see if more work is available.
Place a job on hold.
Add new personalised folders that filter and sort jobs to your own requirements.
Add or remove columns to your job list to show only the information you require.
saproType Client Guide 4 | Page 4
WinScribe Client User Guide 9
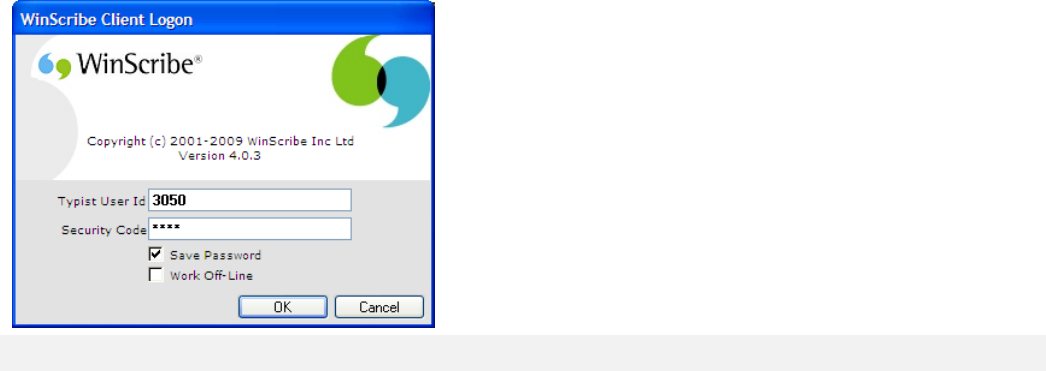
Logging On
1. Click Start | Programs | WinScribe | WinScribe Client. The Logon dialog box is displayed.
You may not see the login window if single signon functionality is enabled in your organization.
2. Enter your user id and the security code supplied by your System Manager.
3. If you want to work offline, (if you have jobs in your My Jobs folder) click the Work Off-Line tick box.
4. If you want to store logon information so that you do not have to enter it each time you connect, click the Save Password
tick box.
5. Click OK.
Notes:
When a new user logs on for the first time, default hardware settings from the previous user are applied.
It is a good idea to change your security code from time to time to protect the confidentiality of your work.
saproType Client Guide 4 | Page 5
10 WinScribe Client User Guide
You can select to go on or offline at any time by clicking the connection status in the main window and choosing the relevant
option. When you are offline, the server jobs queue is hidden. You can continue to work on jobs in your personal queue
while offline.
Going offline does not disconnect your internet connection if you are using a modem.
When working offline, completed jobs, rejected jobs and changes to the on-hold status are not updated on the server until
you next go online.
Logging on via Modem
When you logon to WinScribe in online mode, if the PC is configured to use a modem, then the normal Internet dialing dialog box
is presented allowing you to select your internet service provider.
1. Click Start, point to Programs, point to WinScribe, and then click WinScribe Client. The Logon dialog box is displayed.
2. Enter your user id and the default security code supplied by your System Manager.
3. If you have jobs in your personal queue and want to work offline, click the Work Off-Line tick box.
4. If you want to store logon information so that you do not have to enter it each time you connect, click the Save Password
tick box.
5. Click OK. The Dial-up Connection is displayed.
6. From the Connect to list select the ISP (Internet Service Provider) you wish to connect to (only required if you have accounts
with more than one ISP).
7. Enter your user name and password.
8. If you want to store logon information so that you do not have to enter it each time you connect, click the Save password
tick box.
9. If you want to connect automatically the next time you logon to WinScribe, click the Connect automatically tick box.
10. Click Connect.
saproType Client Guide 4 | Page 6
WinScribe Client User Guide 11
Notes:
If you use a non-standard dialer, then you will have to manually connect to the Internet prior to logging on.
For PCs using a LAN based connection to the Internet, No dialing dialog box is presented. The LAN connection is used
automatically.
Setting Up an Internet Connection
When you logon to WinScribe in an online mode, if the PC is configured to use a modem, then the normal Internet dialing dialog
box is presented allowing you to select the Internet service provider. If you use a non-standard dialer, then you will have to
manually connect to the Internet prior to logging on.
For PC's using a LAN based connection to the Internet, No dialing dialog box is presented. The LAN connection is used
automatically.
Connecting to the WinScribe Server via the Internet
Connection to the WinScribe server is carried out using the standard Windows Internet settings for Windows. You need to have
already set-up an account with an ISP and you can then use the Windows Internet Connection Wizard to connect to the
WinScribe server using your internet connection.
Windows Internet Connection Wizard
To create an internet connection to your account, the Internet Connection Wizard collects all the necessary information from you
and then creates the connection.
If you are not already running the wizard, you can start it from Internet Explorer as follows:
1. On the Tools menu in the browser, click Internet Options.
2. Click the Connections tab, and then click Setup.
3. Follow the instructions on your screen.
saproType Client Guide 4 | Page 7
12 WinScribe Client User Guide
For PCs using a LAN based connection to the Internet, No dialing dialog box is presented. The LAN connection is used
automatically.
Note: Before you create an internet connection, check with your internet service provider (ISP) to verify the required connection
settings. A connection to your ISP may require one or more of the following settings:
A specific IP address.
IP header compression (for PPP).
DNS addresses and domain names.
POP3 settings.
SMTP settings.
Optional settings, such as Internet Protocol Security.
saproType Client Guide 4 | Page 8
WinScribe Client User Guide 13
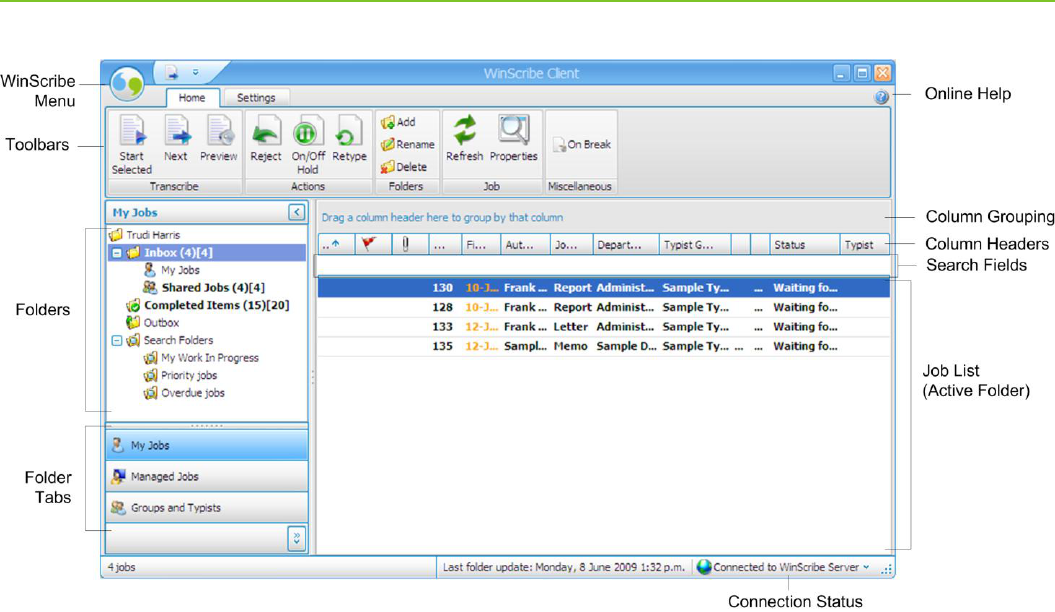
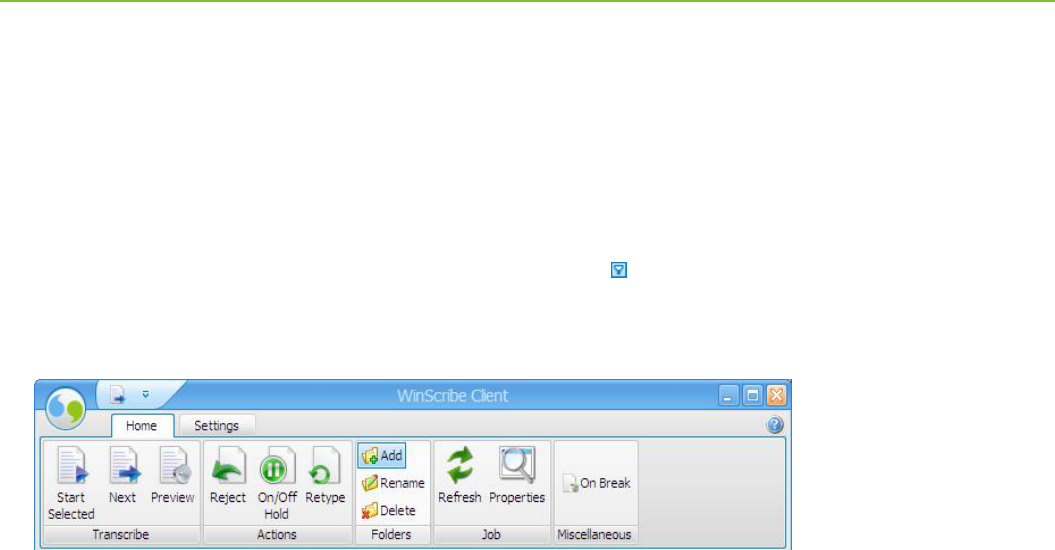
This section describes the functions available on the main WinScribe Client control panel.
The WinScribe Client Control Panel
saproType Client Guide 4 | Page 9
14 WinScribe Client User Guide
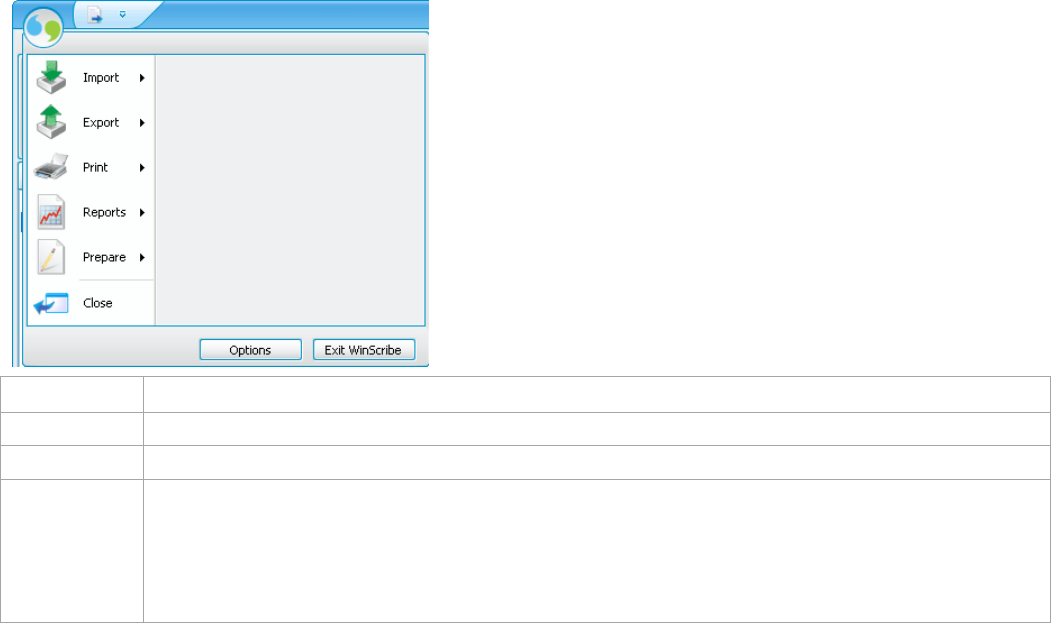
The WinScribe Menu
Click on the WinScribe logo (in the top left corner) to display the WinScribe Menu.
Option
Description
Import
Imports jobs (page 56) from an external device such as a portable recorder.
Export
Exports a list of jobs and their details into Microsoft Excel.
Print
Enables you to print (or preview) a list of all jobs in the currently selected folder:
Print: Opens the Print window for you to select a printer and configure print options.
Quick Print: Sends the job list directly to the default printer.
Print Preview: Opens a Preview window. The toolbar on the Preview window enables you to format the job
list, configure page and printing options, and print, export or email the job list.
saproType Client Guide 4 | Page 10

WinScribe Client User Guide 15
Option
Description
Reports
Opens the WinScribe Report Wizard for you to generate Productivity reports (page 69).
Prepare
Opens a menu that enables you to select Properties or Templates:
Properties: Opens the Properties window for the currently selected job in the job list. Refer to Job
Properties (page 46) for further details.
Templates: Opens the Templates window for you to create and edit templates. Refer to Working with
Templates for further details.
Close
Closes WinScribe Client.
Options
Opens the Options window for you to configure your WinScribe Client settings (page 75).
Exit WinScribe
Closes WinScribe Client.
Toolbars
The toolbars in WinScribe Client are grouped under three tabs:
The Home Tab
The Settings Tab
The Workflow Tab
saproType Client Guide 4 | Page 11
16 WinScribe Client User Guide
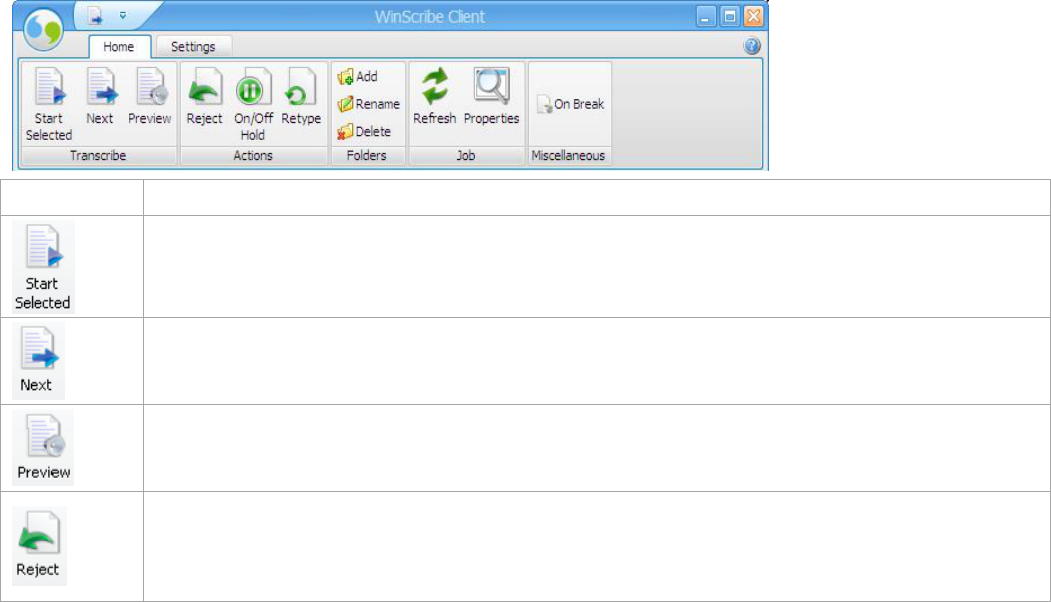
The Home Tab
When WinScribe Client is first opened, the Home tab is displayed.
Button
Action
Opens the job that is currently selected in the job list.
Note: The job will only open if it is available for download or already downloaded, and if your security
permissions allow you to open the job.
Opens the next job in your My Jobs folder.
Note: High priority jobs are opened before normal priority jobs.
Plays the first few seconds of audio for the selected job. The number of seconds of audio played is
determined by your setting in the Preview Seconds field in the Options (page 75) window.
Note: Jobs can only be previewed if they are allocated to you (in your My Jobs folder).
Click to reject a job that you have downloaded or that you have been allocated. This removes the job from
your My Jobs folder, changes the status of the job back to Waiting For Typist, and makes it available for
another typist to download.
Note: You can only reject jobs if you have the appropriate permissions.
saproType Client Guide 4 | Page 12
WinScribe Client User Guide 17
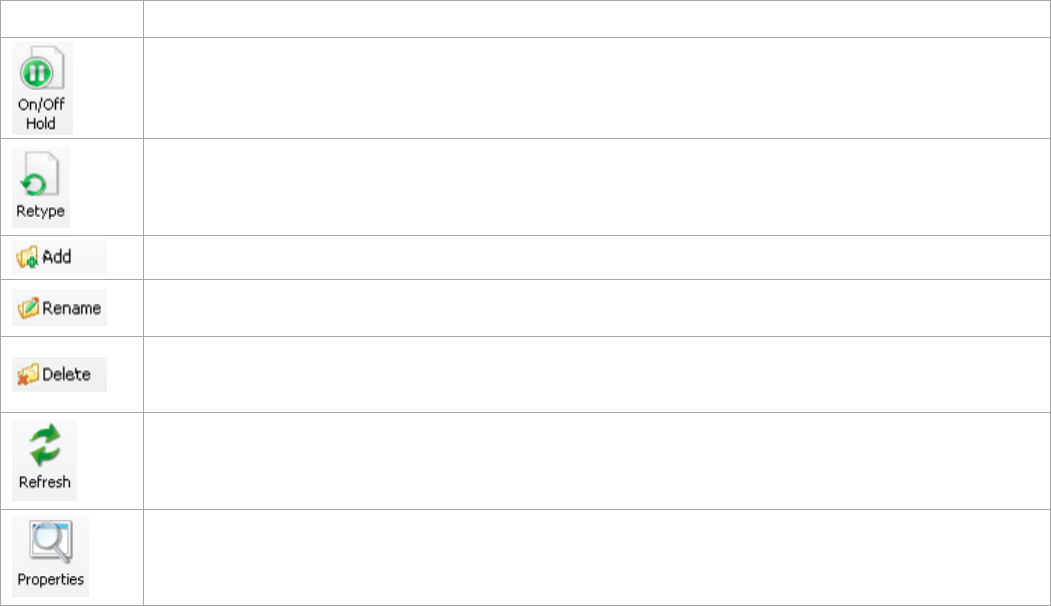
Button
Action
Click to place the selected job on hold if you are unable or do not wish to complete it now. Click again, to
remove the On Hold flag.
Refer to Placing Jobs On Hold (page 52) for more details.
Click to retrieve the selected job from your Completed Items folder and put it back into your Inbox. This
changes the status of the job from Completed to Waiting for a Typist, enabling you to revise or retype the
job.
Adds (page 28) a folder with the currently active filtering options.
Renames (page 29) the selected folder. You can only rename folders that you have added. Default folders
cannot be renamed.
Deletes (page 29) the selected folder. You can only delete folders that you have added. Default folders
cannot be deleted.
Refreshes the current display, showing any new jobs or jobs updated since the display was last refreshed. If
Auto Refresh (page 80) is turned on, the display is automatically refreshed at set intervals.
Opens the Job Properties (page 46).
saproType Client Guide 4 | Page 13
18 WinScribe Client User Guide
Button
Action
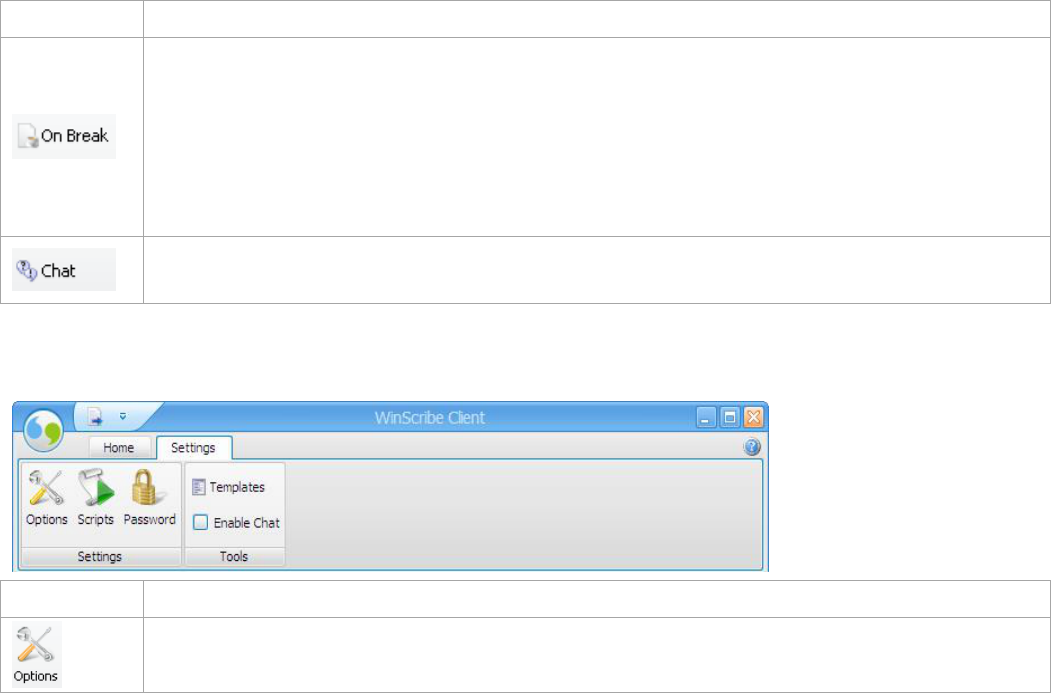
Click when going on a break. This reduces your toolbar so only the On Break and Chat buttons are shown.
Click the On Break button again when you are ready to resume work.
WinScribe tracks your work, as follows:
If a job is open (the Playbar is visible), you are recorded as working on that job.
If no job is open but the On Break button is not used, you are recorded as inactive.
If the On Break button is clicked, you are recorded as away on a break.
These statistics can be reported on using the Typist Productivity Report.
Opens the Chat window (page 63) to enable you to send and receive text messages from one or more of
your fellow transcriptionists.
The Settings Tab
Click the Settings tab to display the Settings toolbar.
Button
Action
Opens the WinScribe Client Options (page 75) window enabling you to update and modify your settings.
saproType Client Guide 4 | Page 14
WinScribe Client User Guide 19
Button
Action
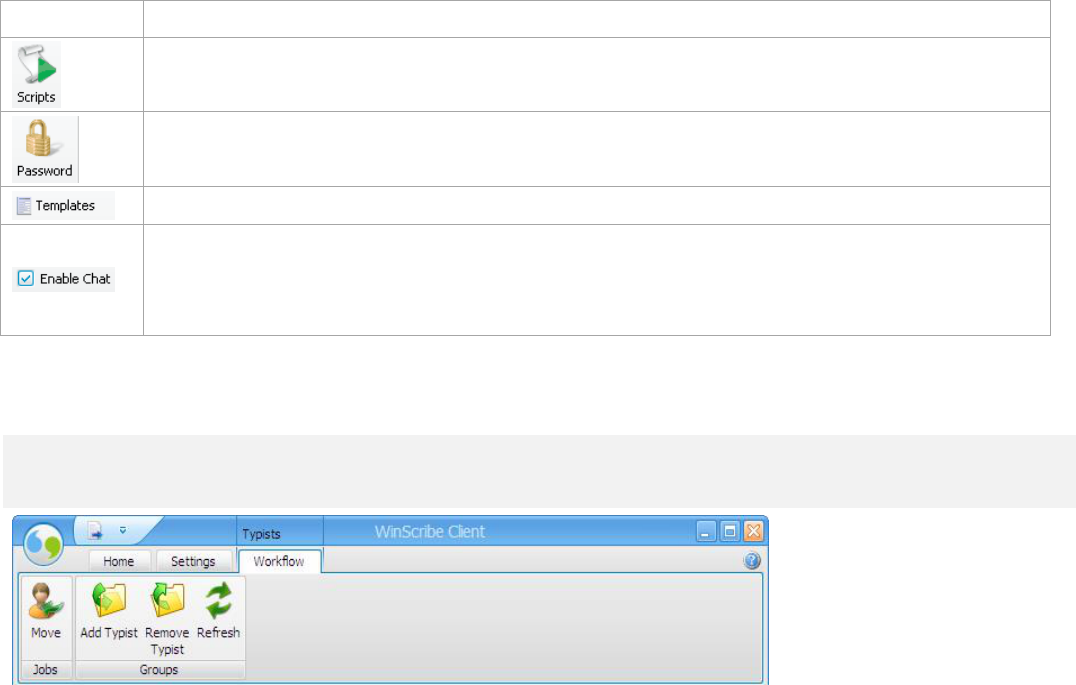
Opens the WinScribe Script Editor (page 73), enabling you to write scripts to automate aspects of the
transcription process.
Opens the Security (page 60) window enabling you to change your password or internet security details.
Opens the WinScribe Template Manager (page 71) for you to set up templates.
Tick this checkbox to enable WinScribe Chat (page 63). The Chat button on the Home toolbar is only visible
when this option is selected.
Clear this checkbox to disable chat and set a 'do not disturb' flag. If a typist tries to send you a chat message
while this option is turned off, they receive an error advising that you are offline.
The Workflow Tab
Click on the Workflow tab to display the Workflow toolbar.
This toolbar is only visible if you are a Group Typist Manager or a Facility Typist Manager and you select the Groups and Typists
(page 27) folders tab.
saproType Client Guide 4 | Page 15
20 WinScribe Client User Guide
Button
Action
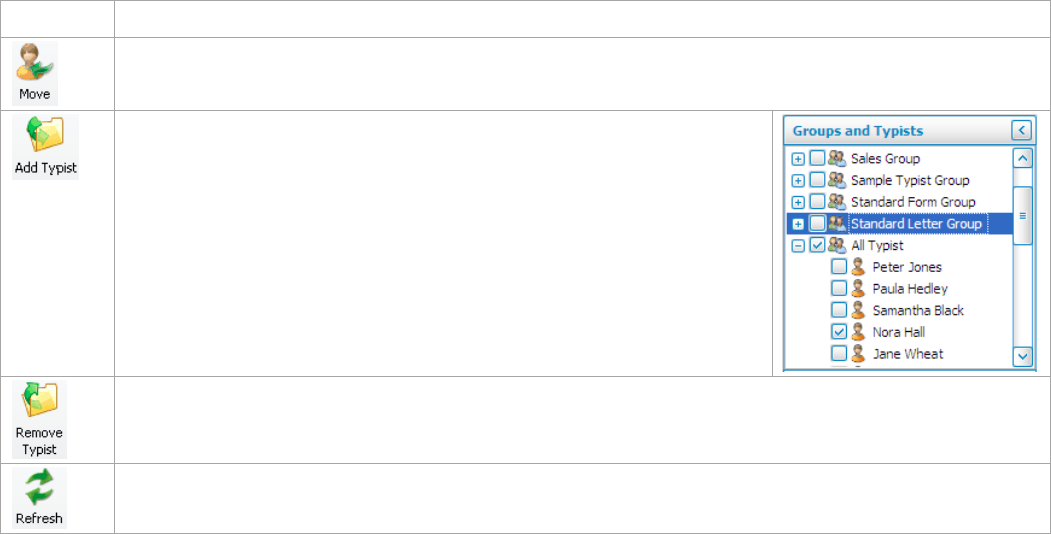
Use to allocate (page 54) a job to a specific typist or typist group. You can only move jobs if you have the
Allocate Jobs to Others permission turned on in WinScribe Web Manager.
To add a typist to a typist group:
Locate the typist and select the checkbox next to their name
Select a typist group
Click the Add Typist button.
(If you are a Group Typist Manager, the typist must be a member of a typist
group you belong to, or that typist will not be visible).
To remove a typist from a typist group, tick the checkbox belonging to the typist you wish to remove and click
the Remove Typist button. This action can only be performed if you have the Allocate Jobs to Others
permission turned on in WinScribe Web Manager.
Refreshes the current display, showing any new jobs or jobs updated since the display was last refreshed. If
Auto Refresh (page 80) is turned on, the display is automatically refreshed at set intervals.
saproType Client Guide 4 | Page 16
WinScribe Client User Guide 21
The Job List
The list of jobs in the main job window includes information on each job. You can use the Column Chooser (page 31) to customize
which columns are displayed.
Jobs shown in bold have not yet been downloaded from the WinScribe Server.
You must be online to download a job from the WinScribe server, and you cannot open or work on a job unless you have
downloaded it.
Once you have downloaded a job from the WinScribe server, you can work on that job whether you are online or offline.
To download a job, drag the job into your My Jobs folder, or double-click on the job. The job will then be assigned to you.
Tip: Use CTRL + SHIFT + HOME -to move to the top of the list and CTRL + SHIFT + END to move to the end
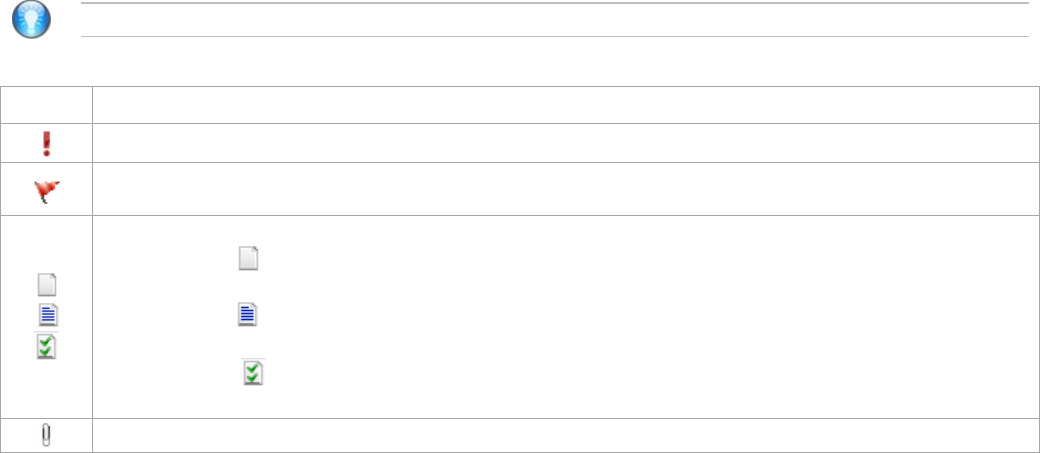
The following symbols may be displayed:
Symbol
Description
Jobs that have been marked as high importance have this symbol in the priority column and are highlighted in red.
Jobs that have been placed on hold display a flag in the On Hold column. You can place a job on hold if you are unable to
finish the job (for example, if you require more information from the author).
If a job has speech recognition text attached to it, an icon is displayed in the Speech Recognition column:
A blank page indicates the speech recognition process is still being run, and the text is not yet available. The status
(Waiting SR) is displayed next to the page icon.
A lined page indicates that the speech recognition job is ready for transcription. The status of the speech recognition
text (Waiting Correction) is stated next to the icon.
A ticked page indicates that correction of the speech recognition text has been completed. The status of the speech
recognition text (Corrected) is stated next to the icon.
If a job has one or more files attached to it, this symbol is displayed in the Attachments column.
saproType Client Guide 4 | Page 17
22 WinScribe Client User Guide
Job Number
A unique number assigned to each job by WinScribe. Job numbers are sequential and are assigned automatically when the job is
created.
Key Field
The Key field is a reference number that has meaning within your organization. For example, a hospital may use a patient number
as a key field, whereas a legal firm may use a matter number. The key field can contain letters and/or numbers.
Folders
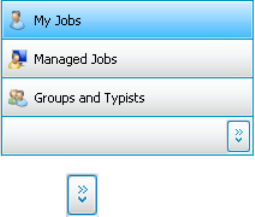
There are three folder tabs that control the folders you see:
My Jobs (page 23)
Managed Jobs (page 25)
Groups and Typists (page 27)
Click on the required tab to make it active in the view.
Use the buttons to hide one or more of the tabs (Show Fewer Buttons), or to unhide them (Show More Buttons).
saproType Client Guide 4 | Page 18
WinScribe Client User Guide 23
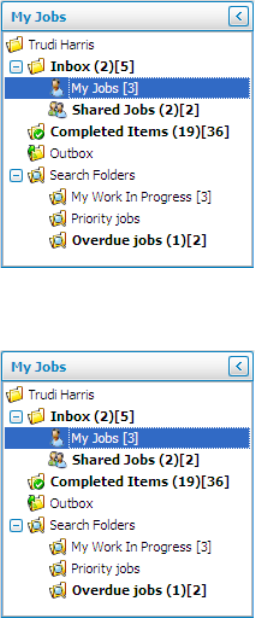
What Are The Numbers in Brackets?
The first number in brackets is the number of jobs within the selected folder that have
not yet been downloaded from the WinScribe Server.
The second number in brackets is the total number of jobs in the folder.
If you are working offline you will only be able to work on jobs you have already
downloaded from the WinScribe Server.
My Jobs
The My Jobs tab displays:
All jobs allocated to you
All jobs allocated to typist groups you belong to
It does not include jobs allocated to other typists.
Folders in the My Jobs Tab
The following subfolders are available within the My Jobs Tab:
Inbox
Completed Items
Outbox
Search Folders
saproType Client Guide 4 | Page 19
24 WinScribe Client User Guide
The Inbox
Selecting the Inbox shows you all jobs available for viewing in the My Jobs tab.
Jobs are sorted into the following sub-folders:
My Jobs
This folder shows:
Jobs that have been allocated specifically to you by the System Manager or by an Author. These jobs are shown in bold
until you have opened them for the first time, or they have been downloaded from the server.
Jobs that you have dragged into this folder from the Shared Jobs folder (therefore allocating those jobs to yourself).
Jobs that you have downloaded.
Jobs that have been allocated to you by another typist.
Jobs that you have started transcribing but have not completed.
Shared Jobs
This folder shows jobs that have been allocated to typist groups you belong to.
The Completed Items Folder
This folder shows jobs that you have completed typing. If a job that you have marked as completed needs revision, you can take
the job back out of the Completed Jobs folder by selecting the job and clicking the Retype button. This moves the job back to
your My Jobs folder, and changes the status of the job to In Typist Queue.
The Outbox
This folder displays jobs that are waiting to be uploaded to the Server.
saproType Client Guide 4 | Page 20
WinScribe Client User Guide 25
Search Folders
The Search Folders provide additional filtering of jobs allocated to you or to typist groups you belong to.
My Work in Progress
This folder shows all the jobs that you have downloaded from the server, including any you are currently typing.
Priority Jobs
This folder shows all jobs from the Inbox that are marked as high priority
Overdue Jobs
This folder shows all jobs from the Inbox that have a Finish By date that has passed, making the job overdue.
Note that you can add additional folders as required. Refer to Working With Folders (page 28) for information on adding,
renaming and deleting custom folders.
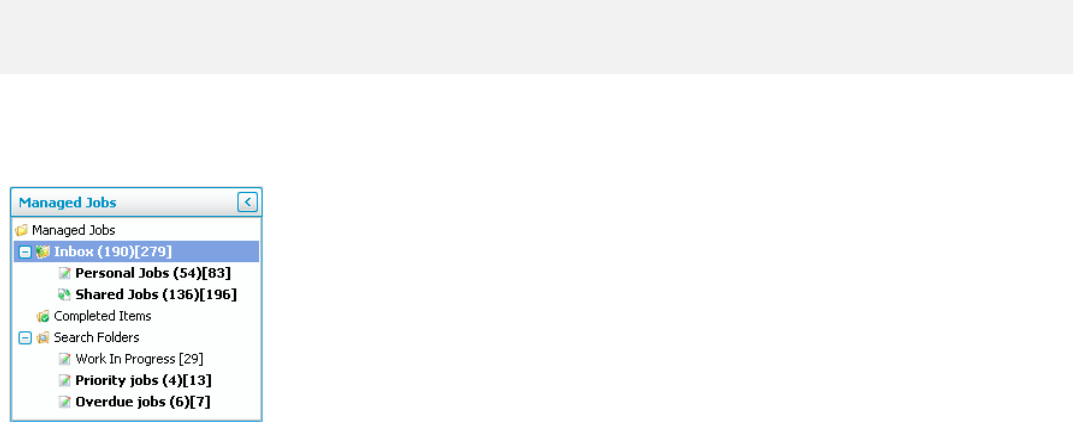
Managed Jobs
The Managed Jobs tab is only displayed if you are a Group Typist Manager or a Facility Typist Manager.
The jobs that are visible depend on your level of security:
If you are a Facility Typist Manager, the Managed Jobs folder shows all jobs allocated
to all typists and typist groups in your facility (including yourself).
If you are a Group Typist Manager, the Managed Jobs folder shows all jobs allocated
to all typist groups you belong to, and all typists belonging to those groups (including
yourself).
saproType Client Guide 4 | Page 21
26 WinScribe Client User Guide
The Inbox
Selecting the Inbox shows you all jobs available for viewing in the Managed Jobs tab.
Jobs are sorted into the following sub-folders:
Personal Jobs
This folder shows jobs allocated to specific typists, as follows:
Jobs that have been allocated to you or to another typist in your typist group(s) by the System Manager or by an Author.
Jobs that you have dragged into this folder from the Shared Jobs folder (therefore allocating those jobs to yourself).
Jobs that have been downloaded by you or by another typist in your typist groups (thereby allocating those jobs to the
specific typist who downloaded them).
Jobs that have been allocated to you or a typist in your typist group(s) by another typist.
Jobs that you or another typist in your typist group(s) have started transcribing but have not completed.
Shared Jobs
This folder shows jobs that have been allocated to typist groups you belong to.
The Completed Items Folder
The Completed Items folder shows all jobs completed by other typists. If a job that has been marked as complete needs revision,
you can take the job back out of the Completed Jobs folder by selecting the job and clicking the Retype button. This moves the
job back to the My Jobs folder of the Typist who completed the job, and changes the status of the job to In Typist Queue.
saproType Client Guide 4 | Page 22

WinScribe Client User Guide 27
Search Folders
The Search Folders provide additional filtering of jobs allocated to you or to typist groups you belong to.
My Work in Progress
This folder shows all the jobs from the Inbox with a status of In Typist Queue or Being Typed that have been downloaded
from the server.
Priority Jobs
This folder shows all jobs from the Inbox that are marked as high priority.
Overdue Jobs
This folder shows all jobs from the Inbox that have a Finish By date that has passed, making the job overdue.
Note that you can add additional folders as required. Refer to Working With Folders (page 28) for information on adding,
renaming and deleting custom folders.
Groups and Typists
The Groups and Typists tab enables you to see jobs allocated to individual typists or typist groups.
If you have the Allocate To Others permission setting enabled, you will be able
to drag and drop jobs from the job list into a typist or typist group's folder to
allocate them to that typist or typist group.
If you are a Group Typist Manager or a Facility Typist Manager, selecting the
Groups and Typists tab automatically opens the Workflow tab enabling you to
manage your typists and typist groups. You can add or remove typists from
typist groups, or move typists from one typist group to another. You can do this
by simply dragging and dropping a typist into the required group, or by using
the buttons on the Workflow (page 19) tab.
A Globe icon indicates typists that are currently online.
saproType Client Guide 4 | Page 23
28 WinScribe Client User Guide
A default folder structure is provided with WinScribe Client. These default folders cannot be renamed or deleted. However you
can add as many new folders as you wish, in order to filter your jobs to your precise requirements.
Adding Folders
1. Select the parent folder in which the new subfolder will be created. For example, if the new folder will be a subfolder from
the My Jobs folder, select the My Jobs folder.
2. Select your filtering options for the new folder as follows:
Decide on the column(s) you wish to use to filter the folder contents
Hover the mouse over that column header, then click on the small arrow that appears.
Choose your required filtering option (page 36).
Repeat this process if necessary until you have the filtering you require.
3. Click the Add button on the toolbar to add the new folder.
4. Type a name for your new folder. Press the Enter key or click outside the folder tree to save your new folder.
Working With Folders
saproType Client Guide 4 | Page 24

WinScribe Client User Guide 29
Renaming Folders
Every now and then you may want to rename a folder. You can only rename folders that you have added (page 28).
1. Select the folder you wish to rename.
2. Click the Rename button.
3. Type a new name for the folder. Press the Enter key or click outside the folder tree to save your changes.
Deleting Folders
When a folder is no longer needed, you can remove it. You can only delete folders that you have added (page 28).
1. Select the folder you wish to delete.
2. Click the Delete button.
Once you have deleted a folder it cannot be recovered. You must add the folder again.
Columns
In the Job List you can:
Resize columns by hovering your mouse over the edge of the column header until it forms a double-headed arrow , then
dragging the column to the required size. You can also use the right-click menu to automatically resize your columns for the
best fit (page 30).
Reorder columns by dragging and dropping a column header to a new position in the grid.
Remove columns by dragging them down from the column header section into the Job List. When a black cross appears over
the column header, release the mouse to remove the column. You can also add and remove columns using the Column
Chooser (page 31).
The columns also enable you to sort, group, and filter your data, as outlined below.
saproType Client Guide 4 | Page 25
30 WinScribe Client User Guide
Resizing for Best Fit
The Best Fit option enables you to automatically resize the columns in the Job List so they are the optimal width in order to
display the data they contain.
To automatically resize a single column, right-click on the
required column header and select Best Fit.
To automatically resize all your columns, right-click on any
column header and select Best Fit (all columns).
saproType Client Guide 4 | Page 26
WinScribe Client User Guide 31
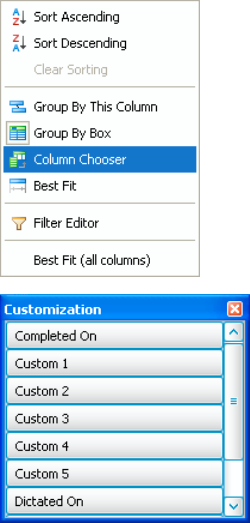
The Column Chooser
The Column Chooser enables you to customize the Job List by adding or removing columns,
including reinstating columns that you have previously removed from the Job List.
To open the Column Chooser, right click on any column header and select Column Chooser.
The Column Chooser window shows all column headers not currently included in the
current Job List display.
To add a column to the Job List, select the column name in the Column Chooser, and
drag it into the required position level with the other column headers.
To remove a column from the Job List, click on the column header and drag it into the
Column Chooser.
saproType Client Guide 4 | Page 27
32 WinScribe Client User Guide
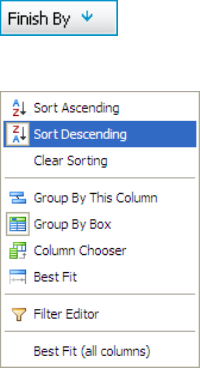
Sort by Column Data
You can sort by the data in a particular column by clicking the column header. An arrow is displayed on the active column to
show that the grid is sorted using the data in that column. The direction of the arrow (up or down) shows whether the data is
sorted in ascending or descending order. Click the column header again to change the order in which it is sorted.
The arrow shows that the data in this column is sorted in descending order.
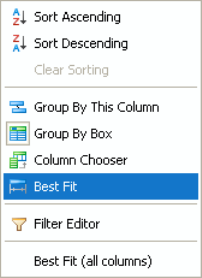
Right-clicking on a column header provides another method of selecting sorting options for the selected column:
To sort a column, right-click on the required column header and select either Sort
Ascending or Sort Descending.
To clear any sorting that has been applied to the column, right-click on the required
column header and select Clear Sorting.
saproType Client Guide 4 | Page 28
WinScribe Client User Guide 33
Group by Column
Group your data by dragging a column header above the others, as shown below.
In this example, the Job List has been grouped by Department, as the Department column has been dragged into the Column
Grouping box above the column headers. The list is then sorted within Departments, in descending order using the Finish By
column, indicated by the arrow on the column header.
To remove the grouping, simply drag the grouping column header back down to the level of the other columns.
saproType Client Guide 4 | Page 29

34 WinScribe Client User Guide
Multi-level Grouping
You can drag as many columns as you like into the Column Grouping box above the other column headers. This will create a
hierarchy of grouping, as shown below.
In this example, jobs have been grouped firstly by Department. Then within those Department groupings they have been
grouped by Job Type. And finally, within the Job Type groupings, they have been grouped by Author.
Right-clicking on a column header provides another method of selecting grouping options for the selected column:
saproType Client Guide 4 | Page 30
WinScribe Client User Guide 35
To group by a column, right-click the required column header and select Group By This
Column.
To clear a grouping that has been applied to the column, right-click on the grouped
column header and select UnGroup.
(The UnGroup menu option is only shown when a grouped column header has been
selected).
Hiding or Displaying the Column Grouping Box
The Column Grouping box displays above the column headers, and is used when grouping columns. If you are not using grouping,
you can hide the Column Grouping box and free up screen space to display jobs.
saproType Client Guide 4 | Page 31
36 WinScribe Client User Guide
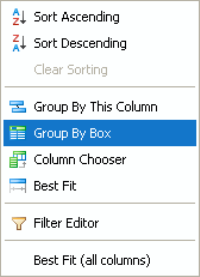
To hide or display the Column Grouping box, right-click on any column header:
To hide the Column Grouping box, select Group By Box.
To redisplay the Column Grouping box, select Group By Box again.
Filtering Columns
This section describes four different methods to filter column data:
Filter Using Column Headers (page 37)
Filter Using the Search Fields (page 37)
Create Custom Filters (page 39)
The Filter Editor (page 40)
You can also clear filters (page 43) you no longer require.
saproType Client Guide 4 | Page 32
WinScribe Client User Guide 37
Filter Using Column Headers
Filter your data by hovering your mouse over a column header until a small arrow appears. Click the arrow to select your filter
criteria:
All: Clear any existing filters in this column.
Custom: Opens the Custom AutoFilter window, enabling you to design
your own, more complex filters.
Refer to Custom Filters (page 39) for more details.
Blanks: Only show those jobs which have a blank entry (no data entered)
in the selected column.
Non Blanks: Only show those jobs which do not have a blank entry in the
selected column.
In addition, a list of existing field names will be shown. Select one of these field names to only show tasks with that field name.
Filter Using the Search Fields
The fields directly underneath the column headers can be used to set up filters for the columns. Click on any of these fields to
select or enter filtering options for that column.
There are two types of search fields:
saproType Client Guide 4 | Page 33
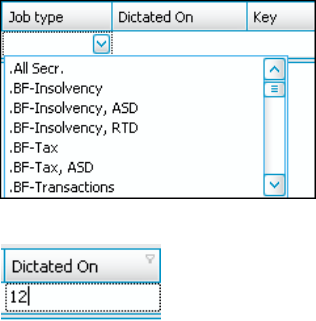
38 WinScribe Client User Guide
1.
The first type of search field are those fields in which you select the
required filtering option from the list provided.
These fields are:
The Priority field
The On Hold field
The Attachments field
The Job Type field
The Department field
The Author field
The Typist field
The Typist Group field
The Downloaded field
The Status field
2.
The second type of search field is where you type in a number or character. Jobs shown
will be restricted to those that match the data being entered. Partial matching is enabled,
so as you type, filtering is active. For example, when you type in the first digit of a number,
jobs shown will be those that have that number as the first character in the selected
column.
These fields are:
The Job Number field
The Dictated On field
The Key Number field
The Length field
The Custom fields
The Finish By field
The Speech Rec Status field
The Typing Time field
The Completed On field
saproType Client Guide 4 | Page 34
WinScribe Client User Guide 39
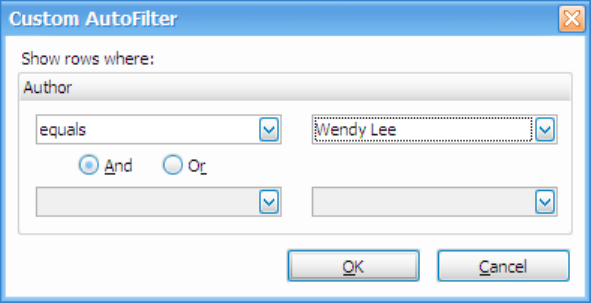
Create Custom Filters
The Custom AutoFilter window enables you to set up your own custom filter for the column.
Select your criteria using the drop down boxes. For example, if creating a filter on the Author column you might select to show
jobs for a selected author.
saproType Client Guide 4 | Page 35

40 WinScribe Client User Guide
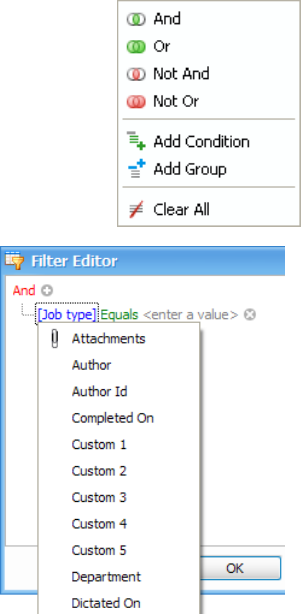
The Filter Editor
The Filter Editor enables you to create more complex filters in order to control which jobs are
displayed.
To open the Filter Editor window, right-click on a column header and select Filter Editor.
Each word or phrase in the Filter Editor window is a field. When you click on any field, more options are displayed from you to
select from.
saproType Client Guide 4 | Page 36
WinScribe Client User Guide 41
Using the Filter Editor
1.
Click the red link (by default this is set to And) to select the required condition from
the list:
And: All conditions in the filter must be met for a record to be included.
Or: One or more of the conditions in the filter must be met for a record to be
included.
Not And: Only one of the conditions must be met for a record to be included. If
more than one is met, it is excluded.
Not Or: None of the conditions must be met for a record to be included. If any
of the conditions apply to a record, it is excluded.
2.
The first condition is displayed. Edit it as follows:
a.
Click the blue link and select the required column for the filter to
be applied to.
b.
Click the green link and select the required operator. The options
available will depend on the column selected for the filter.
c.
If the selected operator requires a value, click the grey link to
enter or select it. For example, if the operator selected is Equals,
you need to enter or select the value that must be in this column
for the filter condition to be met.
If your condition is 'Job Number is greater than 1000', then only
jobs with job numbers higher than 1000 will be displayed when
the filter is applied.
saproType Client Guide 4 | Page 37
42 WinScribe Client User Guide
d.
Some operators require or give you the option to enter
more than one value. For example, if the selected
operator is Is Between, you need to enter the two
values between which the condition will be met.
If the selected operator is Is Any Of, you can click the
plus button to add more values.
3.
Add more conditions as required by clicking the button. Alternatively, you can use the Insert or
Add key on your keyboard, or click the red link and choose .
4.
If required, you can add a group of conditions by clicking the red
link and choosing .
This enables you to set up complex filter structures, in order to
precisely control the jobs included in the Job List when the filter is
selected.
5.
To remove a condition, click the button. Alternatively, you can use the Delete or Subtract key on your keyboard.
To clear all filters and start again, click the red link and choose .
saproType Client Guide 4 | Page 38
WinScribe Client User Guide 43
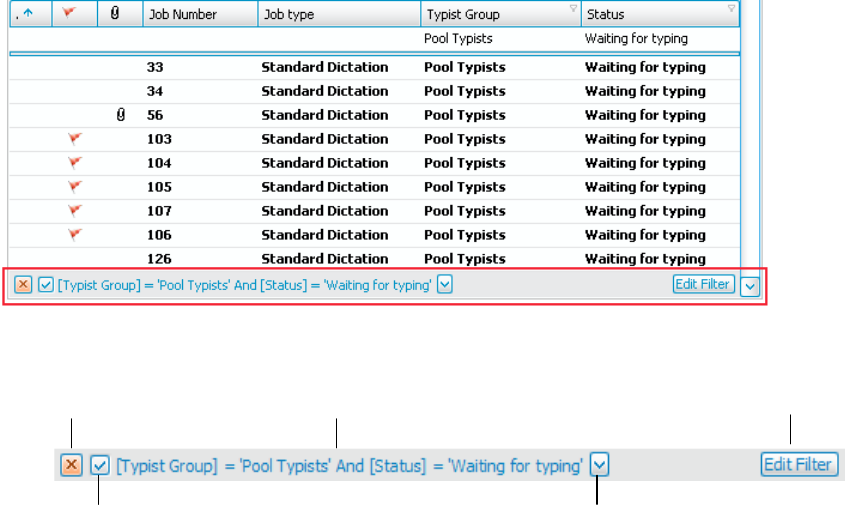
Clearing Filters
It is easy to remove or edit filters that have been applied. Any filters currently applied are shown in a status bar at the bottom of
the Job List window.
The Filter Status Bar
Clear filter
Switch filter on/off
Filter description
List of recently applied filters
Edit current filter
saproType Client Guide 4 | Page 39

44 WinScribe Client User Guide
Icon
Name
Description
Clear filters
Click to remove the current filter(s)
Switch filters
on/off
Clear this checkbox to disable the current filter(s). Re-select to enable the current filter(s)
again.
List of recently-
applied filters
Click the arrow or on the filter description to view a list of recently-applied filters. You can
re-apply one of these previous filters by selecting it. In this case the current filtering will be
discarded and the newly selected filter will apply.
Edit filters
Click the Edit Filter button to display The Filter Editor (page 40) for you to edit the currently
applied filter(s).
Searching for Jobs
In addition to the filtering methods outlined above, a number of fields can be used to search for jobs by entering a value directly
underneath the column header.
The following fields are searchable:
The Job Number field
The Key Number field
The Dictated On field
saproType Client Guide 4 | Page 40
WinScribe Client User Guide 45
The Length field
The Custom fields
The Finish By field
The Speech Rec Status field
The Typing Time field
The Completed On field
Search on any of these fields by entering a number or character. The jobs displayed are limited to those that match the data
entered. Partial matching is enabled, and filtering starts as you type. For example, when you type in the first digit of a number,
jobs shown will be limited to those that have that number as the first character in the selected column.
saproType Client Guide 4 | Page 41
46 WinScribe Client User Guide
Job Properties
Click the Properties button on the Home tab to open the Properties Window for the selected job. This enables you to view all job
information, and to edit the information if you have the appropriate permissions.
Working With Jobs
saproType Client Guide 4 | Page 42

WinScribe Client User Guide 47
When the Properties window is open, a toolbar displays at the bottom of the screen.
Icon
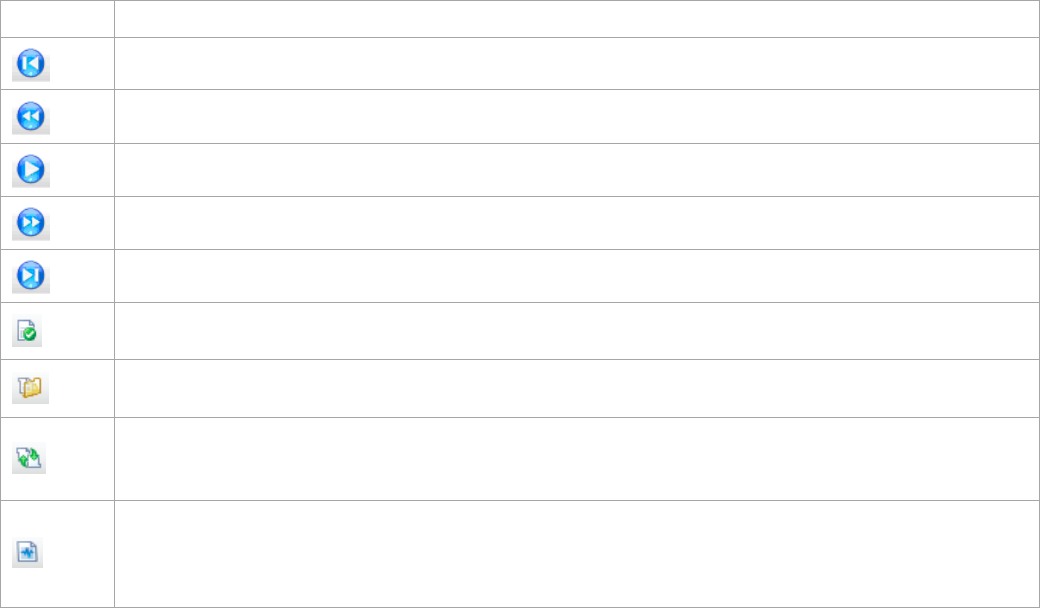
Description
View job properties for the first job in the selected folder.
View job properties for the previous job in the selected folder (you can also move the slider to the left).
View job properties for the next job in the selected folder (you can also move the slider to the right).
View job properties for the last job in the selected folder.
Saves changes if editing the properties of a job.
Cancels changes if editing the properties of a job.
To close the Properties window and return to your normal Job List View, click the Properties button again.
The Playbar
Double-click on a job to open the Playbar. The Playbar enables you to play the associated audio for the job and begin
transcription. Use the buttons to play back the job. You can also use your footpedal or other playback device to perform these
functions.
saproType Client Guide 4 | Page 43
48 WinScribe Client User Guide
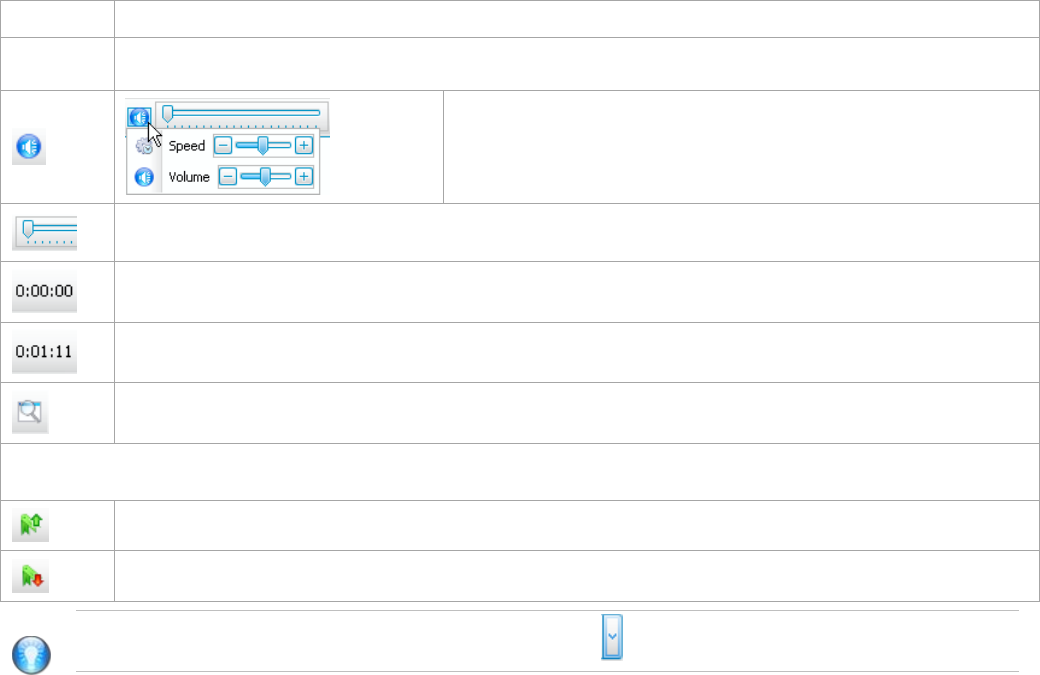
Icons on the Playbar
The following table gives a description of the icons on the playbar and their functions.
Icon
Description
Jumps to the start of the audio recording.
Rewind.
Play. Note this button changes to a Stop button when the job is playing.
Fast forward.
Jumps to the end of the audio recording.
Send Job: Completes the job, sending it to the Outbox to be uploaded to the WinScribe server. Once
uploaded, the job will still be available in your Completed folder.
Incomplete: Click to leave the job incomplete. Your current changes will be saved and the job will be closed.
The job remains in your My Jobs folder for you to complete later.
Start Next Job: Click to complete the open job and automatically start the next job in your queue. You will be
prompted to confirm whether or not the open job is complete. Select Yes to mark it as complete, send it to
the Outbox to be uploaded to the WinScribe Server, and close it. Select No to return to the job.
Correction Complete: This button is only displayed if your organization is using speech recognition (page 65)
and the job being corrected has been processed through the speech recognition server. It replaces the Send
Job and Start Next Job buttons.
Once you have finished correcting the speech recognition text, click this button to complete the job. The
saproType Client Guide 4 | Page 44
WinScribe Client User Guide 49
Icon
Description
corrected text is automatically sent to the recognition server for context and acoustic adaptation, if that
functionality is enabled.
Speed and Volume Control: Click to open the Speed and Volume
Control panel and set your required playback speed and audio
playback volume.
Position Slider: Provides a visual indication of your playback position within the file. To move quickly to a new
position within the playback, click and drag the slider to the desired position.
Position Counter: Counts off the audio playback and shows you the elapsed time in seconds from the start of
the file to your current location within that file.
File Length: Displays the length of the audio file. The format used is HH:MM:SS.
Properties: Click to view the job properties or any files attached to the job.
Bookmarks can be inserted into a job to mark places in the dictation file for future reference. Note that clicking these
options will only be effective if the author has inserted bookmarks into the file.
Previous Bookmark: Jump to the previous bookmark in the audio.
Next Bookmark: Jump to the next bookmark in the audio.
Tip: You can add or remove buttons from your Playbar using the button.
saproType Client Guide 4 | Page 45
50 WinScribe Client User Guide
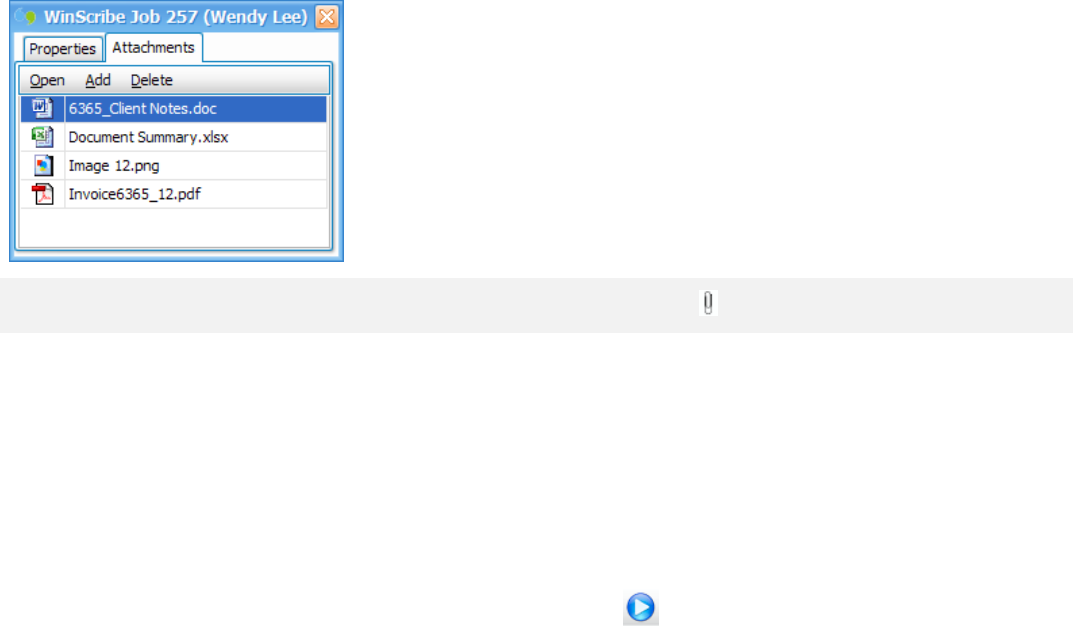
Job Attachments
When you open a job that has attachments, the Attachments window is
opened automatically. The Attachments window can also be opened by
clicking the Properties button on the Playbar.
To open an attachment, click the Open button or double click the
attachment.
To attach a new file, click the Add button and select the required file.
Any type of file can be attached to a job.
To delete an attachment, select the attachment and click the Delete
button. Note that this does not delete the original file, but removes it
from the job.
If your Attachments column is visible in the Job List, jobs with attachments display a icon.
Transcribing Jobs
1. To start the next job in your queue, click the Next button. If no jobs are available in your My Jobs folder, the highest priority
job in your Shared Jobs folder is opened (provided you are online).
2. To start a specific job, select the job then click the Start Selected button.
3. The typist Playbar is launched.
4. If a Word Processor is defined in your WinScribe Client options (page 80), it is opened automatically. This only occurs when
you start a job for the first time. Once a job has been opened, it is assumed that you have started typing the job and have
saved the document. When reopening a job, you need to locate and open the previously saved document.
5. To start job playback, press the Play button on your foot pedal, or click .
saproType Client Guide 4 | Page 46

WinScribe Client User Guide 51
6. To mark a job as Complete and close the Playbar click .
7. To mark a job as Complete and to start the next job click .
8. To mark a job Incomplete and leave it in your My Jobs folder click .
9. To mark a speech recognition job as Correction Complete click .
If you have the Confirm End Job Commands option enabled, you will be asked to confirm that you wish to mark the job as
complete.
Password Protected Jobs
If a job is password protected, it is stated in the Job Notes. The job notes can either be displayed as a column in the job list, or
you can select for the notes to be shown on a separate line beneath the job details, as shown below. This option is set in the
Miscellaneous settings (page 80) tab of the WinScribe Client Options.
When you attempt to open a password protected job, you are prompted to enter the
job password. If you do not enter the correct password, the job does not open.
saproType Client Guide 4 | Page 47
52 WinScribe Client User Guide
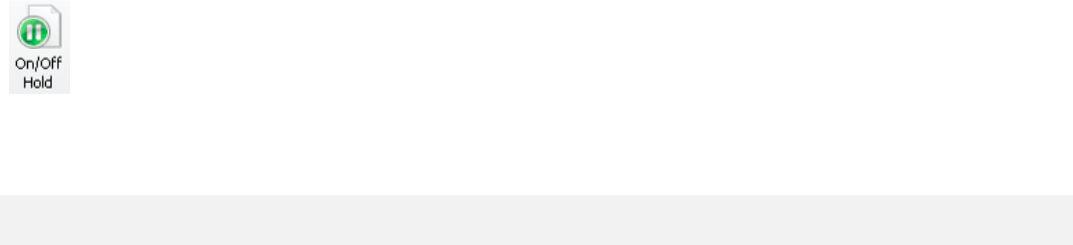
Placing Jobs On Hold
You can place a job on hold if you are unable to complete it at the current time. For example, if the author has
not supplied you with sufficient information. This prevents the job from being opened when starting new jobs in
your queue.
1. Select the job you wish to place on hold.
2. Click the On/Off Hold button on the Home tab.
3. Click the On/Off Hold button again to take the job off hold. This job will then be opened as normal.
You may place a job on / off hold while offline, however the job folder is not updated until you next go online.
Previewing Jobs
Jobs can only be previewed if they are allocated to you (that is, if they are in your My Jobs folder). To preview a job, select it and
press the Preview button on the Home tab. Alternatively, right-click on the job and select Preview.
WinScribe begins playing the job for the number of seconds as defined in your Playback settings.
Downloading Jobs
To download jobs:
1. Go online.
2. Any jobs to be downloaded must be in your My Jobs folder, or the Shared Jobs folder.
3. If you have permissions enabled to select your own work, double-click the job you wish to download, or select it and click the
Start Selected button. Otherwise, click the Next button to automatically download and start working on the next job in your
queue.
saproType Client Guide 4 | Page 48

WinScribe Client User Guide 53
4. The Playbar opens while the job is downloaded from the server. This process may take some time to complete depending on
the type and speed of your connection, and the length and number of the jobs being downloaded. The status bar at the
bottom of the screen indicates progress.
Tip: You do not have to wait for a job to finish downloading before commencing playback. WinScribe will continue
to download the job(s) in the background while you work.
Your access to some of these features may be restricted by the System Manager.
Rejecting Jobs
1. Ensure you are working online.
2. In the My Jobs folder, select the job(s) you want to reject.
3. Click the Reject button on the Home tab.
You can only reject jobs if your permissions allow it.
If a Job You Are Working On is Reallocated
In some circumstances, a Manager may allocate a job to a different typist while you are working on it. If this happens, you receive
a warning message advising you that the job status has been changed and you will not be able to continue working on the job.
The job is taken out of your personal queue, and moved to the new typist or typist group.
saproType Client Guide 4 | Page 49

58 WinScribe Client User Guide
4. If any of the dictation files are DS2 encrypted files, a padlock is displayed against those files. Click the Set Password
button to enter the password. If the password is not entered, the file cannot be imported.
5. To delete the files from the input device or folder after they have been imported into WinScribe, tick the Remove checkbox
next to the job.
6. To flag a job as confidential tick the Confidential checkbox. This will allocate the job directly to the chosen typist.
7. The Import checkbox is automatically ticked for each dictation file. If you don't wish to import one or more of the files, clear
the Import checkbox next to the job(s), and those jobs will not be imported.
8. When you are ready to import the jobs, click Import.
saproType Client Guide 4 | Page 50
WinScribe Client User Guide 59
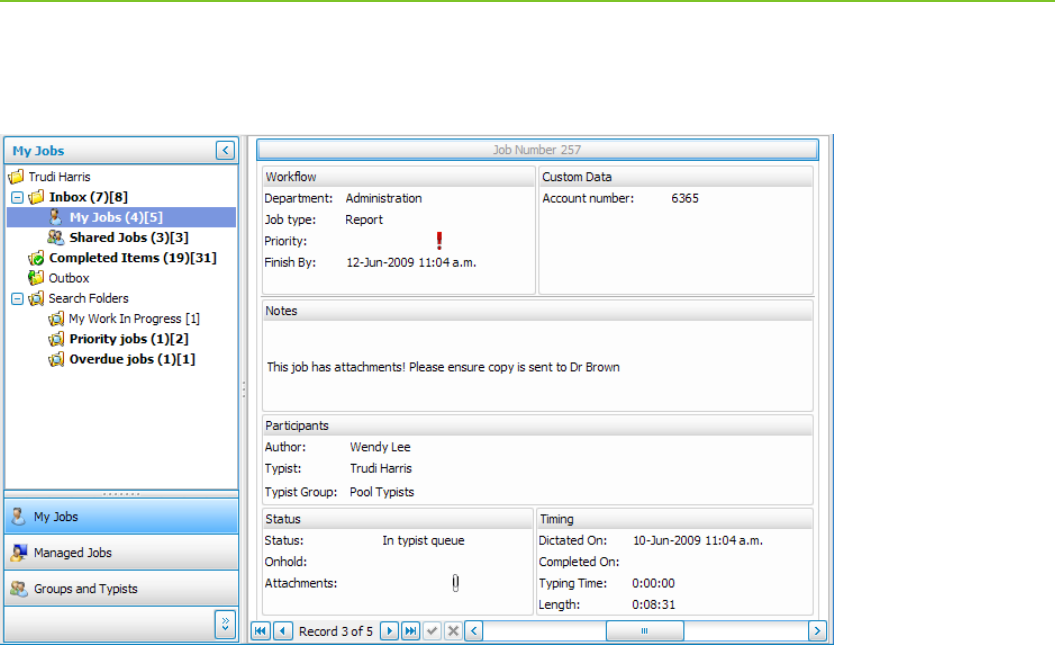
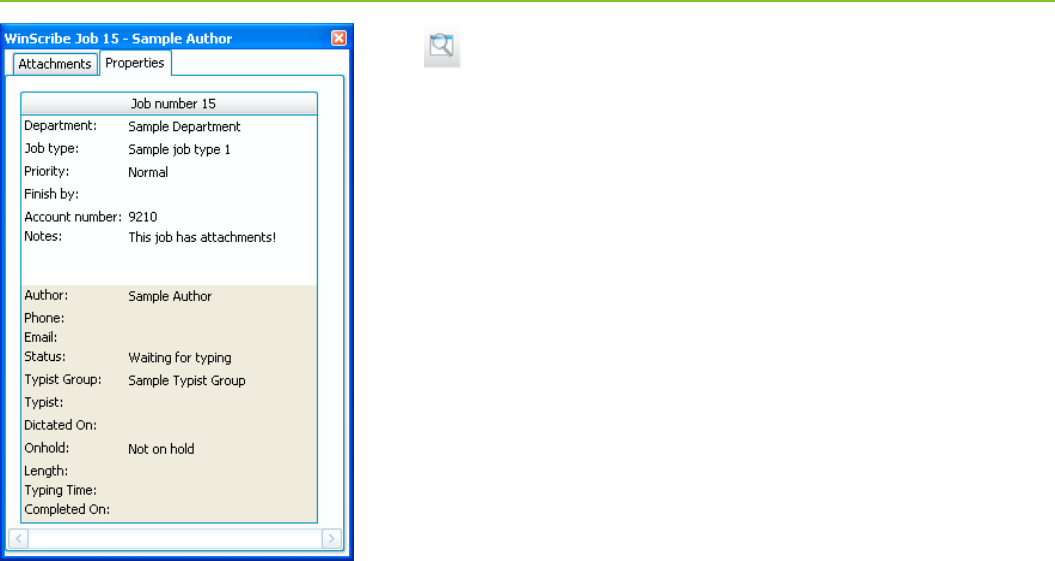
Click the Properties button on the Playbar to open the
Properties window.
The Properties window displays information about the job,
including:
The Department
The Job Type
The Priority of the job
The date the job is due to be finished
The key field(s) entered for the job (if any).
Any notes entered.
The author that dictated the job
The status of the job
The typist group or typist the job is assigned to
Job Properties
saproType Client Guide 4 | Page 51

WinScribe Client User Guide 71
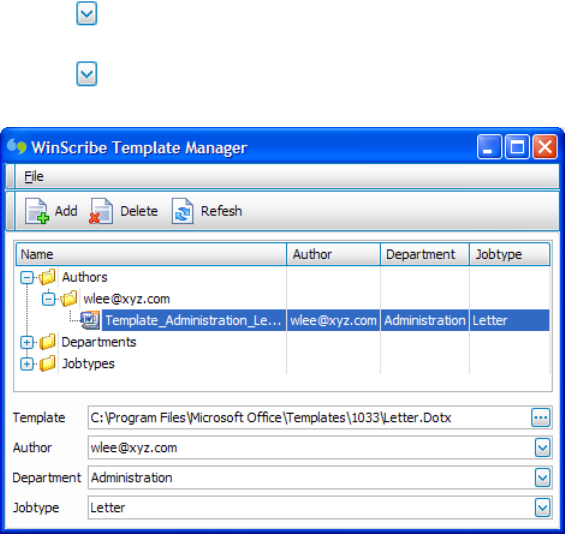
A template is a formatted document that enables you to automatically apply desired text and page formatting to new documents
that are based on it.
The WinScribe Template Manager enables you to specify templates to use for authors, departments and job types. For example,
if an author selects a job type of 'Letter', then you can have a template specifically set up for that author's letters. When you
open jobs for that author with that job type, your Word Processor automatically opens a new document based on that template.
Document templates can be held on a common server to be used by all typists, or on a typists individual PC. To use the
templates, each typist must set up their own template associations using the Template Manager.
Notes:
The Template Manager is only available if folder storage has been selected for your templates in your WinScribe Client
Options (page 80).
The selected template only launches if a Word Processor is defined in your WinScribe Client Options (page 80).
The selected template only launches once when a new job is first opened. Once a job has been opened, it is assumed that
you have started typing the job and have saved the partially-typed document. If you reopen a job, you need to locate and
open the saved document yourself.
Adding a Template
A template can be associated with an author, a department, a jobtype, or any combination of these.
1. Click the button to select a file to be used as a template. You can select any type of file, however the file type needs to
be compatible with the Word Processor being used (defined in the Miscellaneous Settings (page 80) of the WinScribe Client
Options) for the document to launch when a new job is opened.
2. Click the button in the Author field to select the author the template applies to. If selected, the template will only be used
for jobs created by that author.
Working With Templates
saproType Client Guide 4 | Page 52
72 WinScribe Client User Guide
3. Click the button in the Department field to select a department. If selected, the template will only be used for jobs
created in the selected department.
4. Click the Jobtype field to select a job type. If selected, the template will only be used for jobs of that job type.
5. Click Add to add the template.
Deleting a Template
To delete an existing template association, simply select the required template and click the Delete button.
saproType Client Guide 4 | Page 53
WinScribe Client User Guide 75
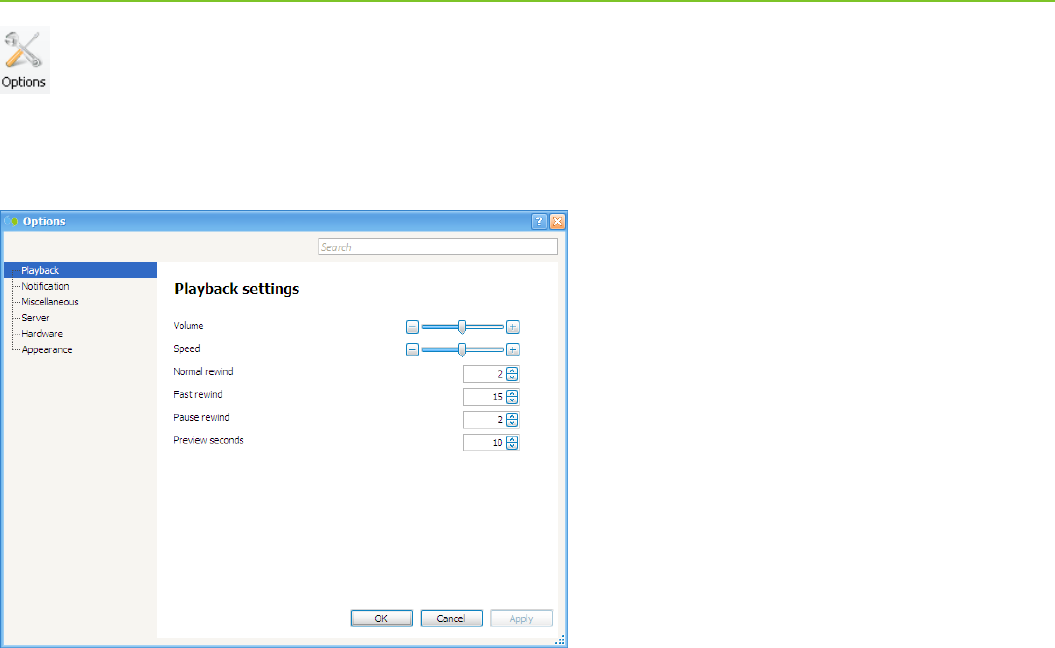
To open the WinScribe Client Options, select the Settings tab and click the Options button.
The Options window will open with the Playback Settings tab initially selected.
Playback Settings
The Playback settings enable you to set your default volume, playback speed, rewind speeds, and number of seconds for
previewing files.
WinScribe Client Options
saproType Client Guide 4 | Page 54

76 WinScribe Client User Guide
Option
Description
Volume
Drag the Volume slide to right or left for more or less volume respectively. The Volume setting
resets the volume slider on the WinScribe Client Playbar and provides the default value for that
control. When you alter the volume from the Playbar, the WinScribe Client Options default setting
is not affected.
Speed
Drag the Speed slider to the right or left for faster or slower playback speed respectively.
Normal rewind
The Normal rewind setting controls the speed of both normal rewinding and normal fast-
forwarding. The slowest setting is 1 and the fastest setting is 9.
Fast rewind
The Fast rewind setting controls the speed of fast rewinding and fast forwarding. Click the up or
down button, or type a number between 2 and 99 to determine this speed. When forwarding or
rewinding dictation, after 3 seconds of holding down the forward or rewind control, the fast
forward or fast rewind will automatically start.
Pause rewind
Click the up or down button, or type a number (0 to 9) in the Pause rewind box. WinScribe
automatically rewinds a job by the number of seconds set in the pause rewind setting when you
pause job playback by lifting your foot from the foot pedal.
Preview seconds
Click the up or down button, or type a number (0 to 60) in the Preview seconds box. This controls
the amount of dictation that will play when previewing a job. (Note that the Preview option is only
available for jobs in your My Jobs folder).
saproType Client Guide 4 | Page 55
WinScribe Client User Guide 77
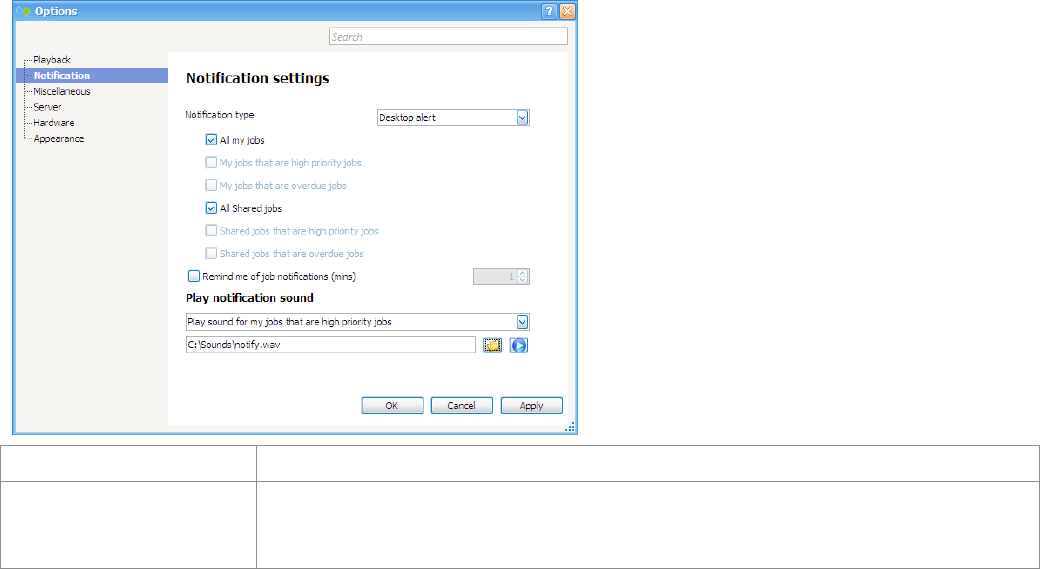
Notification Settings
Notification settings enable you to set options for when new jobs are received. Notification will only work effectively if
autorefresh is enabled in your Miscellaneous Settings (page 80). If notification is enabled, you receive an alert when new jobs are
uploaded.
Field
Description
Notification type
Choose how you wish to be notified when new jobs are received:
Desktop Alert: A small popup window at the bottom of your screen
Email: A system generated email will be sent to the email address as defined for your
saproType Client Guide 4 | Page 56

78 WinScribe Client User Guide
Field
Description
user details in WinScribe Web Manager.
The jobs you are notified of, depend on the options selected below.
All my jobs
Select this option to be notified when any job assigned to you is received.
My jobs that are high
priority jobs
Select this option to be notified when a job assigned to you with a high priority is received.
My jobs that are overdue
jobs
Select this option to be notified when a job assigned to you becomes overdue
All Shared jobs
Select this option to be notified when any job assigned to a typist group you are a member of
is received.
Shared jobs that are high
priority jobs
Select this option to be notified when a job assigned to a typist group you are a member of
with a high priority is received.
Shared jobs that are
overdue jobs
Select this option to be notified when a job assigned to a typist group you are a member of,
becomes overdue.
Remind me of job
notifications (mins)
Select this option to be reminded at regular intervals if a job (meeting the notification criteria
defined above), is received and has not yet been completed.
If you select this option, you must also select the frequency (in minutes) that you will be
notified. For example, if you select 5, you will receive a reminder every 5 minutes while the
job remains untyped.
Play Notification Sound
To play a sound when certain jobs are received, select which jobs to play the sound for:
Play sound for all my jobs
Play sound for my jobs that are high priority jobs
Play sound for my jobs that are overdue jobs
saproType Client Guide 4 | Page 57
WinScribe Client User Guide 79
Field
Description
Play sound for all shared jobs
Play sound for shared jobs that are high priority jobs
Play sound for shared jobs that are overdue jobs
Click the button to select the sound file to play. You can select any .wav file.
Click the Play button to preview the sound.
saproType Client Guide 4 | Page 58
80 WinScribe Client User Guide
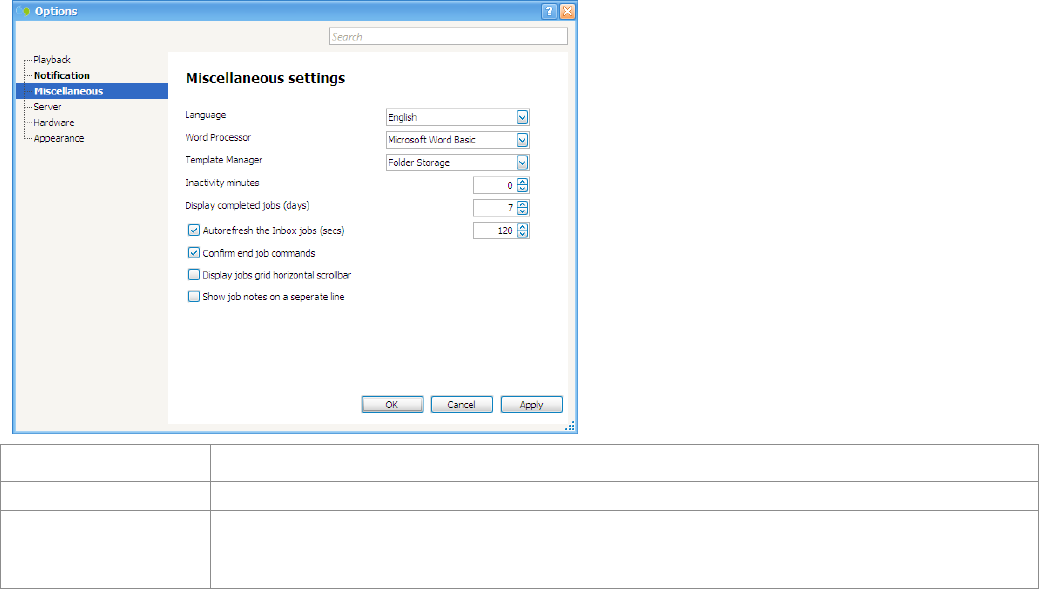
Miscellaneous Settings
The Miscellaneous settings enable you to select display options and other options for WinScribe Client.
Field
Description
Language
Sets the language for WinScribe Client.
Word Processor
Enables you to select the word processor that is launched when opening new jobs, ready to start
transcription. You can choose from Microsoft Word, or (if you have the OpenOffice addin installed)
OpenOffice.
saproType Client Guide 4 | Page 59

WinScribe Client User Guide 81
Field
Description
Template Manager
If using templates (page 71), select Folder Storage and browse to the location in which your
template data will be stored. This location can be changed later if necessary, using the Template
Manager.
Inactivity minutes
This option allows you to specify the period of inactivity before WinScribe Client returns to the
Logon screen. The typist who was logged in previously must logon again to resume activity. The
session remains open, and another typist cannot logon on that PC.
If you want to disable this feature, set the value to "0" (zero).
Display completed
jobs (days)
Defines how long (in days) your completed jobs are displayed in the Sent Items folders. For
example, if set to 7, only jobs completed in the last 7 days are displayed. Older jobs are not visible.
Set the value to "0" (zero) to display all jobs.
Autorefresh the Inbox
jobs (secs)
New jobs only display in your Inbox when WinScribe is refreshed. You can manually refresh (by
clicking the Refresh button on the Home tab), or use this setting for WinScribe to refresh
automatically.
If you select this option, you must also select the frequency (in seconds) the autorefresh will occur.
Note: This option must be enabled for notification to work.
Confirm end job
commands
Select this option to be prompted to confirm a job is complete when pressing the Complete Job
button on the playbar. This can prevent you from accidently marking jobs as complete before they
are finished.
Display jobs grid
horizontal scrollbar
Displays a scrollbar at the bottom of the job list window, enabling you to display more columns
and/or wider columns. If this option is not enabled, the columns are automatically sized to fit the
available window.
Show job notes on a
separate line
Displays job notes on a separate line beneath the job details in the job list. Alternatively, to make
notes visible in the job list, you can adjust the view and have notes displayed as a separate column
(page 31).
saproType Client Guide 4 | Page 60
82 WinScribe Client User Guide
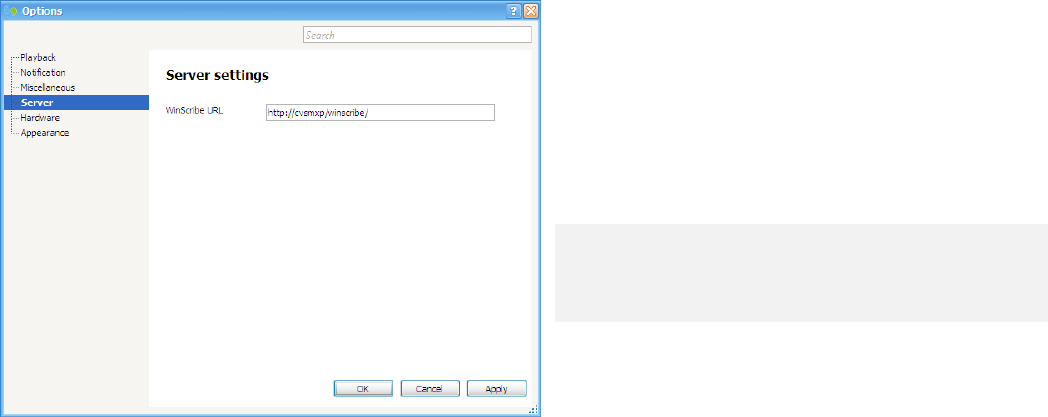
Server Settings
The Server settings enable you to specify the URL of your WinScribe Server. This URL is automatically defined during the
WinScribe Client installation process. You can change this to connect to a different WinScribe server, if required. You must be
offline to change this setting.
To download jobs from more than one server:
Either use a separate user id and security code for
each, and set the URL of the required server in the
WinScribe URL field.
-or-
Create a shortcut on your desktop with the server
connection properties set to connect to the desired
server.
You must disable the Save password option on the logon
dialog box for this to work. WinScribe Client requires a
URL to connect to the WinScribe server
saproType Client Guide 4 | Page 61
WinScribe Client User Guide 83
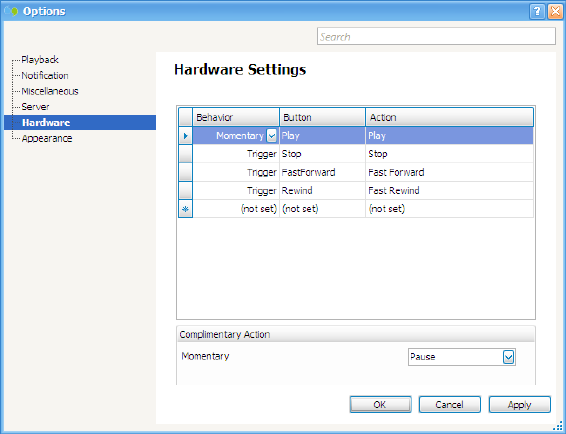
Hardware Settings
The Hardware settings enable you to configure the buttons on your footpedal to perform different actions from the default
settings.
When you open the Hardware Settings window it shows the current settings for the buttons on your footpedal. Each line
represents a different button. You can set the Behavior, Action, and Complimentary Action for each button.
Behavior
The behavior controls how the button will act when you press it:
saproType Client Guide 4 | Page 62
84 WinScribe Client User Guide
Momentary: The button performs an action while it is held down, and performs the complimentary action on release. For example, if
you set the momentary action to Play and the complimentary action to Pause, the audio will play while you press the button, and pause
playback when the button is released.
Trigger: The button will simply trigger an action. For example, if you set a trigger action to Rewind, the audio file will rewind when you
press and release the button (the action is triggered on release of the button).
Toggle: The button toggles between the selected action and a complimentary action. For example, if you set a toggle action to Play and
the complimentary action to Stop, then when you press and release the button the audio plays (the action is triggered on release of the
button), and when you press and release it a second time, playback will stop.
Button
Select which button to apply the action and behavior to. For example, if you select Fast Forward then set the action to Play, the button
that would normally act as the Fast Forward button will Play instead.
Action
Select a System Action for the button to perform. Available actions are:
None (the button will not perform any action)
Play
Pause
Resume
Fast Forward
Stop
Record (Note that Record is not an applicable setting for foot pedals)
Complimentary Action
For Momentary and Toggle actions, you can select a complimentary action:
Momentary Actions: The complimentary action is performed when the button is released.
Toggle Actions: The complimentary action is performed every second time the button is pressed.
saproType Client Guide 4 | Page 63

WinScribe Client User Guide 85
Appearance Settings
The Appearance settings enable you to select the skin (or theme) used by WinScribe Client.
When you click a skin it is applied immediately, enabling you to preview it when deciding which one to choose.
saproType Client Guide 4 | Page 64
