
Personal Safety
User Guide
for Apple devices

2Apple Personal Safety User Guide
Contents
Guided solutions 4
Safety Check on iPhone (iOS 16 or later) 4
Checklists 19
Personal safety at a glance 24
Personal safety at a glance 24
Review and take action 26
Secure AirDrop and NameDrop 26
Securely control whom you share content with from iPhone, iPad, and Apple Watch 29
Securely control whom you share content with from Mac 35
Manage your location 42
Safely manage how you forward content 59
Reject unknown sign-in attempts 61
Record suspicious activity 62
Store your data securely in iCloud 64
Delete suspicious content 66
Manage Family Sharing settings 69
Avoid fraudulent requests to share info 74
Securely control your Home accessories 75
How to erase all content and settings 76
Restore the data you backed up 78

3Apple Personal Safety User Guide
Safety and privacy tools 82
Update your Apple software 82
Set a unique passcode or password 86
Secure your iPhone or iPad with Face ID 89
Secure your devices with Touch ID 91
Delete unknown fingerprints from iPhone or iPad 93
Add or delete fingerprints on your Mac 94
Keep your Apple ID secure 95
Use two-factor authentication 98
Help prevent being locked out of your device 100
Keep your device, app, and website passwords secure on iPhone and iPad 102
Manage shared password and passkeys 104
App privacy features in Apple products 106
Harden your devices against mercenary spyware 109
Manage safety settings in Messages 111
Use Check In for Messages 114
Block calls and messages 117
Receive warnings about sensitive images and videos on iPhone, iPad, and Mac 119
Keep your browsing history private 121
Make an emergency call or text on iPhone or Apple Watch 125
Obtain evidence related to another person’s account 130
Copyright 131

4Apple Personal Safety User Guide
Guided solutions
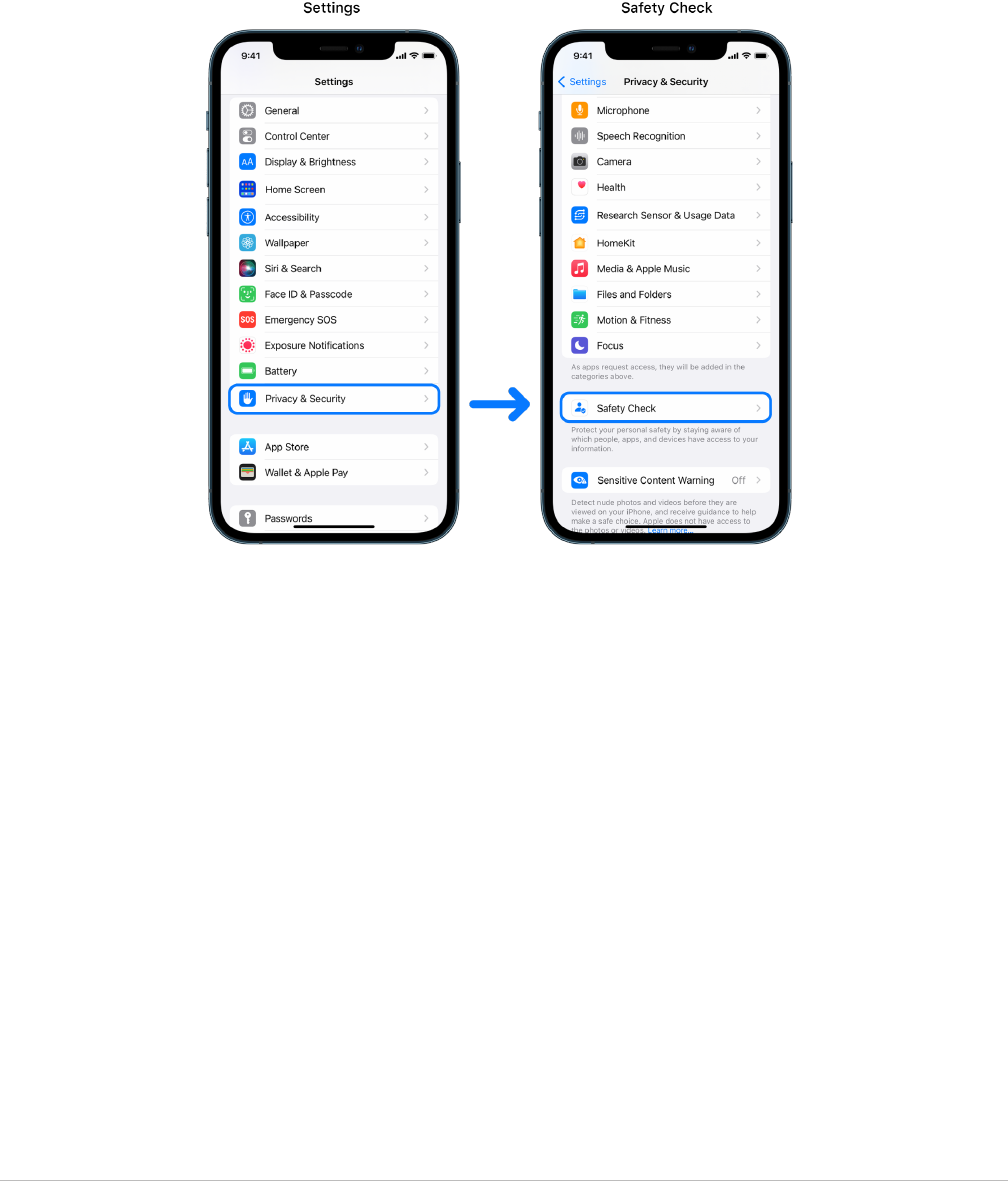
Safety Check on iPhone (iOS 16 or later)
Use Safety Check on iPhone to stop sharing and secure
your account
If your personal safety is at risk, you can use Safety Check on iPhone to quickly stop
sharing your information, or to review and update sharing with individual people and
apps. Safety Check requires iOS16 or later. (To find the software version installed on your
device, go to Settings > General, then tap About.)
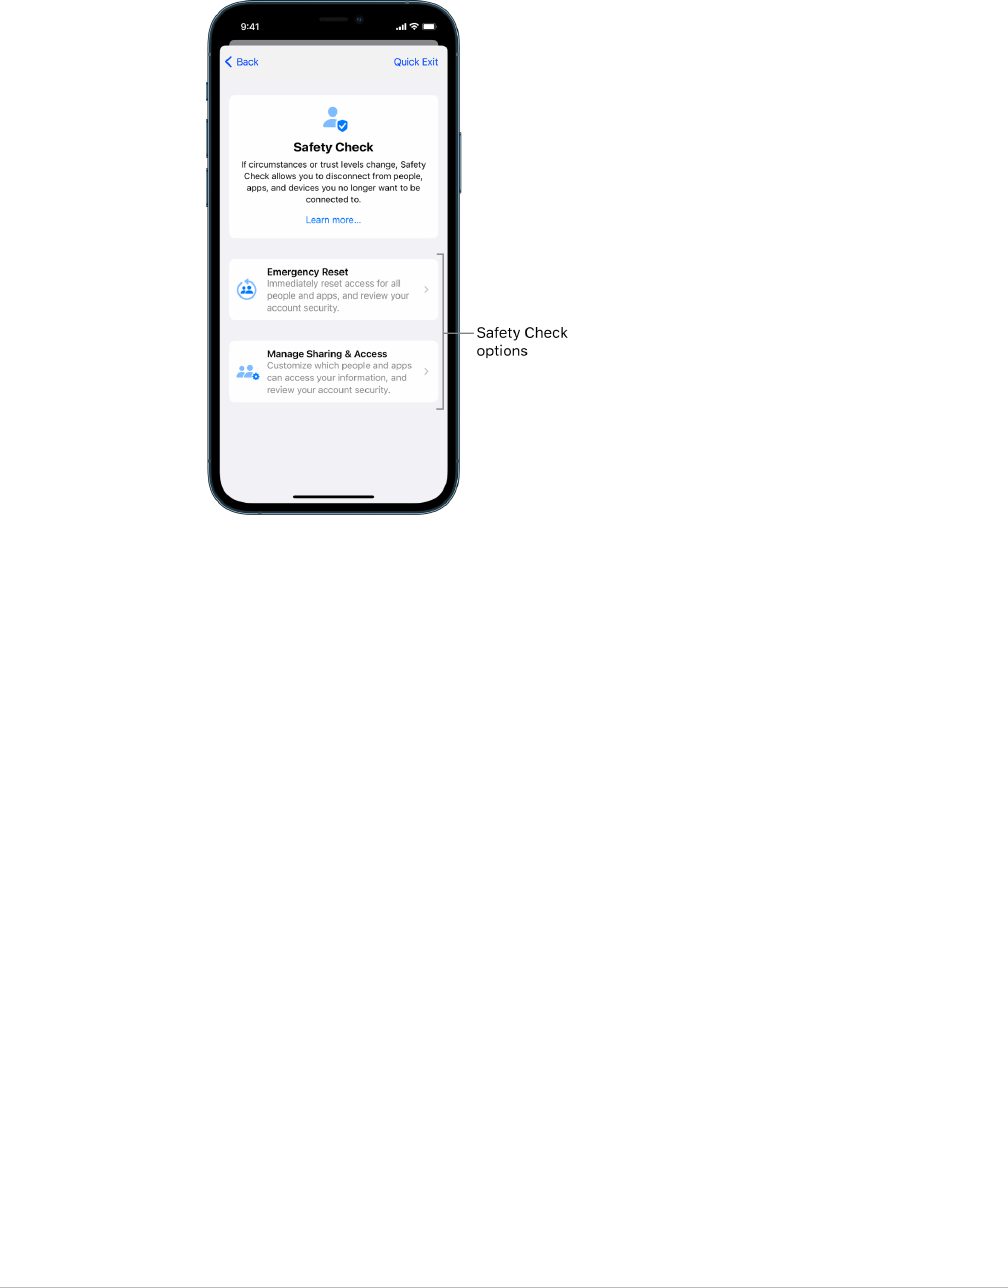
There are two ways you can stop sharing using Safety Check:
• Use Emergency Reset to immediately stop sharing the sharing types shown in
How Safety Check works to keep you safe. Emergency Reset also allows you to review
and reset settings associated with your AppleID.
5Apple Personal Safety User Guide
• Use Manage Sharing & Access to stop sharing information with specific people or
apps. If you’d like to review what you’re sharing and whom you’re sharing with, use this
option.
When using Emergency Reset and Manage Sharing & Access, keep in mind:
• People may notice you’ve stopped sharing information with them.
• By ending sharing relationships, you may lose access to data such as shared photos
and notes.
For more information about Safety Check, see “How Safety Check on iPhone works to keep
you safe” later in this document.
6Apple Personal Safety User Guide
Quickly exit Safety Check
A Quick Exit button is available if you need to quickly exit Safety Check. Any changes you
made before using Quick Exit are saved.
Tap Quick Exit on any Safety Check screen to immediately close the Settings app and
return to the Home Screen.
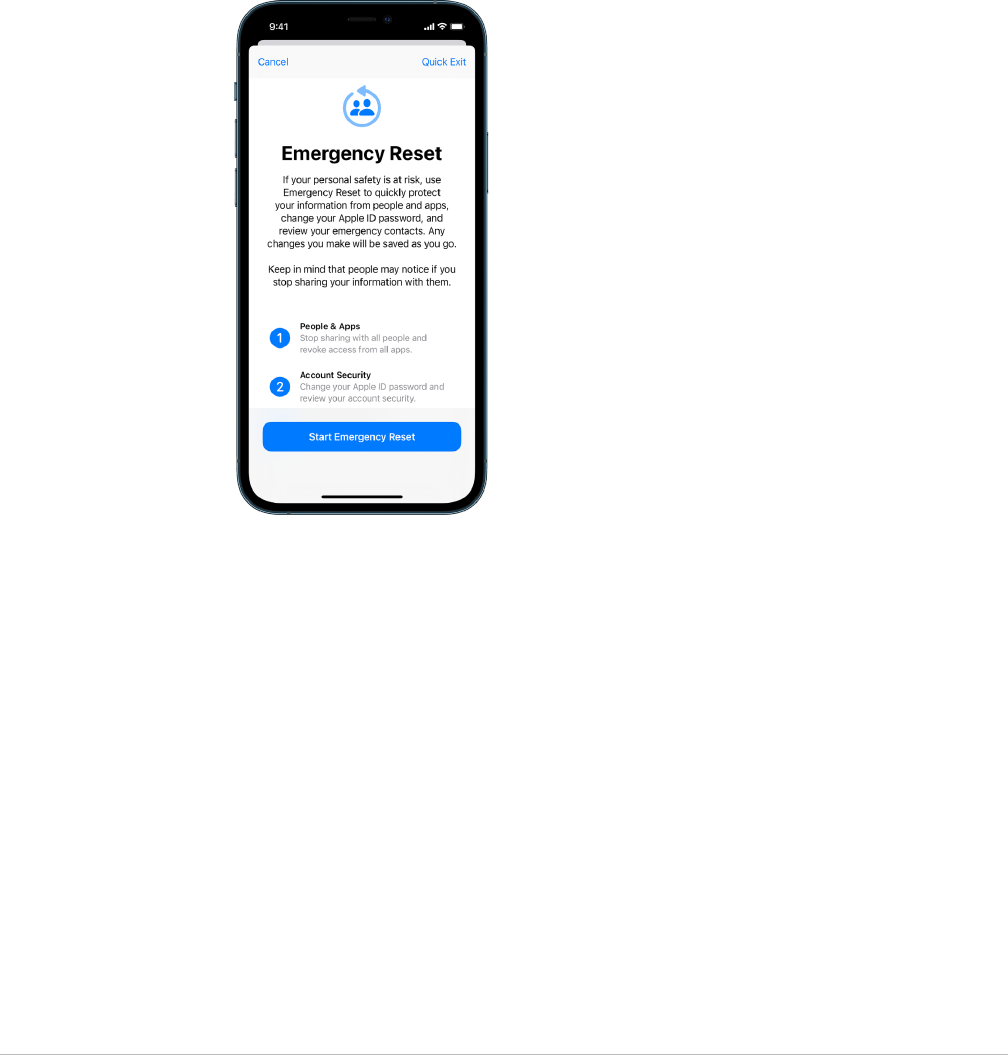
How do I use Emergency Reset in Safety Check?
1. Go to Settings > Privacy & Security > Safety Check.
2. Tap Emergency Reset, then follow the onscreen instructions.
Progress is saved as you go.
3. When you’ve finished, go to Verify that you’ve stopped sharing, below.
Note:If you have Stolen Device Protection turned on, Safety Check may work a little
differently. To learn more about Stolen Device Protection, see the Apple Support article
About Stolen Device Protection for iPhone (https://support.apple.com/HT212510).
7Apple Personal Safety User Guide
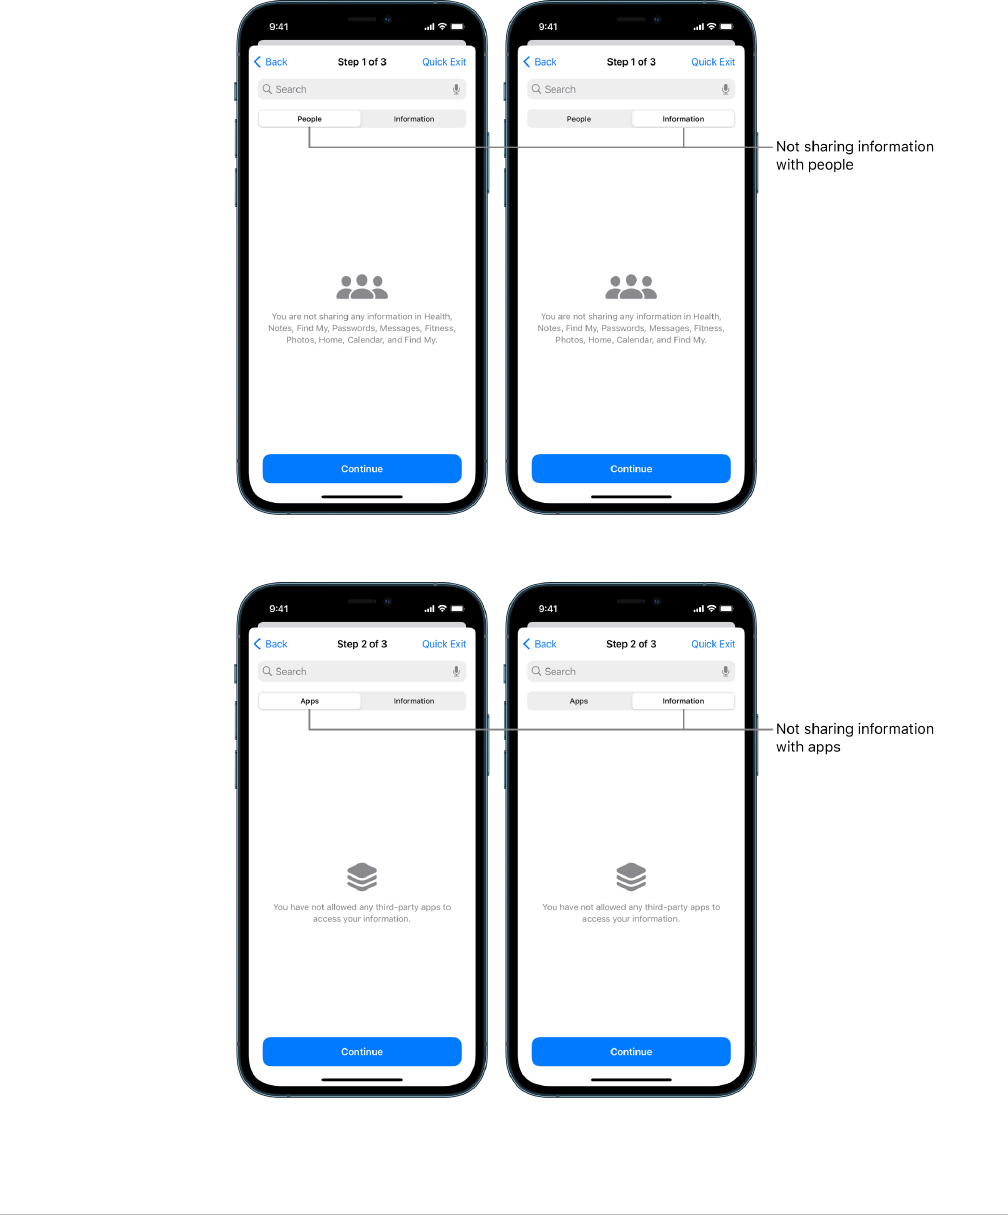
How do I use Manage Sharing & Access in Safety Check?
When you want to explore sharing in more detail, use Manage Sharing & Access to review
and reset information you’re sharing with people, review and reset the information that
apps have access to, and update your device and AppleID security. Progress is saved as
you go.
1. Go to Settings > Privacy & Security > Safety Check.
2. Tap Manage Sharing & Access.
3. Do one of the following to stop sharing information with other people:
• Tap People, select people in the list, review the information shared with people,
then decide which information you want to stop sharing with selected people.
• Tap Information, select apps in the list, review the information shared with people,
then decide which information you want to stop sharing with selected people.
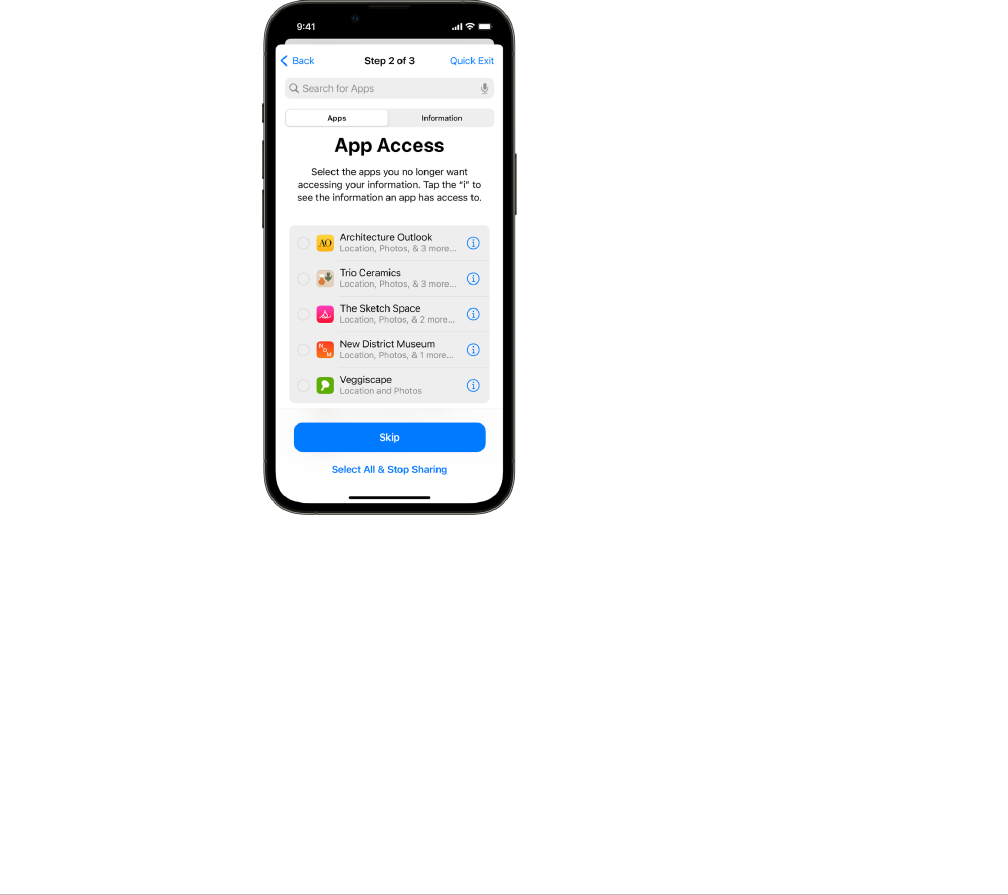
4. Do one of the following to stop sharing information with other apps:
• Tap Apps, select apps in the list, review the information shared with them,
then decide which information you want to stop sharing with the selected apps.
• Tap Information, select the information being shared in the list, review the
information shared with apps, then decide which information you want to stop
sharing with the selected apps.
8Apple Personal Safety User Guide
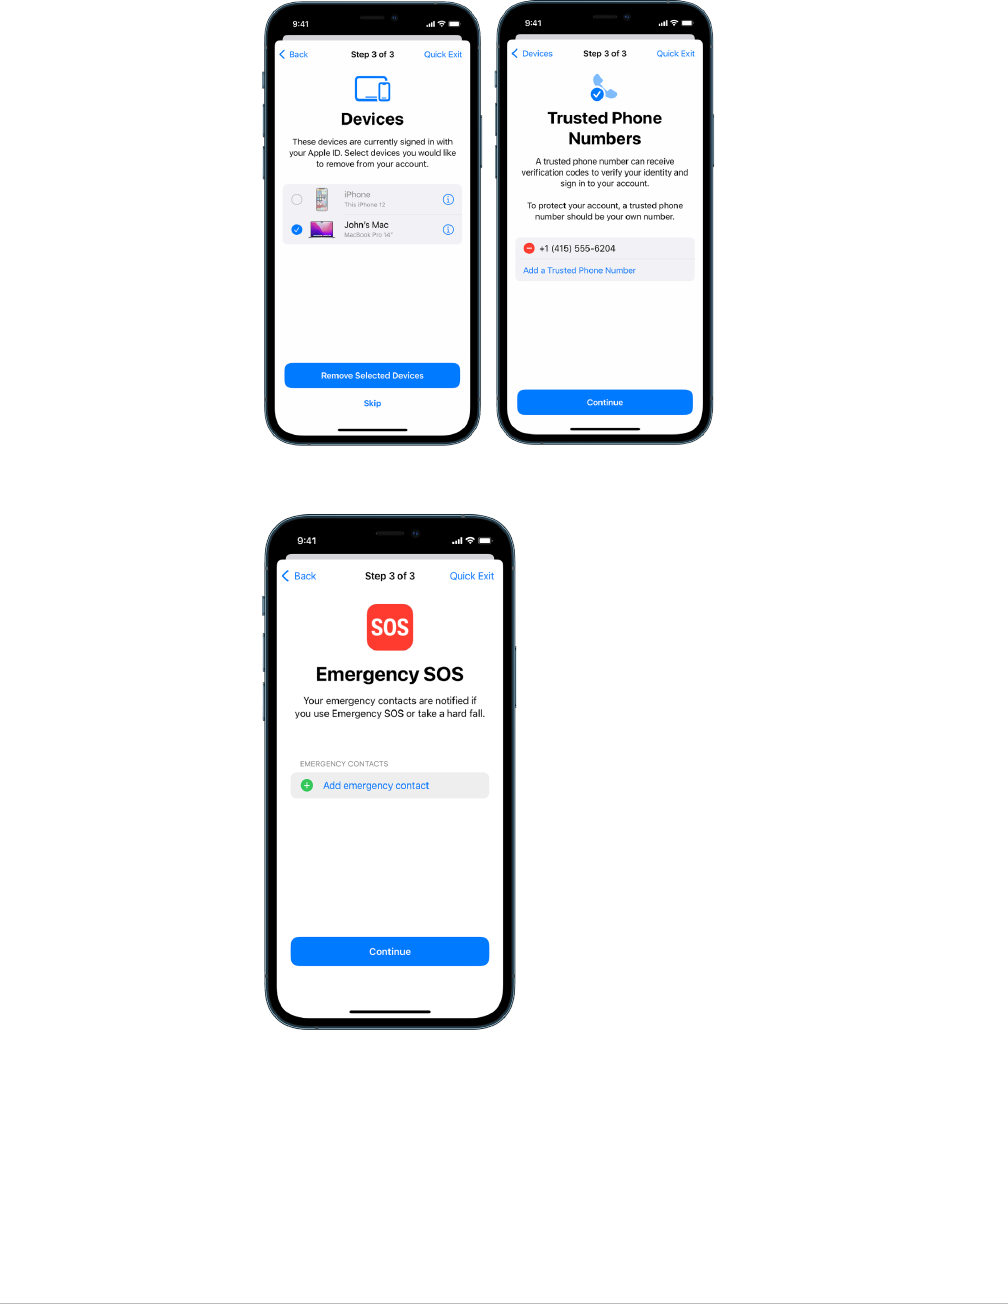
5. Tap Continue, then do any of the following:
Note:You are asked to review only content you can make changes to.
• Review and remove devices connected to your AppleID.
• Review and update phone numbers used to verify your identity.
• Update your AppleID password.
• Add or update your emergency contacts.
• Update your device passcode, or your FaceID or TouchID information.
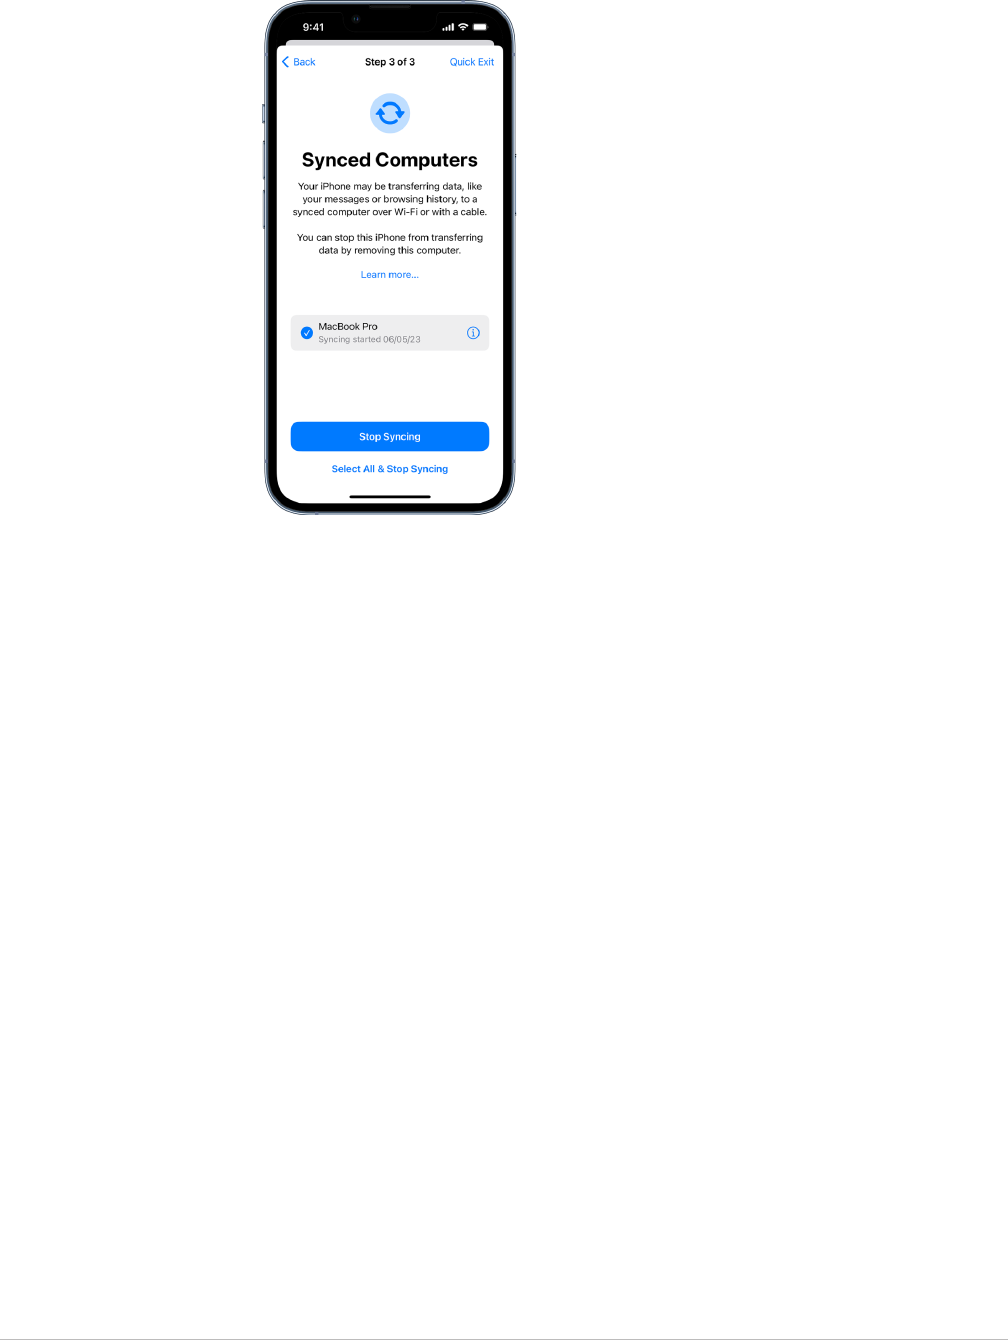
• Review and remove synced computers. (iOS17 or later only)
• If you have iCloud+ and haven’t yet turned on Private Relay, you can do so now.
(iOS17 or later only)
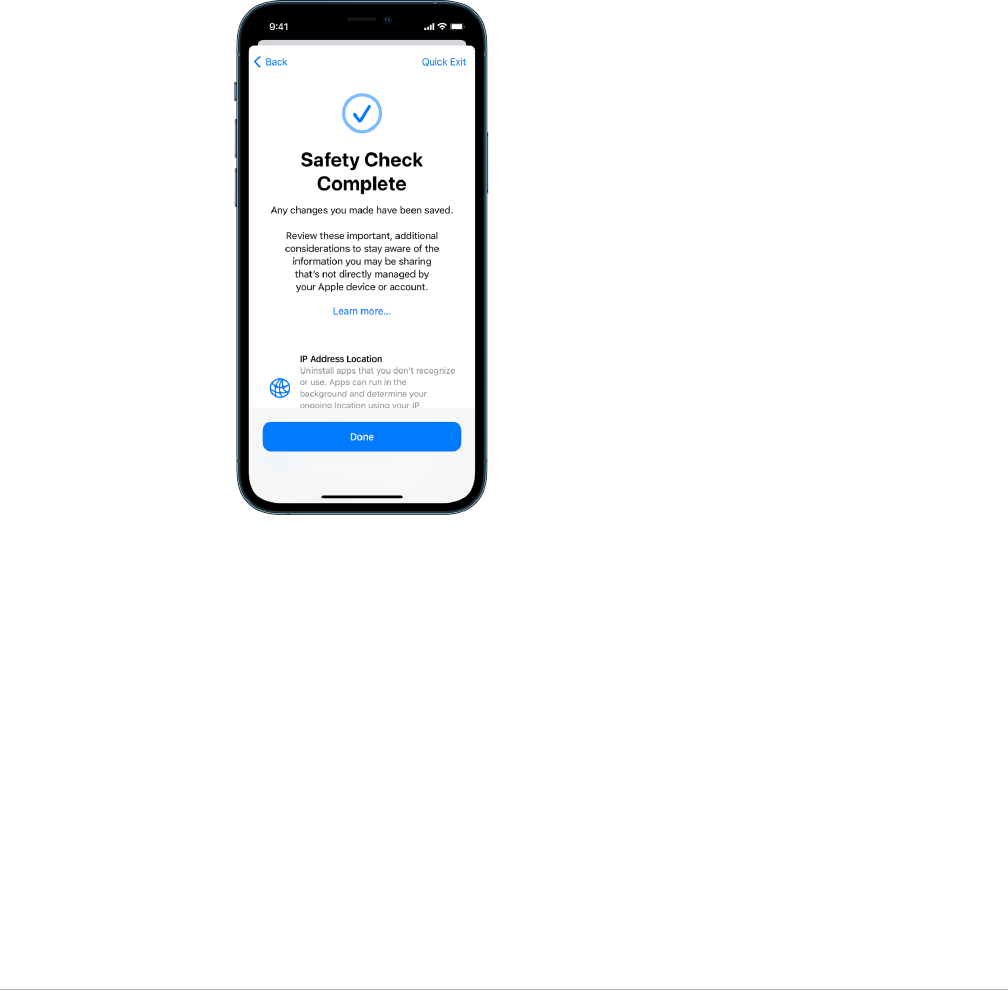
6. Tap Done.
7. When you’ve finished, go to the next task to verify that you’ve stopped sharing.
Important:Review additional considerations when using Safety Check later in this
document to learn about tips for protecting your private information beyond Safety
Check.
9Apple Personal Safety User Guide
Verify that you’ve stopped sharing
After using Safety Check, you can confirm that changes have been made. You can verify
that sharing and information access has stopped. This has three steps:
• Step 1: Verify that information sharing has stopped with all people and information
shared to people has been stopped.
• Step 2: Verify that sharing has stopped for apps.
• Step 3: Verify any account changes you made:
10Apple Personal Safety User Guide
• Devices connected to your AppleID.
• Phone numbers used to verify your identity.
• Emergency contacts you added or changed.
11Apple Personal Safety User Guide
• Synced computers you removed.
How Safety Check on iPhone works to keep you safe
If your personal safety is at risk, you can use Safety Check on iPhone to quickly stop
sharing your information, or to review and update sharing with individual people and apps.
If you need to immediately stop sharing information, see “How do I use Emergency Reset
in Safety Check?” earlier in this document.
12Apple Personal Safety User Guide
If you need to review or stop sharing information with specific people or apps, see
“How do I use Manage Sharing & Access in Safety Check?” earlier in this document.
To view a video on how to use Safety Check on your iPhone, see “Use Safety Check on
your iPhone” (https://www.youtube.com/watch?v=y9QX-0IVQL4).
What does Safety Check do?
You can use Safety Check to check whom you’re sharing information with, restrict
Messages and FaceTime to your iPhone, reset system privacy permissions for apps,
change your passcode, change your AppleID password, and more.
If you want to restart sharing with someone after using Safety Check, just open the app or
service you’d like to share information from and share that content again.
If you have Stolen Device Protection turned on, Safety Check may work a little differently.
To learn more about Stolen Device Protection, see the Apple Support article About Stolen
Device Protection for iPhone (https://support.apple.com/HT212510).
Note:If your iPhone has Screen Time restrictions turned on or has a mobile device
management (MDM) profile installed, you can still use Safety Check, but some options may
not be available.
13Apple Personal Safety User Guide
What do I need to use Safety Check?
Safety Check is available only on iPhone running iOS16 or later. To use Safety Check,
you must have an AppleID that uses two-factor authentication. You must also be signed in
to Settings > [your name] on your iPhone. (To find the software version installed on your
device, go to Settings > General, then tap About.)
To access Safety Check, go to Settings > Privacy & Security > Safety Check.
Note:If you don’t have access to Safety Check or you’re having trouble using the feature,
you can manually adjust your sharing settings and access to your device and accounts.
See Stop sharing later in this document.
14Apple Personal Safety User Guide
Which Apple apps stop sharing information with people using Safety
Check?
Safety Check can turn off sharing information from the following Apple apps to other
people:
App Information
Activity
Check In
Health
Home
Shared Calendars
Shared items in FindMy
Shared location using FindMy
Shared Maps ETA
Shared Notes
Shared Passwords
Shared Photos (Including Shared Library and Shared
Albums)
15Apple Personal Safety User Guide
What information stops being shared with apps using Safety Check?
Safety Check removes from all apps on your iPhone any data gathered by the following
apps, networks, and features:
Bluetooth®
Calendars
Camera
Contacts
Files and Folders
Health
Local Network
Location Services
Media and Apple Music
Microphone
Motion & Fitness
Photos
Reminders
Research
Speech Recognition

16Apple Personal Safety User Guide
How does Safety Check work with my AppleID?
Safety Check can be used to modify information associated with your AppleID. You can
use Safety Check to:
• Review and remove devices signed into your account
• Review and update trusted phone numbers
• Change your AppleID password
• Update your emergency contacts
• Update your device passcode and your FaceID or TouchID information
Note:If you have Stolen Device Protection turned on, Safety Check may work a little
differently. To learn more about Stolen Device Protection, see the Apple Support article
About Stolen Device Protection for iPhone (https://support.apple.com/HT212510).
What is Emergency Reset?
Safety Check has an option called Emergency Reset. You use it to immediately stop sharing
the items listed above, which includes all types of sharing. Emergency Reset also allows
you to review and reset settings associated with your AppleID.
If you’re unsure what you’re sharing and whom you’re sharing with, see “How do I use
Manage Sharing & Access” earlier in this document.
Additional considerations when using Safety Check
Use Safety Check in iPhone (running iOS16 or later) to quickly stop sharing and access to
your information, or easily review and update sharing with individual people and apps.
In some cases, you may also be sharing information that Safety Check can’t review or
change—for example, accounts and passwords, social media sharing, or an iPad or Mac
that may also have information you’ve shared. Carefully review the following to help you
decide what additional steps you may want to take to reduce the amount of information
you’re sharing.
IP address and apps
An IP address is a unique identifier that your internet service provider assigns to internet-
connected devices so that you can use the internet. IP addresses don’t convey your exact
location but can give a general idea of where you are and allow data collection companies
to recognize you over time. Apps installed on your device may use your IP address to
gather information about your general location. Review installed apps and delete those that
you don’t use or don’t recognize.
For more information on how to review and delete installed apps, see “Delete suspicious
content from your devices” later in this document.

17Apple Personal Safety User Guide
Accounts and passwords
Think about the accounts you use that may contain sensitive personal information you want
to protect, like banking, shopping, email, social media, education, and others. Change the
passwords for these accounts to help ensure no one else can access them. Check through
each account’s security and privacy settings to ensure that your information is protected.
For accounts you use to communicate, like email, phone, and messaging, check to make
sure nothing is being forwarded without your permission.
Social media
Remember that posting photos and other personal information on social media can reveal
details about your location and personal life. Check your privacy settings, review your lists
of connections and followers, and think carefully about what you post to ensure the level of
privacy you need.
Other devices you own or use
Check the sharing and access settings for any other devices you use to make sure your
information is secure. If anyone else is with you, like a child or friend, remember that their
devices may also be sharing information.
Unwanted tracking
Unwanted tracking alerts were created to discourage people from trying to misuse
AirTags and other small FindMy accessories to track someone without their knowledge.
To receive alerts if an unknown AirTag or other FindMy network accessory is moving with
you, make sure Bluetooth®, Location Services, and Tracking Notifications are turned on.
To turn on Tracking Notifications, open the FindMy app, tap Me, scroll to Customize
Tracking Notifications, then turn on Allow Notifications.
See the Apple Support article “What to do if you get an alert that an AirTag, Find My
network accessory, or set of AirPods is with you” (https://support.apple.com/119874).
Home and HomeKit
If you’re a member of an Apple home and decide to remove yourself, remember that the
person who manages the home can still use HomeKit accessories, like cameras, that could
impact your personal safety.
See “Securely control your Home accessories” later in this document.
Apple Wallet
If you share cards or keys with someone in Wallet, the person you’re sharing with may
be able to view your transaction history or door lock history. To review your recent
transactions, open the Wallet app. Remember that details of financial transactions may also
be viewed through shared bank accounts and shared credit cards, or if someone else has
online access to your financial accounts. Remember to update your passwords.

18Apple Personal Safety User Guide
Cellular plan
If you’re part of a shared cellular plan, other members of the plan may have access to
your location, call and messaging activity, or billing details. Contact your carrier for more
information about your plan and to see what additional safety measures can be placed on
your account, such as an access PIN or security code before changes can be made. If you
don’t have a shared plan but someone else has online access to your cellular plan account,
they may also have access to your location, call and messaging activity, or billing details.
Remember to update your passwords.
Family Sharing
If you’re a member of an Apple Family Sharing group, the Family Sharing organizer may
be able to see the purchases you’ve made and make changes to a child’s device settings.
To leave a family group, go to Settings, tap your name, and open Family Sharing settings.
Child accounts can’t be removed from a Family Sharing group; however, they can be moved
to another Family Sharing group or their AppleID can be deleted.
Learn more about how to leave Family Sharing groups in steps 1 and 2 of the “Manage
location” checklist later in this document.
For more detailed information on Family Sharing, see “Manage Family Sharing settings”
later in this document.

19Apple Personal Safety User Guide
Checklists
Limit access to your iPhone or iPad
If you’re running iOS15 or earlier, use this checklist to see who has access to your devices
or your AppleID. If you’re running iOS16 or later, see “How Safety Check works” earlier in
this document.
1. Check which devices are signed in to your AppleID by going to Settings > [your
name]. If you see a device you don’t recognize, tap on that device name and select
“Remove from Account.”
2. Check to see if there is an unexpected alternate FaceID appearance or additional
TouchID fingerprint set up on your device by following these instructions: Set up
FaceID and Set up TouchID on your iPhone or iPad.
3. Sign in to the Apple ID website (https://appleid.apple.com) and review all the personal
and security information in your account to see if there is any information that someone
else has added.
4. If you have two-factor authentication turned on, review trusted devices for any devices
that you don’t recognize. If you don’t have it turned on, you can turn it on by following
these instructions: Set up two-factor authentication on your iPhone or iPad.
5. Review the installed apps on your device and look for apps you don’t recognize or don’t
remember installing. You can look up any apps you find in the App Store to see what
their purpose is.
6. Mobile device management (MDM) configuration profiles—typically installed by
employers, schools, or other official organizations—allow additional privileges and
access to a user’s devices. To look for an unknown MDM configuration profile on your
devices, see Delete unknown configuration profiles from your iPhone or iPad.
7. To see if anything has been changed in or added to your sharing permissions, see the
checklist Manage location.
20Apple Personal Safety User Guide
How to stop sharing your iPhone or iPad content
If you’re running iOS15 or earlier, use this checklist to learn how to stop sharing with
someone you previously shared with. If you’re running iOS16 or later, see “How Safety
Check works” earlier in this document.
1. Check to see if you’re part of a Family Sharing group by going to Settings >
[yourname] and look for the Family Sharing tab. If you’re in a Family Sharing group,
the names of the family members are visible.
2. If you’re part of a Family and no longer want to share information, you can remove
yourself (as long as you’re 13 or older). If you’re the one who set the Family up (the
word Organizer appears under your name), you can remove anyone over the age of
13 from the Family.
3. In the FindMy app , tap the People tab to see whom you share your location with.
If you want to stop sharing with an individual, select the person, then tap Stop Sharing
My Location. To stop sharing with everyone, tap Me, then turn off Share My Location.
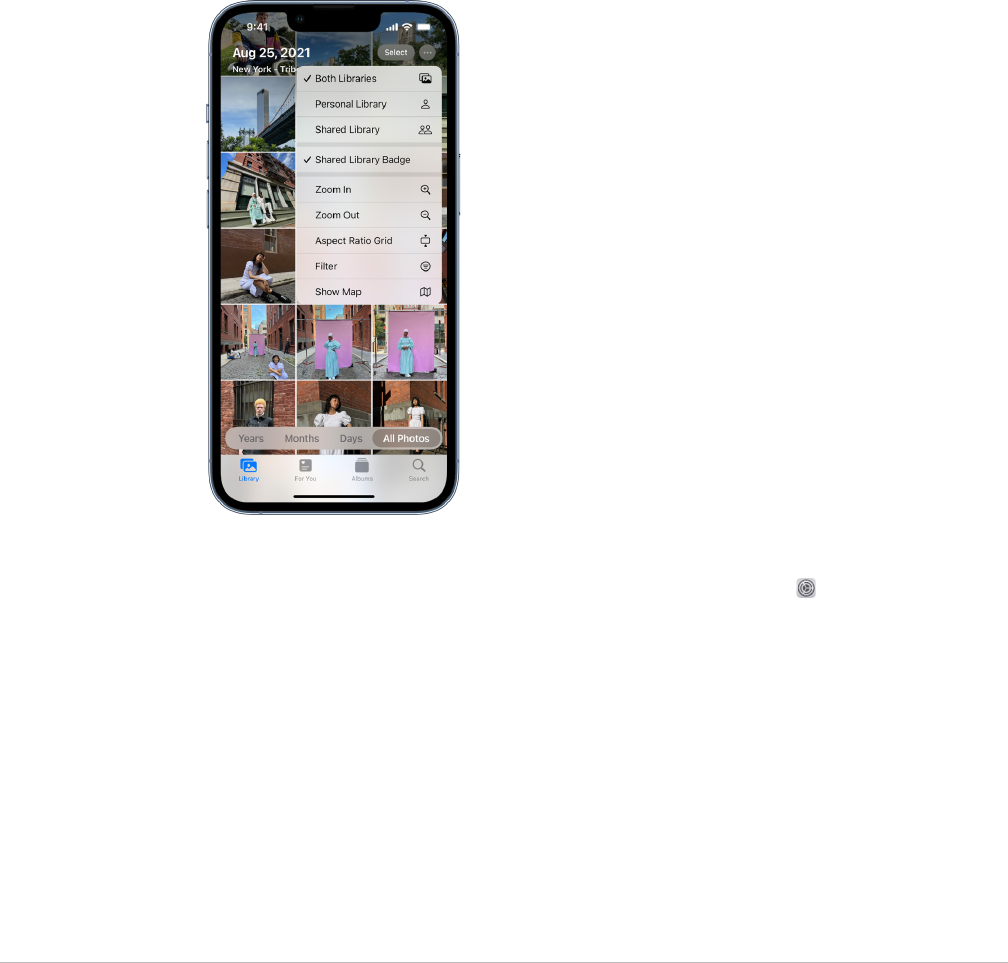
4. In the Photos app , tap Albums, then go to Shared Albums. Select a shared album,
and tap People to see the owner of the shared album and whom it’s shared with.
• If you’re the album owner and would like to stop sharing, tap the name of the
subscriber you want to stop sharing with, then select that option.
• If you’re a subscriber, you can tap Unsubscribe from the bottom of the screen.
You can also delete any photos that you shared.
5. In the Calendar app , tap Calendars. Select a shared calendar and tap the Info button
to see whom the calendar is shared with.
• If you’re the Calendar owner and would like to stop sharing, tap the name of the
subscriber you want to stop sharing with, then select that option.
• If you’re a subscriber, you can tap Delete Calendar from the bottom of the screen.

21Apple Personal Safety User Guide
6. If you have an AppleWatch and shared your Activity rings with someone, you can
choose to stop sharing. On iPhone, go to the Activity app , then tap Sharing.
Tap a person you share with, tap their name, then tap either Remove Friend or Hide my
Activity.
7. You can also choose to share information with others using third-party apps. Conduct
a review of apps you’ve installed on your device to see if any of them are sharing
information. See Securely control whom you share content with from iPhone, iPad,
and Apple Watch.
22Apple Personal Safety User Guide
How to stop sharing your iPhone or iPad location
1. You can Use Safety Check on iPhone (iOS16 or later) to manage which people and apps
have access to your location.
2. To stop sharing your location with all apps and services, for even a short period of time,
go to Settings > Privacy > Location Services and turn off location sharing. This stops
all apps on your device, such as Maps, from using your location. No one is notified if
you turn off Location Services, but some features may not work as expected without
access to your location.
Note:You can also temporarily turn off FindMy iPhone in the same tab if you’re
concerned someone may have access to your iCloud account. In the list of apps using
Location Services, tap FindMy, then select Never.
3. To stop sharing your location with certain apps and services, go to Settings > Privacy
> Location Services, then choose the apps and services you want to stop sharing with.
Tap the app name, then choose Never under Allow Location Access.
4. To stop sharing your location with a particular person, open the FindMy app , tap
People, select a person, then tap Stop Sharing My Location at the bottom of the screen.
If you started—and later stopped—sharing your location in FindMy, the person isn’t
notified and can’t see you in their list of friends. If you reenable sharing, they get a
notification that you’ve started sharing your location with them.
5. To stop sharing your estimated time of arrival (ETA) in Maps, open Maps, select
Favorites to open a window containing all of the locations you’ve designated as a
Favorite. Tap the Info button next to each location you want to review automatic ETA
sharing settings, then scroll down to the Share ETA section and remove the person you
want to stop sharing with.

23Apple Personal Safety User Guide
6. To check which devices and accessories are currently available through FindMy to
anyone who has access to your AppleID, go to FindMy > Devices and review the list.
If there is a device you don’t recognize and want to review, tap the device then tap
Remove This Device.
Note:If you’re part of a Family Sharing Group, members of your sharing group that have
allowed you to see the location of their devices will be listed below, separated by owner
name.
7. When photos and videos that include location metadata are shared, the people you
share them with may be able to access the location metadata and learn where it was
taken. If you’re concerned about someone having access to the location metadata
associated with your photos or videos, you can remove the current metadata and stop it
from being collected in the future.
24Apple Personal Safety User Guide
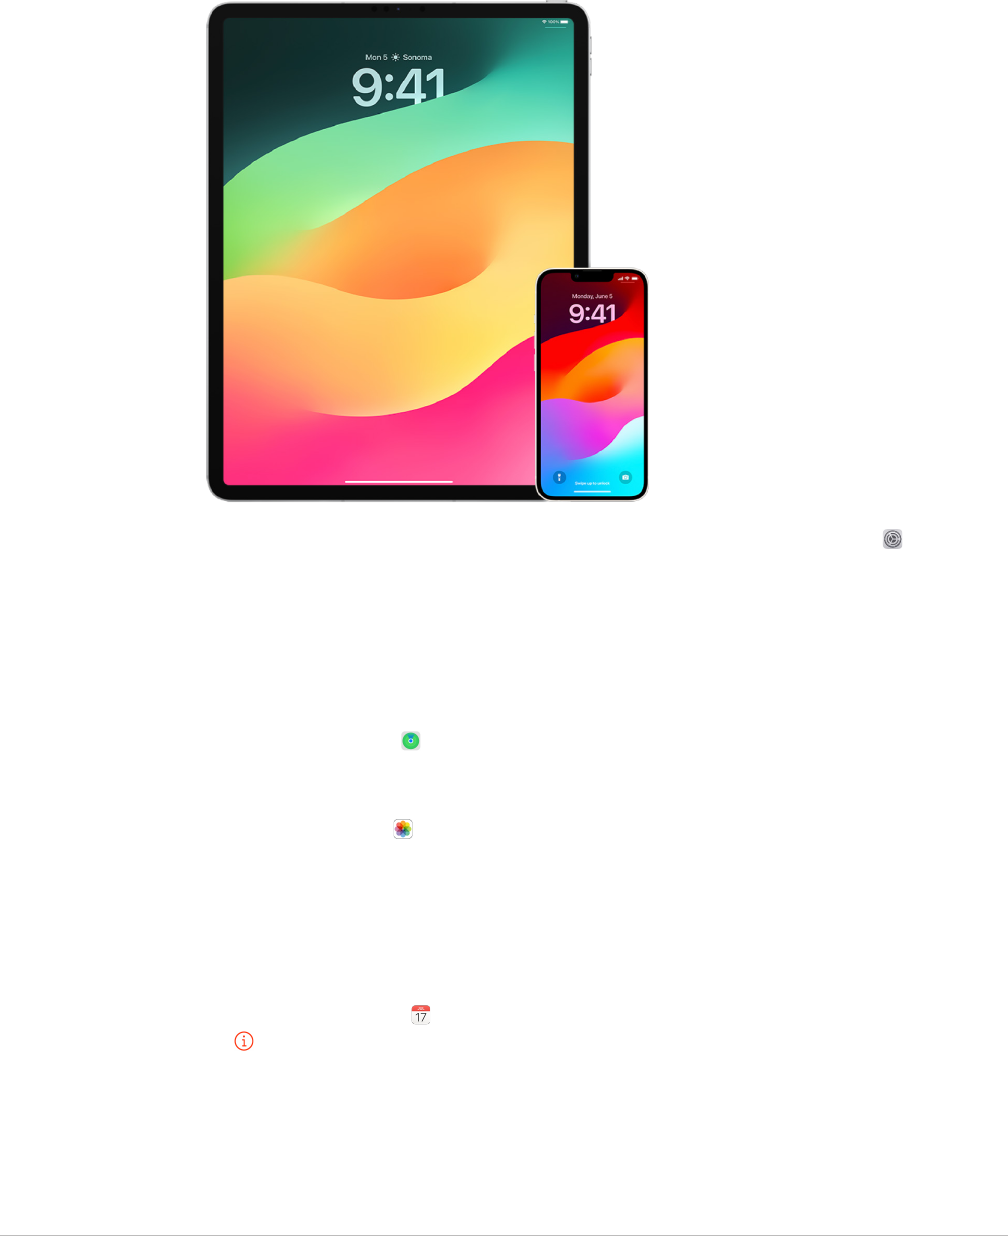
Personal safety at a glance
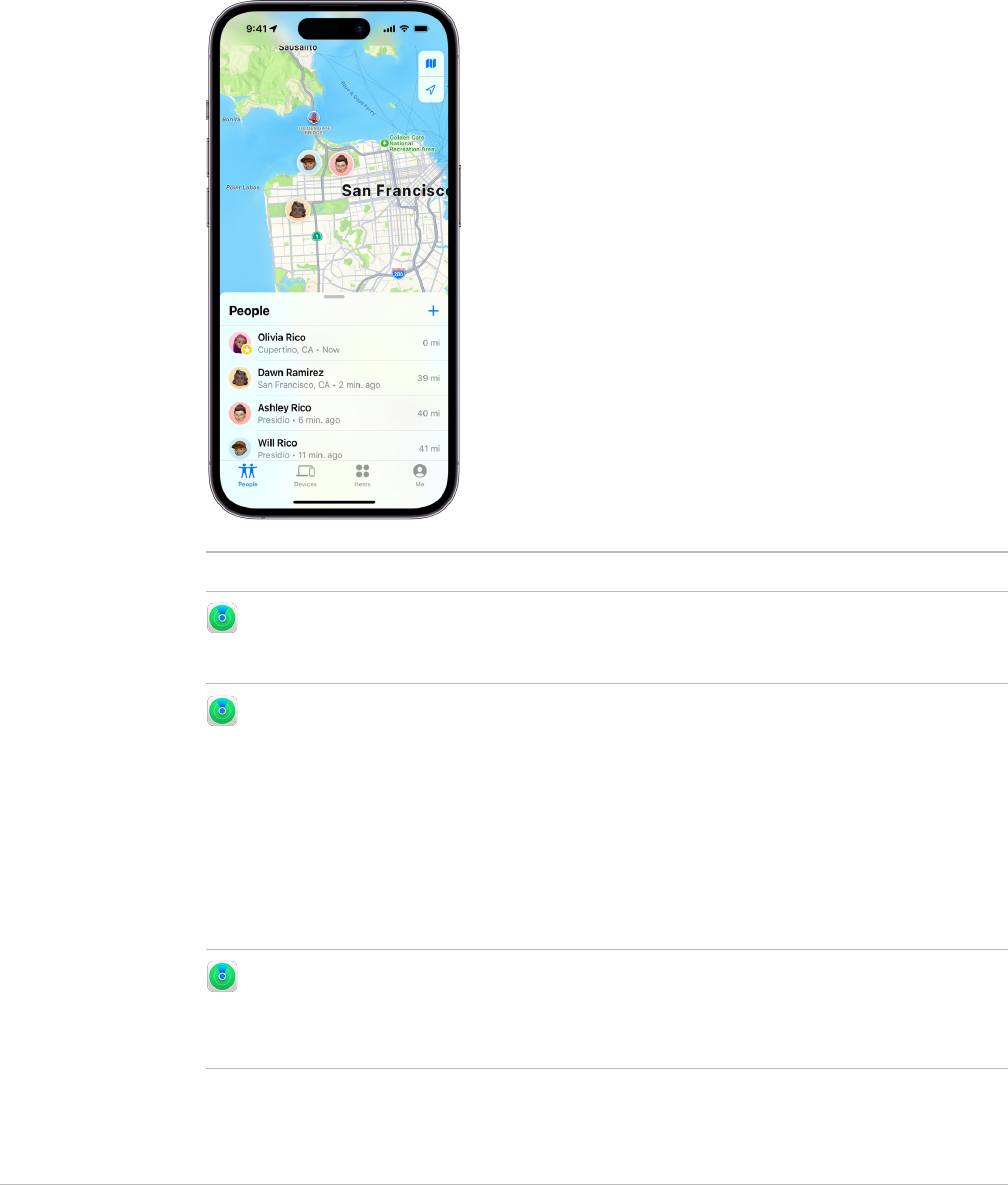
Personal safety at a glance
Apple makes it easy to connect with the people closest to you, while helping you stay
aware of what you’re sharing and with whom. If you gave someone access to your personal
information and no longer want to—or if you’re concerned someone who had access
to your device or accounts made changes without your permission—this guide offers
strategies and solutions to help you regain control.
This resource applies primarily to Apple devices running the latest operating systems
(iOS17, iPadOS17, and macOSSonoma14) but also applies to AppleWatch and HomePod.

25Apple Personal Safety User Guide
In iOS16 or later, you can use Safety Check on iPhone to quickly view what you’re sharing
and whom you’re sharing it with. You can then decide whether to stop sharing this
information. Even if you haven’t upgraded to iOS16, you can still view Apple’s checklists
and in-depth feature tasks to help you if you’re experiencing technology-enabled abuse,
stalking, or harassment. These tasks include step-by-step instructions on how to remove
someone’s access to information you previously granted—like location data in the FindMy
app, meetings you’ve shared in Calendar, and more. You’ll also learn about features you
can use to enhance your personal safety—such as how to automatically let a friend know
when you’ve arrived home safely and how to engage Emergency SOS.
This guide is updated regularly to provide you with the information you need to feel safe
and secure while using Apple products.
Tip:Where applicable, additional details for other products are provided or linked to,
including links to user guides for Apple devices. You can download a PDF of this guide
and print it for your convenience. All features, instructions, and settings can vary with the
product model or software version. If you need assistance with a particular feature,
search Apple Support at https://support.apple.com.
Additional safety resources
If you feel your safety is at risk, these additional resources might be helpful:
• United States: The Safety Net Project
(https://www.techsafety.org/resources-survivors)
• United States: National Center for Victims of Crime
(https://victimsofcrime.org/getting-help/)
• United Kingdom: Refuge UK
(https://refuge.org.uk/i-need-help-now/how-we-can-help-you/national-domestic-
abuse-helpline/)
• Australia: WESNET Safety Net Australia
(https://techsafety.org.au/resources/resources-women/)

26Apple Personal Safety User Guide
Review and take action
Secure AirDrop and NameDrop
What is AirDrop?
AirDrop is an easy way to share images, documents or other files between Apple devices
that are near each other. You can set it up so that everyone near you can share, so that
only your contacts can share, or so that no one can share.
Note:The Contacts Only option is available on devices with iOS10, iPadOS13.1, and
macOS10.12, or later. If your device uses an earlier software version and you want to
limit who can send files to you over AirDrop, you can turn it on when you need it and then
disable it when not in use.
What is NameDrop?
NameDrop (part of AirDrop) is an easy way for you to share your contact information with
someone, or receive theirs, without handing them your iPhone. NameDrop allows users to
easily share contact information by simply bringing their iPhone devices together, or by
bringing an iPhone and AppleWatch together (AppleWatchUltra, AppleWatch Series 7 or
later, and AppleWatchSE 2nd generation).
You can also choose the specific contact details that you want to share—and importantly,
what information you don’t want to share. To use NameDrop, both devices must be running
iOS17.1 or later, or watchOS10.1 or later. See Review and update your Contact Card later in
this document.
NameDrop works automatically. If you need to turn NameDrop off, see Turn Off NameDrop
later in this document.
Note:When you share your contact information through Contacts or NameDrop, by default
your pronouns aren’t shared. When you’re sharing another contact’s information,
their pronouns are never shared.

27Apple Personal Safety User Guide
Manage AirDrop
• On your iPhone or iPad, go to Settings > General, tap AirDrop, then choose an option
that works best for you.
To learn more, see:
• “Use AirDrop on iPhone to send items to nearby devices” in the iPhone User Guide
(https://support.apple.com/guide/iphone/iphcd8b9f0af)
• “Use AirDrop on iPad to send items to nearby devices” in the iPad User Guide
(https://support.apple.com/guide/ipad/ipadf0a1530e)
Review and update your Contact Card
You can update the information that you share in NameDrop by updating your Contact
Card—for example, if you only want to share your first name or your initials.
Note:NameDrop shares only your name, the phone number or email address you choose,
and Contact Poster information associated with your Contact Card. It doesn’t share other
information in your Contact Card, like your home address or birthday.
1. Open the Contacts app .
2. Tap My Card > Edit.
3. Review and update your name, phone numbers, and email addresses that you’d like to
share through NameDrop.
Share your contact info with NameDrop
You can share your contact info with another person.
1. Do one of the following:
• Share from iPhone or iPad: Hold your iPhone a few centimeters above the other
person’s iPhone or AppleWatch.
• Share from AppleWatch to AppleWatch: Open the Contacts app on your
AppleWatch, tap your picture in the top-right corner, tap Share, then bring your
watch to the other person’s AppleWatch.
• A glow emerges from both devices, and AppleWatch vibrates to indicate that a
connection is being made.
2. Continue holding your devices near each other until NameDrop appears on both
screens.
3. Choose to share your contact card (or a specific phone number or email address) and
receive the other person’s, or choose to receive only the other person’s.
If you’re sharing your contact card, tap , select the fields you want to include, then
tap Save. The same fields are selected by default next the time you use NameDrop.
To cancel, move the two devices away from each other or lock your iPhone before the
NameDrop transfer is complete.

28Apple Personal Safety User Guide
Turn Off NameDrop
1. Open the Settings app .
2. Tap General > AirDrop.
3. Turn off Bringing Devices Together.
29Apple Personal Safety User Guide
Securely control whom you share content with
from iPhone, iPad, and Apple Watch
You can share content securely with others on your Apple devices using several different
methods. With each method, your screen shows the people you’re sharing with. You can
also remove them from shared content on your iPhone, iPad, and AppleWatch.
To control whom you share content with from a Mac, see “Securely control whom you share
content with from Mac” later in this document.
30Apple Personal Safety User Guide
Manage sharing settings for Shared Albums in Photos
With Shared Albums in Photos, you choose the photos and videos you want to share,
and the people you want to share them with. You can also change your sharing settings
at anytime. If you stop sharing a photo or an album with someone, they won’t receive a
notification and their access to the shared album and its contents is removed.
If you’re a subscriber to a shared album, you can delete any photos that you shared.
You can also select Unsubscribe to unsubscribe from the shared album.
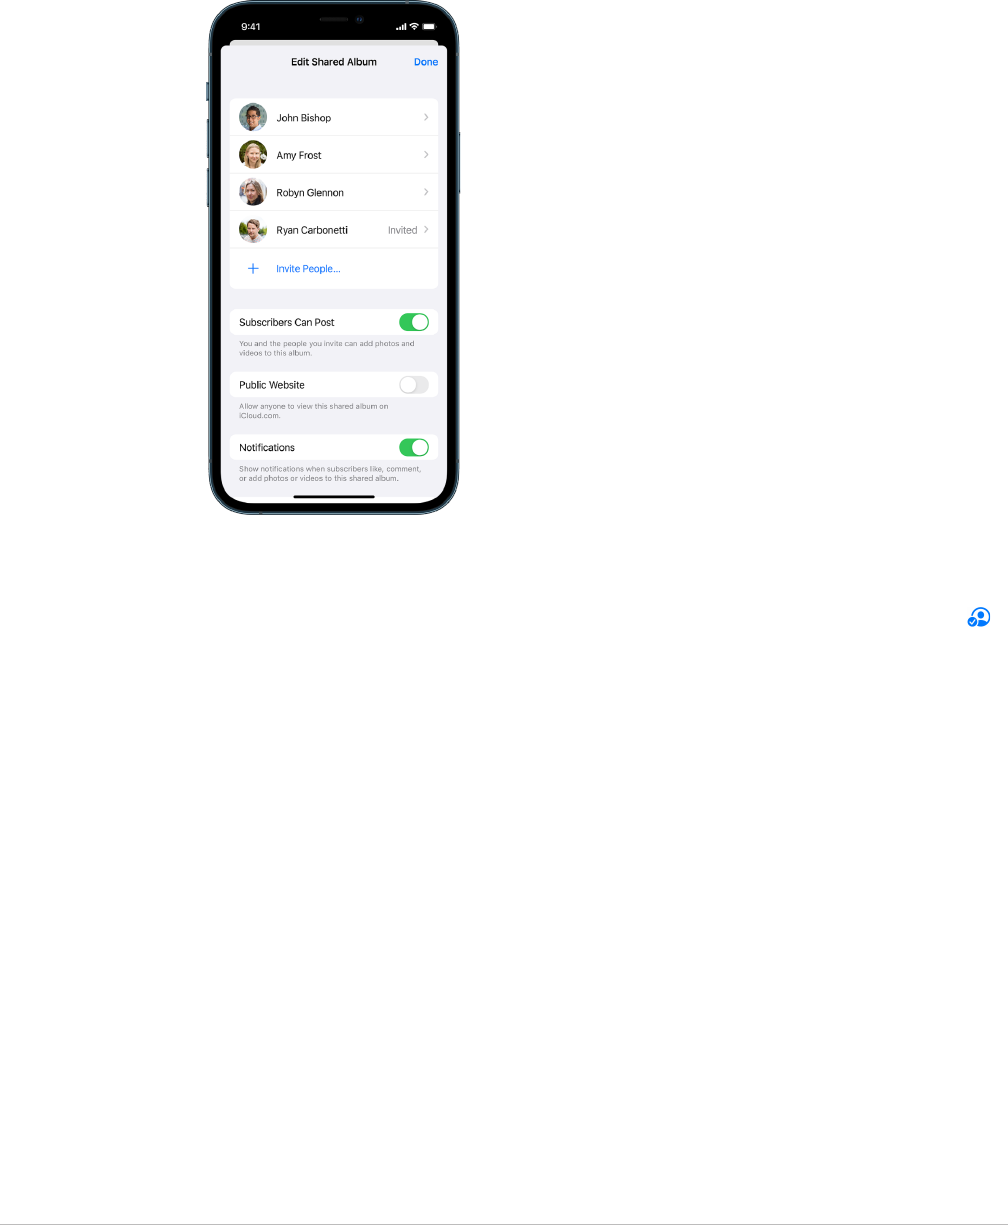
1. Select a shared album on your iPhone or iPad, then tap the Add Subscribers button .
2. Do any of the following:
• Invite new subscribers: Tap Invite People, then enter the names of the subscribers
you want to add.
Subscribers can add photos and videos to the album. Turn off the Subscribers Can
Post button so only you can add photos and videos.
• Remove subscribers: Tap the name of the subscriber, then tap Remove Subscriber.
• Turn notifications off: Tap the Notifications button. Tap again to turn Notifications
on.
To learn more, see:
• “Share photos and videos on iPhone” in the iPhone User Guide
(https://support.apple.com/guide/iphone/iphf28f17237)
• “Share photos and videos on iPad” in the iPad User Guide
(https://support.apple.com/guide/ipad/ipad4f44c78f)
31Apple Personal Safety User Guide
Remove participants from a Shared Library in Photos
iCloud Shared Photo Library lets you share photos and videos seamlessly with up to five
other people. When you contribute photos and videos to iCloud Shared Photo Library,
they move out of your Personal Library and into the Shared Library. With Shared Library
you can choose what to share, and you can automatically share content straight from the
camera. All participants can add, edit, and delete content in the Shared Library. And the
person who set up the Shared Library—the library creator—provides iCloud storage for all
of the content.
If you’re the library creator, you can remove participants from the Shared Library or delete
your Shared Library at any time. When you remove a participant from your Shared Library,
they receive a notification and can copy all of the items in the Shared Library to their
Personal Library. A participant can’t remove other participants.
Note:Shared Libraries in Photos require iOS16 or iPadOS16.1 or later. To find the software
version installed on your device, go to Settings > General, then tap About.
1. Do any of the following:
• To remove participants from a Shared Library, go to Settings > Photos > Shared
Library, then tap Delete Participants.
• To leave a Shared Library, go to Settings > Photos > Shared Library, then tap Leave
Shared Library.
When you leave a Shared Library, you can copy everything from the Shared Library
into your own library, or just the content you contributed.
• To delete a Shared Library, you must be the organizer. Go to Settings > Photos >
Shared Library, then tap Delete Shared Library.
All participants are notified that the Shared Library has been deleted.

32Apple Personal Safety User Guide
To learn more, see:
• “Set up or join an iCloud Shared Photo Library in Photos” in the iPhone User Guide
(https://support.apple.com/guide/iphone/iph28ac9ea81)
• “Set up or join an iCloud Shared Photo Library in Photos” in the iPad User Guide
(https://support.apple.com/guide/ipad/ipad94c5ed43)
Manage calendar sharing settings
If you previously invited a person to share your calendar, you can manage their ability to
edit the calendar or you can stop sharing the calendar with that person.
If you’re the Calendar owner and would like to stop sharing, tap the name of the subscriber
for options. If you’re a subscriber, select Delete Calendar to remove the shared calendar.
1. Tap Calendar on your iPhone or iPad, then tap the Info button next to the shared
calendar you want to edit.
2. Tap a person, then do any of the following:
• Turn Allow Editing on or off.
• Tap Stop Sharing.
To learn more, see:
• “Share iCloud calendars on iPhone” in the iPhone User Guide
(https://support.apple.com/guide/iphone/iph7613c4fb)
• “Share iCloud calendars on iPad” in the iPad User Guide
(https://support.apple.com/guide/ipad/ipadc2a14a22)
Manage shared Tab Groups in Safari
You can share a Tab Group and collaborate with people who use iCloud. A shared tab group
can have a total of 100 participants. Participants can add and remove tabs from the Tab
Group, and everyone sees updates in real time.
Everyone you collaborate with must be signed in with their AppleID, have Safari turned on
in iCloud settings (https://support.apple.com/guide/iphone/iphde0f868fd), and have two-
factor authentication turned on.
1. Tap Safari , then tap the Collaborate button at the top-right corner.
2. Tap Manage Shared Tab Group, then do any of the following:
• Remove someone: Tap a name, then tap Remove Access.
• Stop sharing with everyone: Tap Stop Sharing.
• Add someone: Tap Share With More People, then invite them.
To learn more, see:
• “Add and remove people from a shared Tab Group” in the iPhone User Guide
(https://support.apple.com/guide/iphone/iph4a323d663#iph5f23c7659)
• “Add and remove people from a shared Tab Group” in the iPad User Guide
(https://support.apple.com/guide/ipad/ipad76b9549e#iPad252604e8)

33Apple Personal Safety User Guide
Manage Shared with You settings by person
When someone shares content with you from the Music, AppleTV, News, Photos,
Podcasts, and Safari apps, Shared with You can automatically organize it into a Shared with
You section for easy access.
Content that’s shared with you in the Messages app is automatically organized in a Shared
with You section in the Music, AppleTV, News, Photos, Podcasts, and Safari apps. If there
is content shared with you through Messages that you don’t want to appear in associated
apps, you can turn off this feature by person.
1. Tap Messages on your iPhone or iPad, then tap the conversation whose content you
don’t want to share across apps.
2. When the thread opens, tap the person’s name at the top.
3. Turn off Show in Shared with You, then tap Done.
To learn more, see:
• “Use Messages to receive and share content with friends” in the iPhone User Guide
(https://support.apple.com/guide/iphone/iphb66cfeaad)
• “Use Messages to receive and share content with friends” in the iPad User Guide
(https://support.apple.com/guide/ipad/ipad5bf3d77b)
Manage Shared with You settings by app
If you want to turn Shared with You on or off within the Music, AppleTV, News, Photos,
Podcasts, or Safari apps, you can adjust your settings.
• On your iPhone or iPad, go to Settings > Messages > Shared with You, then turn off
Automatic Sharing or turn off Shared with You for a specific app.

34Apple Personal Safety User Guide
Manage Activity sharing on AppleWatch
If you have an AppleWatch and previously shared your Activity rings with someone,
they can see information about your activity level and workouts. It doesn’t give them any
information about your location.
You can hide your progress, or stop sharing your activity with a particular person entirely,
from the Sharing tab in the Activity app. If you stop sharing your activity, that person isn’t
notified.
1. Open the Activity app on your AppleWatch.
2. Swipe left, then turn the Digital Crown to scroll to the bottom of the screen.
3. To remove someone you’re sharing with, tap their name, then tap Remove.
To learn more, see:
• “Share your activity from AppleWatch” in the AppleWatch User Guide
(https://support.apple.com/guide/watch/apd68a69f5c7)
35Apple Personal Safety User Guide
Securely control whom you share content with
from Mac
You can share content securely with others on your Apple devices using any of several
different methods. With each method, you can view people you’re sharing with and you can
also remove them from shared content on your Mac.
To control whom you share content with from an iPhone, iPad, and AppleWatch,
see “Securely control whom you share content with from iPhone, iPad, and Apple Watch”
earlier in this document.
How to manage file sharing settings for AirDrop on Mac
AirDrop is an easy way to share images, documents, or other files between Apple devices
that are near each other. You can set it up so that everyone near you can share, so that
only your contacts can share, or so that no one can share.
Note:The Contacts Only option is available on devices with iOS10, iPadOS13.1, and
macOS10.12, or later. If your device uses an earlier software version and you want to limit
who can send files to you over AirDrop, you can turn AirDrop on when you need it and then
disable it when you don’t.
36Apple Personal Safety User Guide
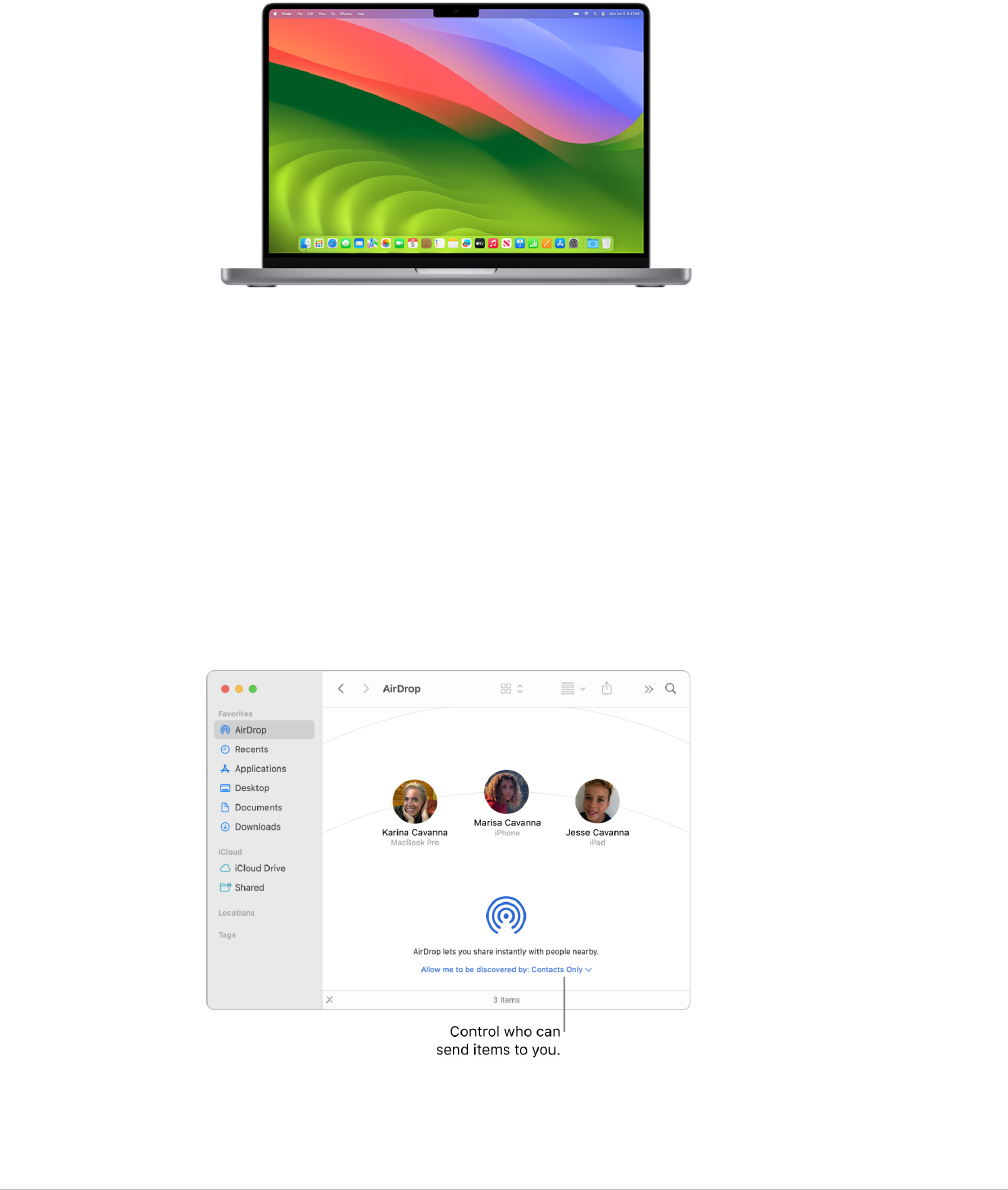
Use the Finder to manage AirDrop
1. On your Mac, click the Finder icon in the Dock to open a Finder window.
2. In the Finder sidebar, click AirDrop.
3. In the AirDrop window, click the “Allow me to be discovered by” pop-up menu,
then choose an option that works best for you.
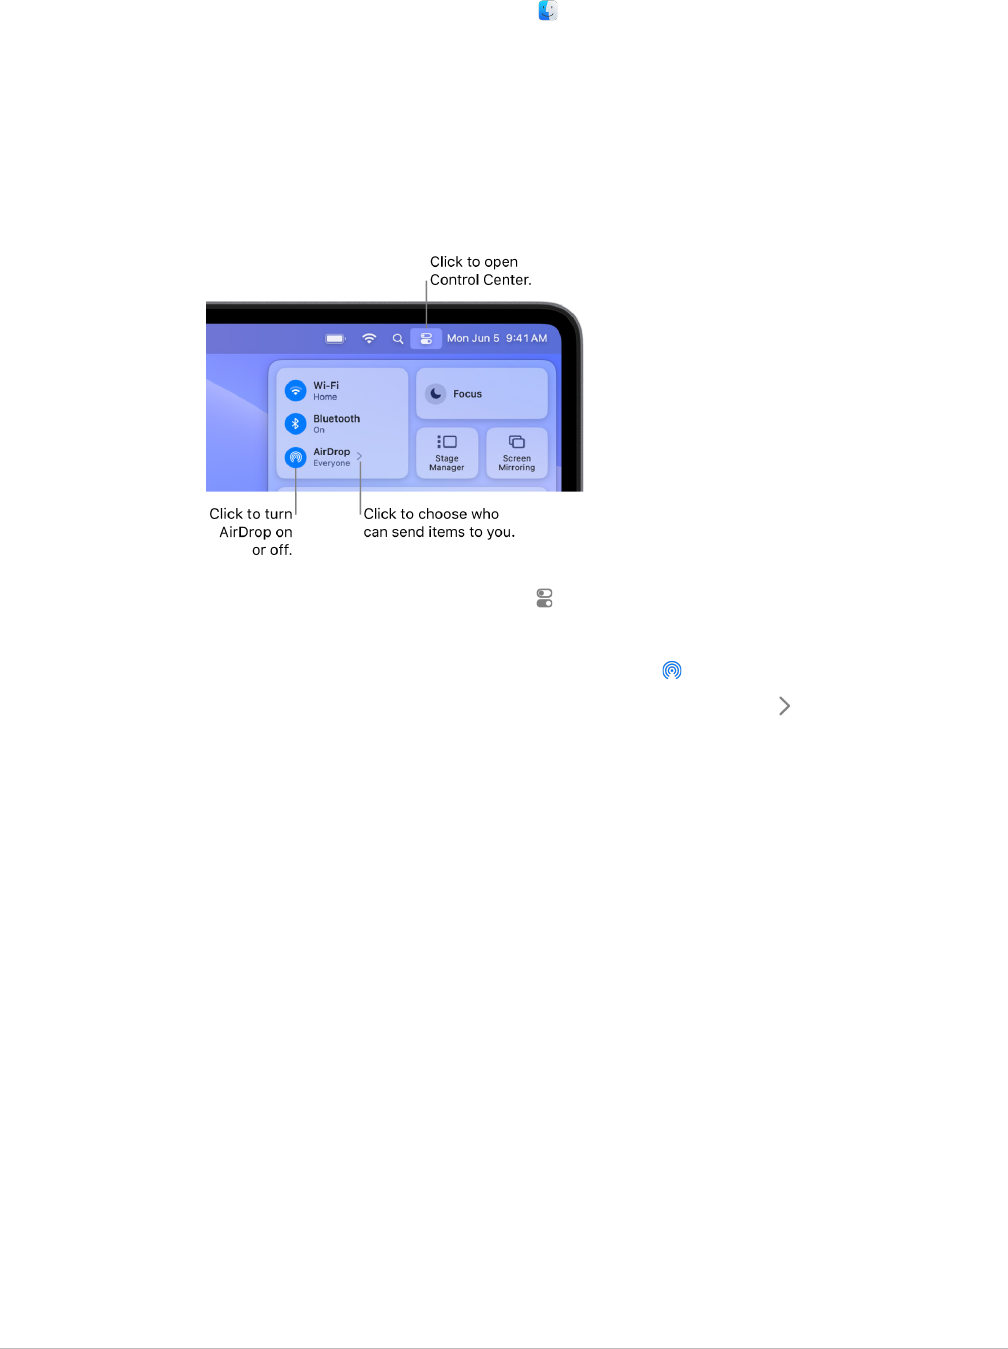
Use Control Center to manage AirDrop on Mac
You can use Control Center on Mac to quickly turn AirDrop on or off and choose who can
send items to you using AirDrop.
1. On your Mac, click Control Center in the menu bar.
2. Do any of the following:
• Turn AirDrop on or off: Click the AirDrop icon .
• Choose who can send items to you: Click the arrow button next to AirDrop,
then choose an option that works best for you.
To learn more, see:
• “Use AirDrop on your Mac to send files to devices near you” in the macOS User Guide
(https://support.apple.com/guide/mac-help/mh35868)

37Apple Personal Safety User Guide
Manage sharing settings for Shared Albums in Photos on Mac
With Shared Albums in Photos on Mac, you choose the photos and videos you want to
share and the people you want to share them with. You can also change your sharing
settings at any time. If you stop sharing a photo or an album with someone, they don’t
receive a notification and their access to the shared album and its contents is removed.
If you’re a subscriber to a shared album, you can delete any photos that you shared.
You can also select Unsubscribe to unsubscribe from the shared album.
1. Open the Photos app on your Mac, then click a shared album under Shared Albums in
the sidebar.
2. Click the People button in the toolbar.
3. In the Invite People field, do one of the following:
• Invite new subscribers: Enter an email address.
If the person you’re inviting doesn’t use iCloud, you can select the Public Website
checkbox to create a URL for your shared album. Anyone with this URL can view and
download the shared album’s contents.
• Remove subscribers: Select the subscriber’s email address, then press Delete.
• Reinvite a subscriber: Click the down arrow beside the subscriber’s name and
choose Resend Invitation.
To learn more, see:
• “What are shared albums in Photos on Mac?” in the Photos User Guide
(https://support.apple.com/guide/photos/pht7a4c765b)
• “Subscribe to shared albums in Photos on Mac” in the Photos User Guide
(https://support.apple.com/guide/photos/pht884a8908)

38Apple Personal Safety User Guide
Remove participants from a Shared Library in Photos on Mac
iCloud Shared Photo Library lets you share photos and videos seamlessly with up to five
other people. When you contribute photos and videos to iCloud Shared Photo Library,
they move out of your Personal Library and into the Shared Library. With Shared Library
you can choose what to share, or automatically share content straight from the camera.
All participants have equal permissions to add, edit, and delete content in the Shared
Library, while the person who set up the Shared Library, the library creator, provides iCloud
storage for all of the content.
If you’re the library creator, you can remove participants from the Shared Library or
delete your shared library at any time. When you remove a participant from your Shared
Library, they receive a notification and can copy all of the items in the Shared Library to
their Personal Library. A participant can’t remove other participants. If a participant has
been part of the Shared Library for less than 7 days, they can only retrieve the items they
contributed.
Note:Shared Libraries in Photos on Mac requires macOS13 or later. To find the software
version installed on your device, from the Apple menu in the upper-left corner of your
screen, choose About This Mac.
1. In the Photos app on your Mac, choose Photos > Settings, then click Shared Library.
2. Click the More button next to the person you want to remove, then choose Remove.
3. Click Remove from Shared Library.
To learn more, see:
• “What is iCloud Shared Photo Library in Photos on Mac?” in the Photos User Guide
https://support.apple.com/guide/photos/pht153ab3a01

39Apple Personal Safety User Guide
Leave or delete a Shared Library in Photos on Mac
Participants can choose to leave a Shared Library at any time. If you’re the organizer of
a Shared Library, you can delete it. When you delete the Shared Library, all participants
receive a notification and can choose to keep all of the items in the Shared Library in their
Personal Library.
If you leave a Shared Library less than 7 days after joining, you can keep only the items you
contributed.
Note:Shared Libraries in Photos on Mac requires macOS13 or later. To find the software
version installed on your device, from the Apple menu in the upper-left corner of your
screen, choose About This Mac.
1. In the Photos app on your Mac, choose Photos > Settings, then click Shared Library.
2. Click Leave Shared Library (if you’re a participant) or Delete Shared Library (if you’re
the organizer).
3. Select one of the following options:
• Keep everything: Add all the photos in the Shared Library to your Personal Library.
• Keep only what I contributed: Add only photos that you contributed to the Shared
Library to your Personal Library.
4. Click Delete Shared Library, then click Delete Shared Library again to confirm the
deletion.
To learn more, see:
• “What is iCloud Shared Photo Library in Photos on Mac?” in the Photos User Guide
https://support.apple.com/guide/photos/pht153ab3a01
• “Leave or delete a Shared Library” in the Photos User Guide
(https://support.apple.com/guide/photos/pht4dd77b3aa#pht82b300b22)

40Apple Personal Safety User Guide
Manage calendar sharing settings on Mac
If you previously invited a person to share your calendar, you can manage their ability to
edit the calendar or you can stop sharing the calendar with that person.
If you’re the Calendar owner and would like to stop sharing, tap the name of the subscriber
for options. If you’re a subscriber, you can select Delete Calendar to remove the shared
calendar.
1. Open the Calendar app on your Mac.
2. Do one of the following:
• On your Mac running macOS13 or later: Choose Calendar > Settings.
• On your Mac running macOS12 or earlier: Choose Calendar > Preferences.
3. Click Accounts, select the calendar account, then click Delegation.
A CalDAV account appears in the “Accounts I can access” list.
Note:For a Microsoft Exchange account, click the Add button , then enter the user
name of the person who gave you access.
To learn more, see:
• “Share calendar accounts on Mac” in the Calendar User Guide
(https://support.apple.com/guide/calendar/icl27527)
Manage shared Tab Groups in Safari on Mac
You can share a Tab Group and collaborate with people who use iCloud. A shared tab group
can have a total of 100 participants. Participants can add and remove tabs from the Tab
Group, and everyone sees updates in real time.
Everyone you collaborate with must be signed in with their AppleID, have Safari turned on
in iCloud settings, and have two-factor authentication turned on.
1. In the Safari app on your Mac, click the Collaborate button in the toolbar.
2. Click Manage Shared Tab Group, then do any of the following:
• Remove someone: Click a name, click Remove Access, then click Continue.
• Stop Sharing with everyone: Click Stop Sharing, then click Continue.
• Add someone: Click Share With More People, then click Messages to invite them.
To learn more, see:
• “Add and remove people from a shared Tab Group” in the Safari User Guide
(https://support.apple.com/guide/iphone/iph4a323d663#iph5f23c7659)

41Apple Personal Safety User Guide
Manage Shared with You settings by person on Mac
1. Open the Messages app on your Mac, then select the conversation.
2. Click the Details button in the top-right corner of a conversation, then deselect Show
in Shared with You to remove shared content from the Shared with You section.
When Shared with You is turned off, you can still pin shared content to show it in the
corresponding app.
To learn more, see:
• “Keep track of shared content in Messages on Mac” in the Messages User Guide
(https://support.apple.com/guide/messages/ichtdc9ebc32)
Manage Shared with You settings by app on Mac
If you want to turn Shared with You on or off within the Music, AppleTV, News, Photos,
Podcasts, or Safari apps, you can adjust your settings on Mac.
1. Open the Messages app on your Mac.
• On your Mac running macOS13 or later: Choose Messages > Settings.
• On your Mac running macOS12 or earlier: Choose Messages > Preferences.
2. Click Shared with You, then do one of the following:
• Turn off all apps: Click Turn Off.
• Turn off selected apps: Deselect apps.
42Apple Personal Safety User Guide
Manage your location
Share or stop sharing your location with people
FindMy for iPhone, iPad, Mac, and AppleWatch helps you keep track of your devices and
lets you and other people share your locations with each other.
If youset up Family Sharingand use Location Sharing, your family members automatically
appear in the People tab, although they still have to share their location with you.
See “Manage Family Sharing settings” later in this document.
43Apple Personal Safety User Guide
Location sharing details and where they are viewable
When you share your location with other people through FindMy, they can view it in the
apps listed in the table below.
If you and the person you share your location with both have an iPhone with iOS15 or later,
you also share your Live Location in all the apps listed below. If you’re on the move, they
can get a sense of the direction you’re traveling in and your speed.
App Description
FindMy
In the FindMy app, others can go to the People tab and
tap your name to see your location.
FindMy
If you and another person both share location with
each other, both have an iPhone15, and are near
each other, you can use Precision Finding to find each
other’s exact location. When you’re located near this
person, Precision Finding helps them find you, until
they’re within a few feet of your location. If someone’s
trying to find you with Precision Finding, you receive a
notification that they’re trying to locate you.
To learn more, see Use Precision Finding on iPhone
15 to meet up with a friend in the iPhone User
Guide. (https://support.apple.com/guide/iphone/
iph3effd0ed6)
FindMy
If you set up Family Sharing and use Location Sharing,
your family members automatically appear in the
People tab but location sharing won’t start until you
share your location with each other. See Manage Family
Sharing settings later in this document.

44Apple Personal Safety User Guide
App Description
Messages
In Messages, when others tap on your contact icon,
they are taken to a Details view that shows your current
location shared through FindMy.
Messages
In Messages in iOS17 and iPadOS17 or later, others
can also see your approximate location at the top of
the Messages thread.
Maps
In Maps, when others search for your name, they see
your current location being shared through FindMy on
their Map.
Review and remove notifications about you
You can use the FindMy app to notify a friend when your location changes
(https://support.apple.com/guide/iphone/iph9bfec93b1). People you share location with
can also set up notifications to see when your location changes.
You can turn off any location notification about you. This includes notifications you set and
notifications your friends create. To see all notifications about you:
1. Do one of the following:
• On your iPhone or iPad: Open the FindMy app , then tap Me.
• On your Mac: Open the FindMy app , click Me, then click the Info button .
2. Look for a Notifications About You section.
• If you do see the Notifications About You section, select a name to see more details.
• If you don’t see the Notifications About You section, your friends aren’t notified
when your location changes.
3. If you see a notification you want to delete, select a name, then select a notification.
4. Delete the notification, then confirm that you want to delete the notification.
Stop sharing your location in FindMy on iPhone and iPad
When you stop sharing through either of the methods listed below, your location
disappears from the other person’s FindMy app on their devices.
Note:If the FindMy app has been deleted from your device, you can turn off Location
Services (go to Settings > Privacy & Security > Location Services) to help ensure that your
location isn’t being shared. Then download the Find My app from the App Store again.
1. Open the FindMy app .
2. Do one of the following:
• To stop sharing with a one person: Select the People tab, find the person you want
to stop sharing with and tap their name, then scroll down and tap Stop Sharing My
Location.
• To stop sharing with everyone: Select the Me tab, then turn off Share My Location.

45Apple Personal Safety User Guide
Stop sharing your location in Messages on iPhone and iPad
When you stop sharing through any of the methods listed below, your location disappears
from the other person’s Messages app on their devices.
1. Open the Messages app .
2. Do one of the following:
• To stop sharing messages in a conversation: Choose the conversation with the
person you want to stop sharing with, tap on the person’s name at the top of the
conversation, then tap “Stop Sharing.”
• To stop sharing by deleting the conversation: In the Messages conversation list,
swipe left on the conversation, tap , then tap Yes to confirm you’d like to stop
sharing your location with the participants in this conversation.
Stop sharing your location in Contacts on iPhone and iPad
When you stop sharing through either of the methods listed below, your location
disappears from the other person’s Contacts apps on their devices.
1. Open the Contacts app .
2. Tap the person’s name.
3. Tap “Stop Sharing My Location.”
When to disable FindMy iPhone for a lost or stolen device
To deter theft and help you find your phone if it’s lost, you can turn on FindMy iPhone in
Settings > [your name] > FindMy.
When FindMy iPhone is turned on, your device may be findable through the FindMy
network for up to 24 hours after it has been powered off or disconnected from the internet.
The location of your device is visible through FindMy in the Devices tab on your other
devices, and to anyone in Family Sharing you share your location with.
If you need to get to a safe location and you want to turn off your device, but you’re
concerned that someone else may use this feature to find your location, you can
temporarily turn off FindMy Network when you power off the device by tapping
iPhone Findable After Power Off (under Slide to Power Off) and following the onscreen
instructions. Use the task below if you want to disable this feature.
Important:When you turn off FindMy [device] and FindMy network, you won’t be able to
locate, lock, or erase your device if it’s lost or stolen.
• On your iPhone or iPad: Go to Settings > [your name] > FindMy > FindMy iPhone >
FindMy network.
Disabling this feature means you can’t use it if your device is lost or stolen and powered
down.
• On your Mac running macOS13 or later: Choose Apple menu > System Settings,
click AppleID , click iCloud, then click Options next to FindMy Mac.
• On your Mac running macOS12 or earlier: Choose Apple menu > System Preferences,
click AppleID , click iCloud, then click Options next to FindMy Mac.
46Apple Personal Safety User Guide
Manage automatic ETA sharing in Maps
In Maps on iPhone and iPad (Wi-Fi + Cellular models), you’re able to automatically share
your estimated time of arrival (ETA) to a Favorite location with anyone in your Contacts.
After you set this up, each time you navigate to the Favorite location, your ETA is shared
with the contacts. After you’re on your route, the bottom of the screen indicates you’re
sharing ETA with other people.
Manage ETA sharing on your iPhone and iPad
1. In the Maps app on your iPhone or iPad (Wi-Fi + Cellular models), tap your profile
icon to the right of the search bar.
2. Select Favorites to open a window containing all of the locations you’ve designated as a
Favorite.
3. Tap the Info button next to the Favorite point of interest.
4. Scroll down to the Share ETA section to review whom you’re automatically sharing your
ETA with.
5. To remove someone, tap the Remove button beside the name of the person you want to
remove.
6. To add someone, tap Add Person, then select the person from your Contacts you want
to automatically share your ETA with for this point of interest.
7. Repeat steps 3–6 for all additional points of interest in your Favorites.

47Apple Personal Safety User Guide
Stop automatic ETA sharing after navigating has started
You can stop automatic ETA sharing even after you begin navigating to a Favorite location.
If you stop sharing your ETA using this method, the person has already received a
notification on their device informing them that you’re navigating to the Favorite location
you selected; however, they’re no longer able to access your ETA or route information.
Important:This method doesn’t permanently remove automatic sharing with that person.
The next time you navigate to this same Favorite location, automatic ETA sharing begins
again. To prevent this, you must remove the contact from Share ETA in the Favorite
location.
1. In the Maps app on your iPhone or iPad (Wi-Fi + Cellular), “Tap the Sharing with
[Name of Contact]” at the bottom of the screen.
2. Identify the person on the list you no longer want to share your ETA with.
3. Select “Tap to stop,” located under that person’s name.
48Apple Personal Safety User Guide
Manage Location Services settings
With your permission, Location Services allows apps (like Maps, Camera, Weather, and
others) and websites to use information from various kinds of networks to determine your
approximate or precise location. You can find Location Services on iPhone, iPad, and Mac.
When an app is using Location Services, the Location Services icon appears on iPhone
and iPad (in the status bar at the top of the screen) and on Mac (in the menu bar).
Even if you disable Location Services, third-party apps and websites may still use other
ways to determine your location. For safety, your device’s location information may be used
for emergency calls to aid response efforts regardless of whether you turn on Location
Services.
Turn off Location Services
When you set up a device, you’re asked if you want to turn on Location Services.
After you’ve completed setup, you can turn Location Services on or off at any time.
• On your iPhone or iPad: Go to Settings > Privacy & Security > Location Services and
turn off location sharing.
• On your Mac running macOS13 or later: Choose Apple menu > System Settings,
click Privacy & Security , click Location Services, turn off Location Services, enter
your password, then click Unlock.
• On your Mac running macOS12 or earlier: Choose Apple menu > System Preferences,
click Security & Privacy , then click Privacy. Click Location Services. If the lock at the
bottom left is locked , click it to unlock the preference pane. Deselect Enable Location
Services.

49Apple Personal Safety User Guide
Turn on Location Services
When you set up a device, you’re asked if you want to turn on Location Services.
After you’ve completed setup, you can turn Location Services on or off at any time.
If you didn’t turn on Location Services at setup:
• On your iPhone or iPad: Go to Settings > Privacy & Security > Location Services and
turn on Location Services.
• On your Mac running macOS13 or later: Choose Apple menu > System Settings,
click Privacy & Security , click Location Services, turn on Location Services, enter
your password, then click Unlock.
• On your Mac running macOS12 or earlier: Choose Apple menu > System Preferences,
click Security & Privacy , then click Privacy. Click Location Services. If the lock at the
bottom left is locked , click it to unlock the preference pane. Select Enable Location
Services.
Specify which apps can use Location Services on iPhone or iPad
Some apps might not work unless you turn on Location Services. The first time an app
needs to access your Location Services information, you receive a notification asking for
permission. Choose one of these options:
• Allow Once
• Allow While Using App
• Don’t Allow
You can also review or change an individual app’s access to your location for individual
apps and indicate how often it may use your location. Instructions follow for iPhone
and iPad.
1. Go to Settings > Privacy & Security > Location Services and review or change access
settings for an app.
To see its explanation for requesting Location Services, tap the app.
2. Determine how closely you want apps to know your location.
• To allow an app to use your specific location, leave Precise Location turned on.
• To share only your approximate location—which may be sufficient for an app that
doesn’t need your exact location—you can turn Precise Location off.
Note:If you set the access for an app to Ask Next Time, you’re asked to turn on
Location Services again the next time an app tries to use it.

50Apple Personal Safety User Guide
Specify which apps can use Location Services on Mac
1. Do one of the following:
• On your Mac running macOS13 or later: Choose Apple menu , click System
Settings, click Privacy & Security , click Location Services, turn off Location
Services, enter your password, then click Unlock.
• On your Mac running macOS12 or earlier: Choose Apple menu > System
Preferences > Security & Privacy , click Location Services, then deselect Enable
Location Services. You may need to first unlock System Preferences to make
changes. To do this, click the Lock button in the bottom-left corner, then enter
your password.
2. Select the checkbox next to an app to allow it to use Location Services. Deselect the
checkbox to turn off Location Services for that app.
If you turn Location Services off for an app, you’re asked to turn it on again the next
time that app tries to use your location data.
3. Scroll to the bottom of the list of apps to reveal System Services, then click the Details
button to see specific system services that use your location.
To allow the location of your Mac to be used by Siri Suggestions and Safari Suggestions,
select Location-Based Suggestions.
To allow your Mac to identify places significant to you and provide useful related
information in Maps, Calendar, Reminders, and more, select Significant Locations.
Significant locations are encrypted and can’t be read by Apple. Click Details to view a
list of locations that have been identified. To remove a location from the list, select it
and click the Remove button . To remove all the locations, click the More button ,
then click Clear History.
Stop and remove location metadata in Photos
When location services is turned on for the Camera app, it uses information gathered
from cellular, Wi-Fi, GPS networks, and Bluetooth® to determine the location of photos
and videos. This location metadata is embedded into each photo and video so that you
can later search for photos and videos in the Photos app based on the location they were
taken, or view collections in the Places album.
When photos and videos that include location metadata are shared, the people you share
them with may be able to access the location metadata and learn where it was taken.
If you’re concerned about someone having access to the location metadata associated
with your photos or videos, you can remove the current metadata and stop it from being
collected in the future.

51Apple Personal Safety User Guide
Review photos that contain location metadata on iPhone or iPad
You can use the Places album in Photos to easily review the photos in your library that have
location metadata embedded.
1. Open the Photos app , then tap Albums.
2. Tap the Places album, then do any of the following:
• If you want to review the photos from a specific time period, tap Grid to view in
chronological order.
• If you want to review by location taken, tap Map to view by location.
Review photos that contain location metadata on Mac
You can use the Places album in Photos to easily review the photos in your library that have
location metadata embedded.
1. In the Photos app on your Mac, select the photos you want to review.
2. Click the Info button , then review the location information.
Remove location metadata in Photos on iPhone or iPad
To remove location metadata associated with a certain photo:
1. Open the Photos app , then tap Albums.
2. Tap the Places album, then do one of the following:
• If you want to review the photos from a specific time period, tap Grid to view in
chronological order.
• If you want to review by location taken, tap Map to view by location.
3. Open the photo you want to remove location metadata from, then tap the Info button
or swipe up.
You’ll see an image in the Maps app showing where the photo was taken.
4. To remove the location metadata, tap Adjust, then tap Remove Location.
Remove location metadata in Photos on Mac
To remove location metadata associated with photos:
1. In the Photos app on your Mac, select the photos you want to change.
2. Choose Image > Location, then choose Hide Location or Revert to Original Location.

52Apple Personal Safety User Guide
Stop location metadata collection in Camera on iPhone or iPad
Location metadata in photos and videos can only be collected if your Camera app has
access to Location Services.
• Go to Settings , tap Privacy & Security > Location Services > Camera, then tap Never.
If you don’t want to completely stop collecting location metadata, you can turn off
Precise Location instead of selecting Never. This allows the Camera app to collect data
on your approximate location instead of on your specific location.
Don’t show location metadata when you share photos in Photos on iPhone or iPad
You can share photos with others without sharing the location where the photos were
taken.
1. Do any of the following:
• Open the Camera app , select the camera roll, then select one or more photos you
want to share.
• Open the Photos app , then select one or more photos you want to share.
2. Tap the Share Sheet , then tap Options.
3. Turn off Location, then tap Done.
4. Share the photos using on of the methods shown in the Share Sheet.

53Apple Personal Safety User Guide
Detecting unwanted trackers
Apple designed AirTags and the FindMy network to help users keep track of belongings
and—at the same time—discourage unwanted tracking. To further help safeguard that no
device is unknowingly tracking users, Apple and Google created an industry standard.
With it, users (both iOS and Android) can be alerted if they are being tracked.
If you feel your safety is at risk, contact your local law enforcement. If the item is an Apple
product, law enforcement can work with Apple to request information related to the item
(https://www.apple.com/legal/privacy/law-enforcement-guidelines-us.pdf). You might need
to provide the AirTag, AirPods, FindMy network accessory, and the device's serial number.
Unwanted tracking alert software availability:
• Unwanted tracking alerts for AirTags and other FindMy accessories are available on
iPhone or iPad running iOS14.5 or iPadOS14.5, or later.
• Unwanted tracking alerts for unknown Bluetooth tracking devices that are compatible
with the Detecting Unwanted Location Trackers industry specification are available on
iPhones running iOS17.5 or later.
(https://datatracker.ietf.org/doc/draft-detecting-unwanted-location-trackers/01/)
• Google provides unwanted tracking detection on devices with Android 6.0 or later.
54Apple Personal Safety User Guide
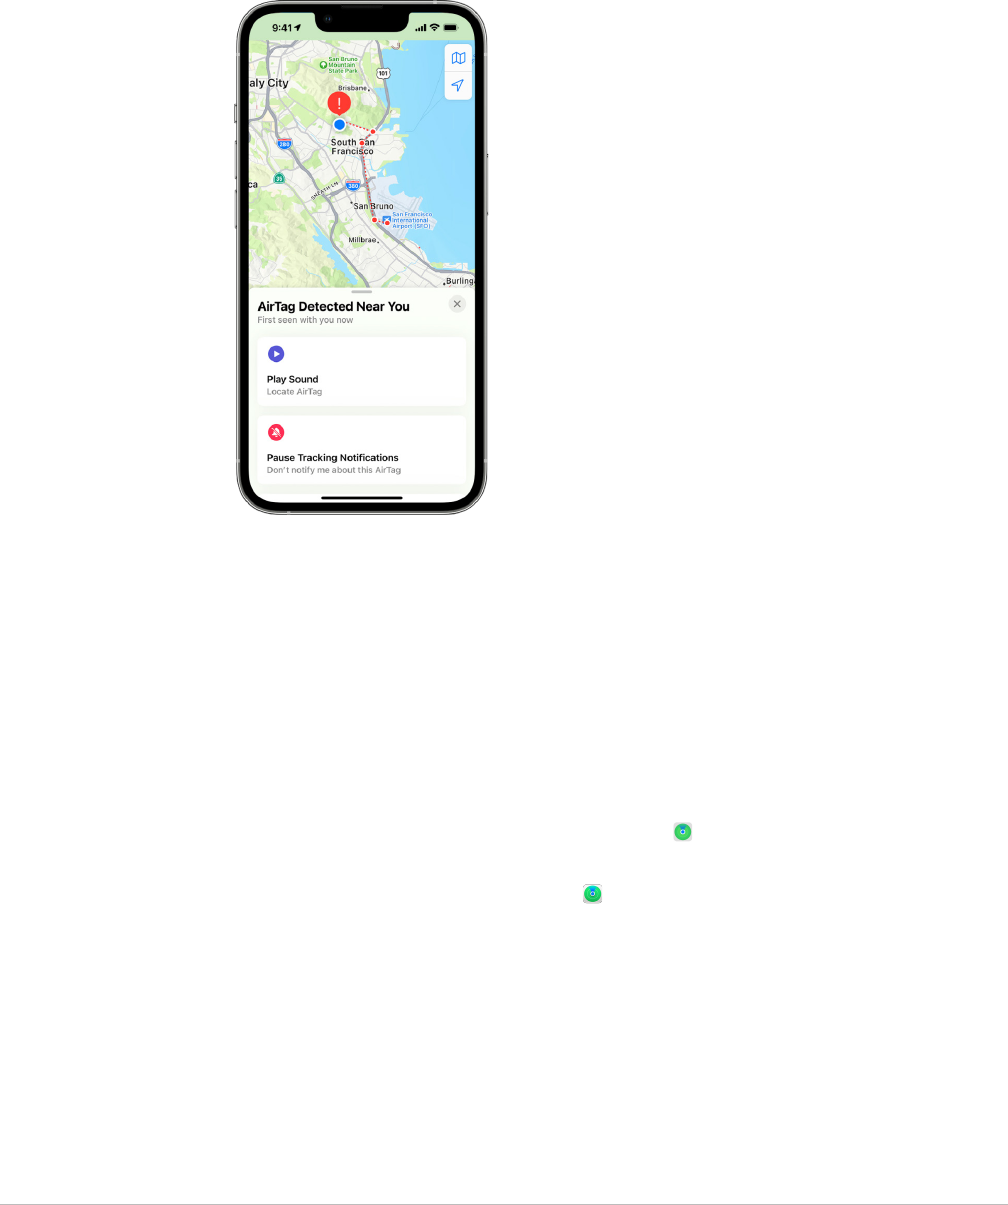
If you get an unwanted tracking alert
Follow these steps to find the item:
1. Tap the alert.
2. Tap continue and then tap Play Sound, or, if you available, tap Find Nearby to use
Precision Finding to help you locate the unknown item.
If the option to play a sound isn’t available or if you’re unable to locate the item with
Precision Finding, the item may not be near you anymore. If you believe the item is still with
you, look through your belongings to try to locate it. Check on your person, or in anything
in your possession that could contain this device. It could be in an item that you don’t
check often, like a jacket pocket, the outer compartment of a bag, or your vehicle. If you
can’t find the device and if you feel your safety is at risk, go to a safe public location and
contact law enforcement.
If you previously received an alert and want to review the information again
1. Do one of the following:
• On your iPhone or iPad: Open the FindMy app , then tap Items, then tap Items
Detected With You.
• On your Mac: Open the FindMy app , click Items, then click Items Detected With
You.
To learn more, see the Apple Support article “What to do if you get an alert that an AirTag,
Find My network accessory, or set of AirPods is with you”
(https://support.apple.com/HT212227).
55Apple Personal Safety User Guide
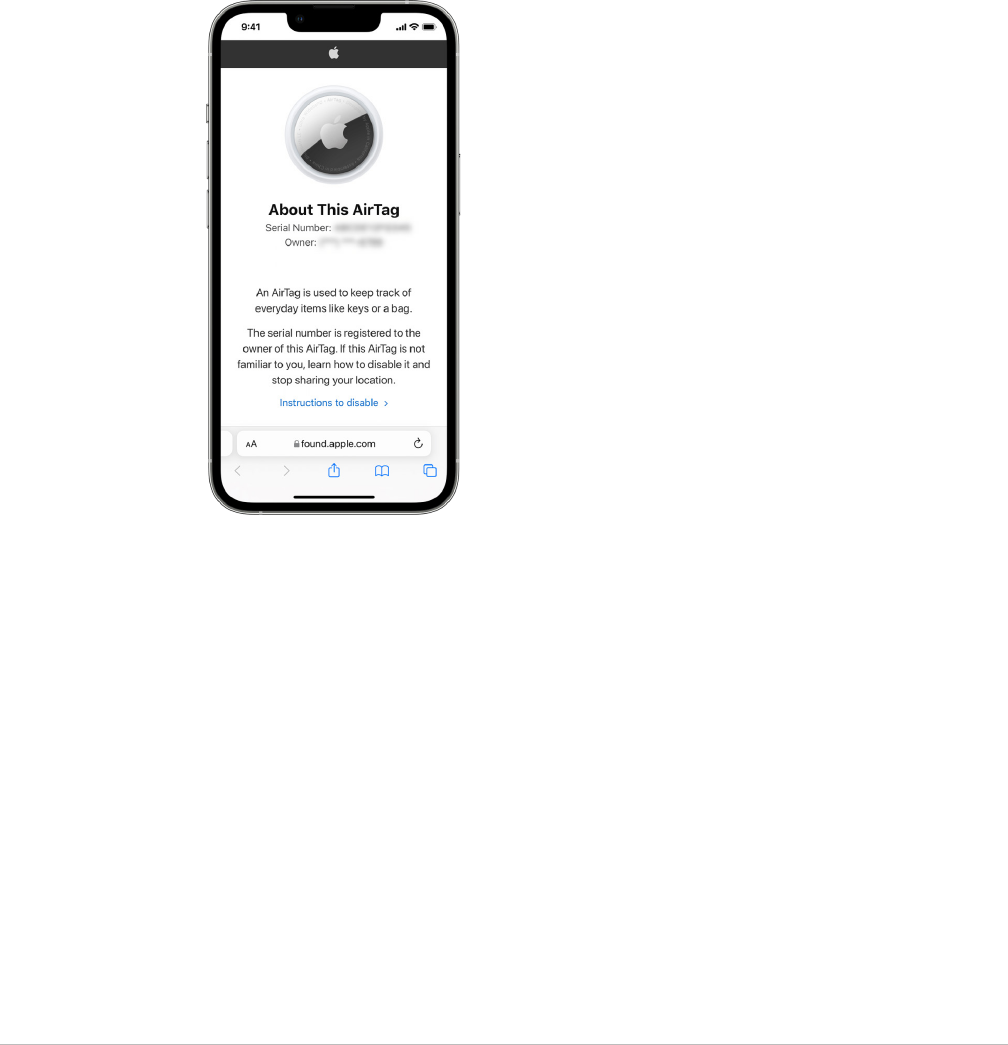
If you find an AirTag, Find My accessory, or compatible Bluetooth tracking device
Follow these steps to get information about it:
1. Hold the top of your iPhone or near the item until a notification appears.
2. Tap the notification. This opens a website that provides information about the item,
including:
• Serial number or device ID
• Last four digits of the phone number or an obfuscated email address of the person
who registered it. This can help you identify the owner, if you know them.
3. If the owner marked the item as lost, you might see a message with information about
how to contact the owner.
56Apple Personal Safety User Guide
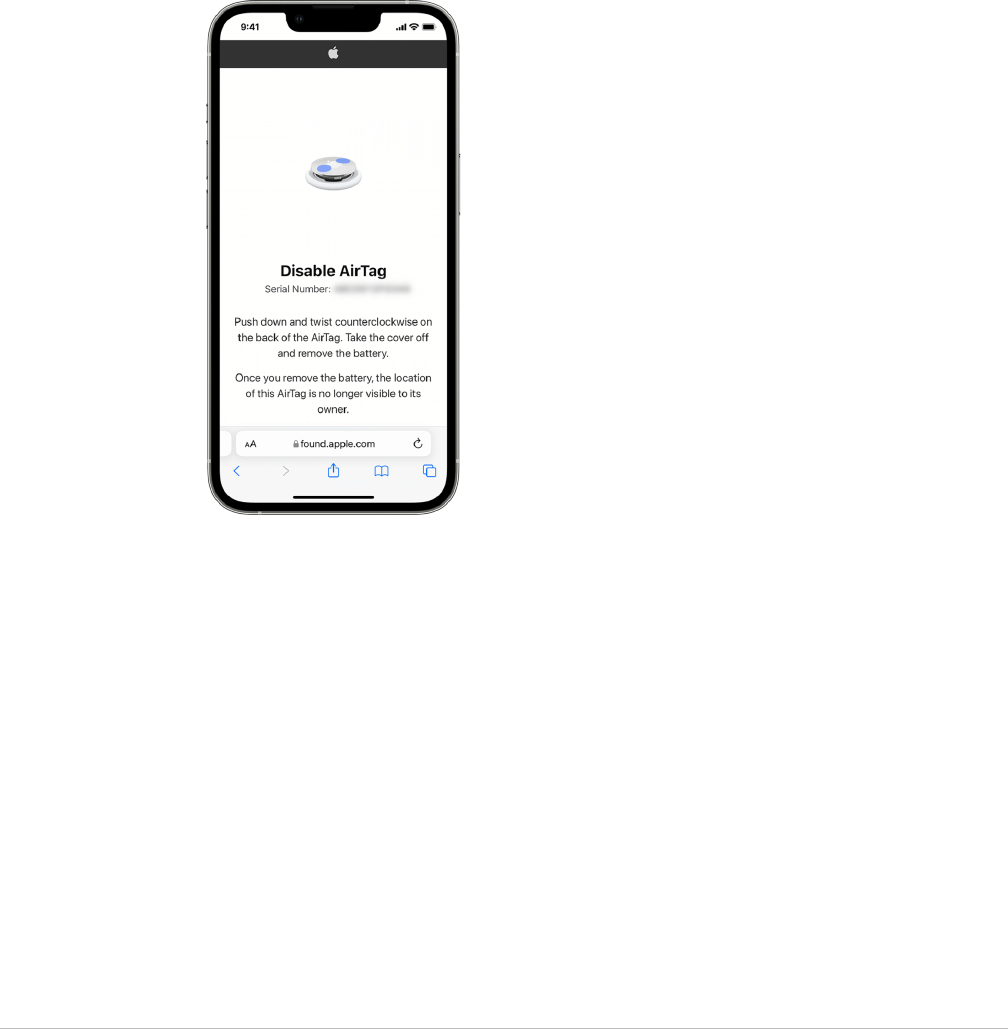
If you are concerned the item might be being used to track you
1. Take a screenshot of the item and owner information for your records.
2. Disable the device and stop it from sharing it’s location by tapping Instructions to
Disable and following the on screen steps.
3. If you feel your safety is at risk, contact your local law enforcement. If the item is an
Apple product, law enforcement can work with Apple to request information related to
the item. You might need to provide the AirTag, AirPods, FindMy network accessory,
and the device’s serial number.
See https://www.apple.com/legal/privacy/law-enforcement-guidelines-us.pdf.
After the item is disabled, the owner can no longer get updates on its current location.
You will also no longer receive any unwanted tracking alerts for this item.
Check for AirTags or Find My accessories using an Android device
Visit the Find Unknown Trackers support page for more information on how to check
for unwanted tracking on Android devices. (https://support.google.com/android/
answer/13658562?visit_id=638525910154486952-839086324&)
If you hear an AirTag make a sound
When moved, any AirTag separated for a period of time from the person who registered it
makes a sound to alert those nearby. If you find an AirTag after hearing it make a sound,
you can use any device that has near-field communication (NFC) technology, such as an
iPhone or Android phone, to see if its owner marked it as lost and help return it. If you feel
your safety is at risk, you can contact your local law enforcement, who can work with Apple
(https://www.apple.com/legal/transparency/government-information.html). You might need
to provide the AirTag or its serial number. (https://support.apple.com/102170)

57Apple Personal Safety User Guide
AirTag item sharing
Item Sharing allows AirTag owners to share the item with up to five people at a time.
Borrowers can:
• See the location of the AirTag in FindMy
• Use Precision Finding to locate the AirTag
• Play a sound if the AirTag is lost
• Be notified when someone new has joined the sharing group
• See each member of the sharing group’s AppleID or Contact Information if the other
member is saved to their Contacts
Note:Borrowers can’t see which borrower has the AirTag
Because everyone in the sharing group can see the location of the AirTag, unwanted
tracking alerts for that AirTag are suppressed for all sharing group members. When
someone leaves the sharing group or when the item owner removes them from the group,
they’re unable to view the location of the AirTag, and unwanted tracking alerts resume.
To learn more, see Share an AirTag or other item in Find My on iPhone in the iPhone User
Guide. (https://support.apple.com/guide/iphone/iph419cc5f28)
Remove yourself from a Sharing Group using Safety Check
Note:After you remove yourself, you can’t see the location of the AirTag, and unwanted
tracking alerts resume. You may want to see if the AirTag is near you before removing
yourself from the share.
1. Go to Settings > Privacy & Security > Safety Check.
2. Tap Manage Sharing & Access.
3. Tap Items > Stop Sharing.
Remove yourself from a Sharing Group using Find My
Note:After you remove yourself, you can’t see the location of the AirTag, and unwanted
tracking alerts resume. You may want to see if the AirTag is near you before removing
yourself from the share.
1. Open the Find My app .
2. Tap Items, and tap the item you’d like to remove yourself from.
3. Tap Remove.

58Apple Personal Safety User Guide
Remove others from a share using Safety Check
1. Tap Settings > Privacy & Security > Safety Check.
2. Tap Manage Sharing & Access > Continue.
3. Tap the name of the person whom you’d like to stop sharing with, then tap
Review Sharing.
4. Tap Items, and tap Stop Sharing.
Remove others from a share using Find My
1. Open the Find My app .
2. Tap Items, then tap the Item name.
3. Tap the name of the sharee whom you’d like to remove.
4. Tap Remove > Stop Sharing.

59Apple Personal Safety User Guide
Safely manage how you forward content
You can review and manage how you forward content and whom you forward it to on an
iPhone, iPad, or Mac.
Manage mail forwarding in iCloud
You can see whether your messages in Mail are being automatically forwarded to another
email address and easily disable forwarding.
1. Sign in to iCloud at https://www.icloud.com with your AppleID user name and password.
If necessary, enter the two-factor authentication code.
2. Click Mail, then click the Settings button at the top of the Mailboxes list, then choose
Preferences.
3. In the General tab, see whether “Forward my email to” is selected and whom it’s being
forwarded to. If necessary, remove the forwarding address and stop forwarding mail
messages.
4. In the Rules tab, review any rules where the “Then” option is set to “Forward to” or
“Forward to an Email Address and Mark as Read,” and if necessary, change the rule
accordingly.
5. Sign out of iCloud.
Manage text message forwarding on iPhone
When you send a message to someone who uses a phone other than an iPhone, your
message is sent as an SMS message. You can set up your iPhone so that when you send or
receive an SMS message, it appears on other devices. You can review the device list and
disable text message forwarding on specific devices.
1. On your iPhone, go to Settings > Messages.
2. Tap Text Message Forwarding to see which devices are able to send and receive text
messages from your device.
3. Turn off certain devices.

60Apple Personal Safety User Guide
Manage call forwarding on Phone
Depending on your cellular carrier, your iPhone may be able to forward calls you receive
to another phone number. You can check to see if calls you receive are being forwarded to
another phone number and turn off this feature.
1. On your iPhone, go to Settings > Phone > Calls > Call Forwarding.
If the slider bar is green, it means that call forwarding is turned on and you can see
which phone number your calls are being forwarded to.
Note:If you don’t see this option, call forwarding is unavailable on your iPhone.
Call your cellular carrier for more information.
2. If necessary, turn off call forwarding.
Turning off call forwarding doesn’t notify the phone number that was receiving
forwarded calls.
61Apple Personal Safety User Guide
Reject unknown sign-in attempts
When you sign in on a new device, you get a notification on your other trusted devices.
The notification includes a map of the new device’s location. This notification can appear
on any trusted device; an iPhone, iPad, or Mac.
This is an approximate location based on the IP address or network that the device is
currently using, rather than the exact location of the device.
If you see a notification that your AppleID is being used to sign in on a new device and
you’re not signing in, tap Don’t Allow to block the sign-in attempt. You may also want to
capture a screenshot of the notification before dismissing it.
See “Record suspicious activity” later in this document.
If you think your AppleID might be compromised, see “Keep your Apple ID secure”
(later in this document) and remove unknown devices.

62Apple Personal Safety User Guide
Record suspicious activity
In some cases, such as if you see a notification that someone is attempting to use your
AppleID to sign in on a new device, you may want to take a screenshot or record video of
the screen. You can then save these as image or video files on your iPhone, iPad, or Mac.
Take a screenshot or screen recording on your iPhone or iPad
1. Do one of the following:
• On your iPhone or iPad with FaceID: Simultaneously press and then release the side
button and volume up button.
• On your iPhone or iPad with a Home button: Simultaneously press and then release
the Home button and the side button or Sleep/Wake button (depending on your
model).
2. Tap the screenshot in the lower-left corner, then tap Done.
3. Choose Save to Photos, Save to Files, or Delete Screenshot.
If you choose Save to Photos, you can view it in the Screenshots album in the Photos
app, or in the All Photos album if iCloud Photos is turned on in Settings > Photos.

63Apple Personal Safety User Guide
Take pictures or screen recordings on your Mac
1. Press Shift-Command-5 (or use Launchpad) to open the Screenshot app and display
the tools.
2. Click a tool to use to select what you want to capture or record.
For a portion of the screen, drag the frame to reposition it or drag its edges to adjust
the size of the area you want to capture or record.
Action Tool
Capture the entire screen
Capture a window
Capture a portion of the screen
Record the entire screen
Record a portion of the screen
3. Select any options you want.
The available options vary based on whether you’re taking a screenshot or a screen
recording. For example, you can choose to set a timed delay or show the mouse pointer
or clicks, and specify where to save the file.
The Show Floating Thumbnail option helps you work more easily with a completed shot
or recording. It floats in the bottom-right corner of the screen for a few seconds so
you have time to drag it into a document, mark it up, or share it before it’s saved to the
location you specified.
4. Start the screenshot or screen recording:
• For the entire screen or a portion of it: Click Capture.
• For a window: Move the pointer to the window, then click the window.
• For recordings: Click Record. To stop recording, click the Stop Recording button
in the menu bar.
When the Show Floating Thumbnail option is set, you can do any of the following while
the thumbnail is briefly displayed in the bottom-right corner of the screen:
• Swipe right to immediately save the file and make it disappear.
• Drag the thumbnail into a document, an email, a note, or a Finder window.
• Click the thumbnail to open a window; there you can mark up the screenshot—or
trim the recording—and share your result.
Depending on where you chose to save the screenshot or recording, an app may open.
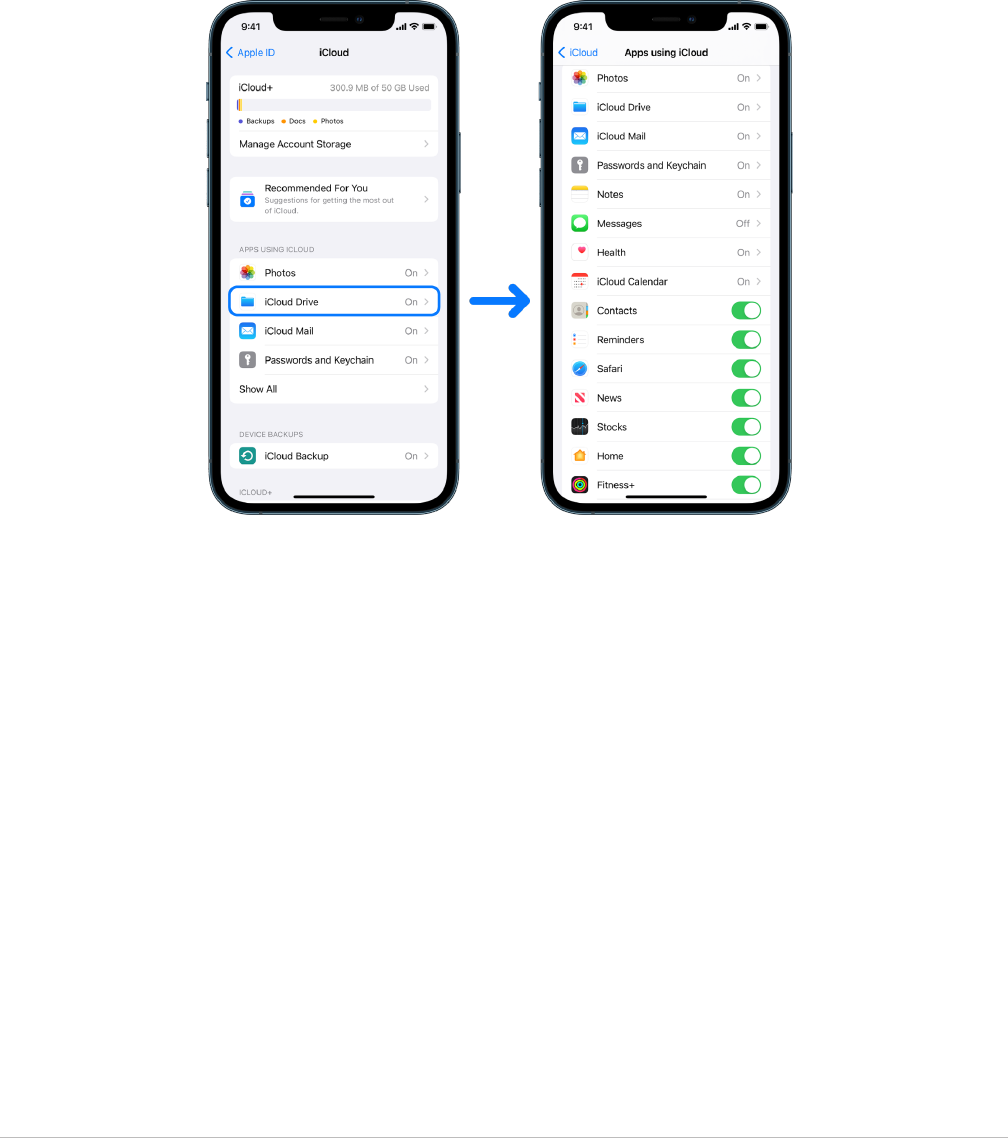
64Apple Personal Safety User Guide
Store your data securely in iCloud
iCloud securely stores your photos, videos, documents, music, apps, device backups, and
more—and keeps them updated across all your devices. iCloud also allows you to share
with friends and family—such things as photos, calendars, and your location. You can sign
in to iCloud on your device or the web with your AppleID.
See the iCloud User Guide for more detailed information about what’s stored in iCloud
(https://support.apple.com/guide/icloud/).
iCloud security options
Apple offers users two options to encrypt and protect the data stored in iCloud:
• Standard data protection (the default setting): Your iCloud data is encrypted, the
encryption keys are secured in Apple data centers, and Apple can assist you with data
and account recovery. Only certain iCloud data—14 data categories, including Health
data and passwords in iCloud Keychain—is end-to-end encrypted.
• Advanced Data Protection for iCloud: An optional setting that offers you Apple’s highest
level of cloud data security. If you choose to turn on Advanced Data Protection,
your trusted devices retain sole access to the encryption keys for the majority of your
iCloud data, protecting it using end-to-end encryption. And with the Advanced Data
Protection, the number of data categories that use end-to-end encryption rises to
23 and includes your iCloud Backup, Photos, Notes, and more.
For more information, see the Apple Support articles “How to turn on Advanced
Data Protection for iCloud” (https://support.apple.com/108756) and “iCloud data
security overview,” the table on Data categories and encryption
(https://support.apple.com/102651).

65Apple Personal Safety User Guide
View and change iCloud settings
You can view and change your iCloud settings on each device, including which apps
(Apple and third-party) use iCloud, iCloud backups, and more:
• On your iPhone or iPad: Go to Settings > [your name] > iCloud.
Disabling this feature means you can’t use it if your device is lost or stolen and powered
down.
• On your Mac running macOS13 or later: Choose Apple menu > System Settings,
click AppleID , then click iCloud.
• On your Mac running macOS12 or earlier: Choose Apple menu > System Preferences,
click AppleID , then click iCloud.
Sign out of iCloud
You can also sign out of iCloud completely on a device. If you sign out of iCloud, it no
longerbacks upthe information on that device.
• On your iPhone or iPad: Go to Settings > [your name] > scroll down, then tap Sign
Out.
• On your Mac running macOS13 or later: Choose Apple menu > System Settings,
click AppleID , clickOverview, then click Sign Out.
• On your Mac running macOS12 or earlier: Choose Apple menu > System Preferences,
click AppleID , clickOverview, then click Sign Out.
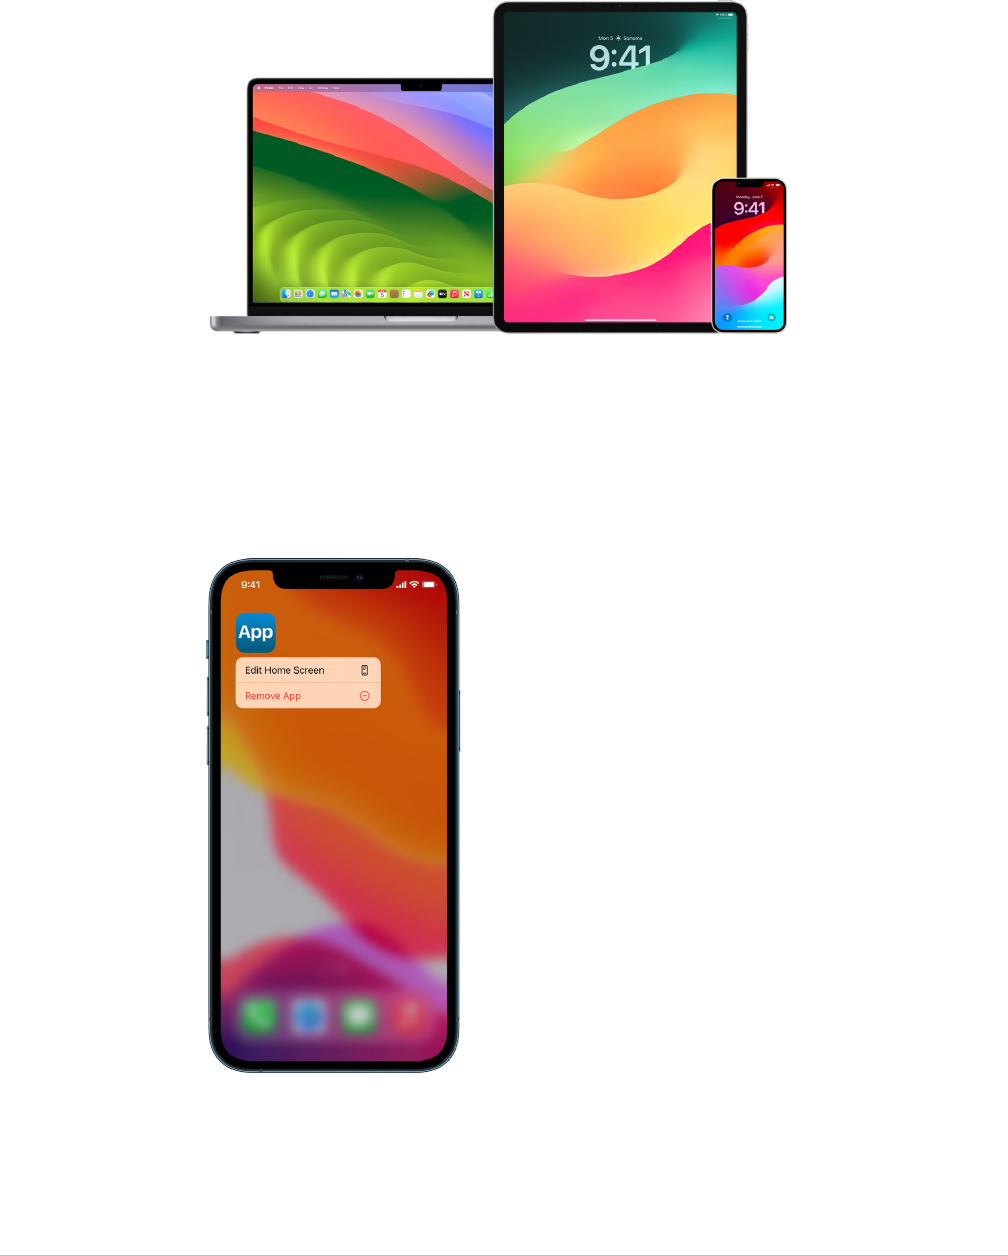
66Apple Personal Safety User Guide
Delete suspicious content from your devices
You can delete any content you’re concerned about or don’t recognize, such as unknown
apps and configuration files on your iPhone, iPad, or Mac.
Review and delete apps from your iPhone or iPad
If you’re concerned someone you once trusted installed an app on your device without
permission, you can review a list of all apps installed on the device and review or change
how each app accesses information. If you notice an app has permission to access your
data and you don’t remember installing it or giving it permission to access your data,
you may want to delete the app.
• Delete an app from the App Library: Go to the Home Screen, then swipe left past all
your Home Screen pages to get to the App Library. Next, tap in the search field, then
locate, touch, and hold the app icon until the menu appears. Tap Delete App to delete it.

67Apple Personal Safety User Guide
• Remove an app from the Home Screen: Touch and hold the app on the Home Screen,
tap Remove App, then tap Remove from Home Screen to keep it in the App Library,
or tap Delete App to delete it.
Review and delete apps from your Mac
You can delete apps that may have been downloaded and installed from the internet or
from a disc.
1. Click the Finder icon in the Dock, then click Applications in the Finder sidebar.
2. Do one of the following:
• If an app is in a folder: Open the app’s folder to check for an Uninstaller. If Uninstall
[App] or [App] Uninstaller is shown, double-click it, then follow the onscreen
instructions.
• If an app isn’t in a folder or doesn’t have an Uninstaller: Drag the app from the
Applications folder to the Trash (at the end of the Dock).
WARNING:The app is permanently removed from your Mac the next time you or the
Finder empties the Trash. If you have files that you created with the app, you may
not be able to open them again. If you decide you want to keep the app, get it back
before emptying the Trash. Select the app in the Trash, then choose File > Put Back.
To uninstall apps downloaded from the App Store, use Launchpad.
Review configuration profiles
Device configuration profiles, mobile device management (MDM) tools, and custom apps
may be used by organizations (like schools and businesses) to manage or supervise
devices, and these tools may allow access to data or location information on the device.
A configuration profile can contain settings for a user’s Mail account, Wi-Fi settings,
VPN settings, and more. Configuration profiles can work on iPhone and iPad, Mac,
and AppleTV.
If you see a configuration profile installed on your device that isn’t supposed to be there,
you may be able to delete it, depending on who installed it. Doing so deletes all of the
settings, apps, and data associated with the configuration profile.
Important:If your device belongs to a school or business, check with your system
administrator before deleting any apps or profiles.
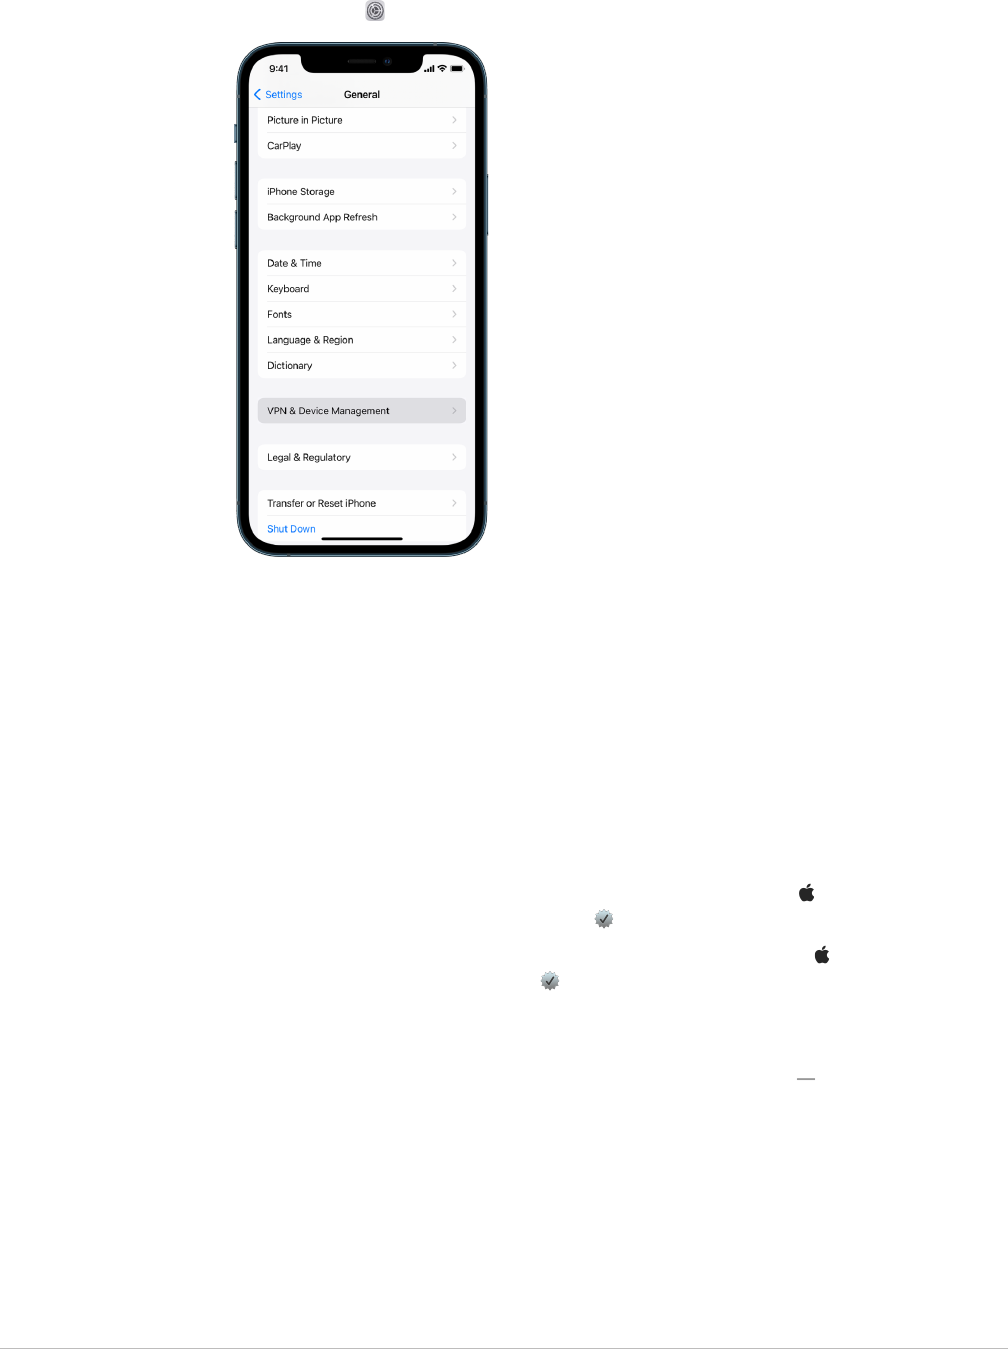
68Apple Personal Safety User Guide
Delete unknown configuration profiles from your iPhone or iPad
1. Go to Settings > General > VPN & Device Management.
If you don’t see any profiles, then no device management profiles are installed on your
device.
2. Select the profile, tap Delete Profile, and follow the onscreen instructions. Restart your
device.
When you remove a profile, all of its settings and information are deleted. For example,
if the profile provided permissions for a virtual private network (VPN) to give access to a
school network, the VPN can no longer connect to that network.
Delete unknown configuration profiles from your Mac
1. Do one of the following:
• On your Mac running macOS13 or later: Choose Apple menu > System Settings >
Privacy & Security, then click Profiles .
• On your Mac running macOS12 or earlier: Choose Apple menu > System
Preferences, then click Profiles .
If you don’t see the Profiles preference pane, then no device management profiles
are installed on your device.
2. Select a profile in the Profiles list, then click the Remove button .
When you remove a profile, all of its settings and information are deleted. For example,
if the profile sets up your email account, removing the profile deletes the email account
information from your Mac.
69Apple Personal Safety User Guide
Manage Family Sharing settings
Family sharing can be used by up to five family members to share subscriptions,
purchases, photos, photo albums, a calendar, and more, all without sharing each other’s
Apple accounts. To change your Family Sharing status, it’s good to know how the different
roles within Family Sharing groups work. You can find Family Sharing on iPhone, iPad,
and Mac.
If you’re sharing a Family iCloud storage plan, each person’s files and documents remain
private, while the amount of storage space being used by each person is visible to all
members.
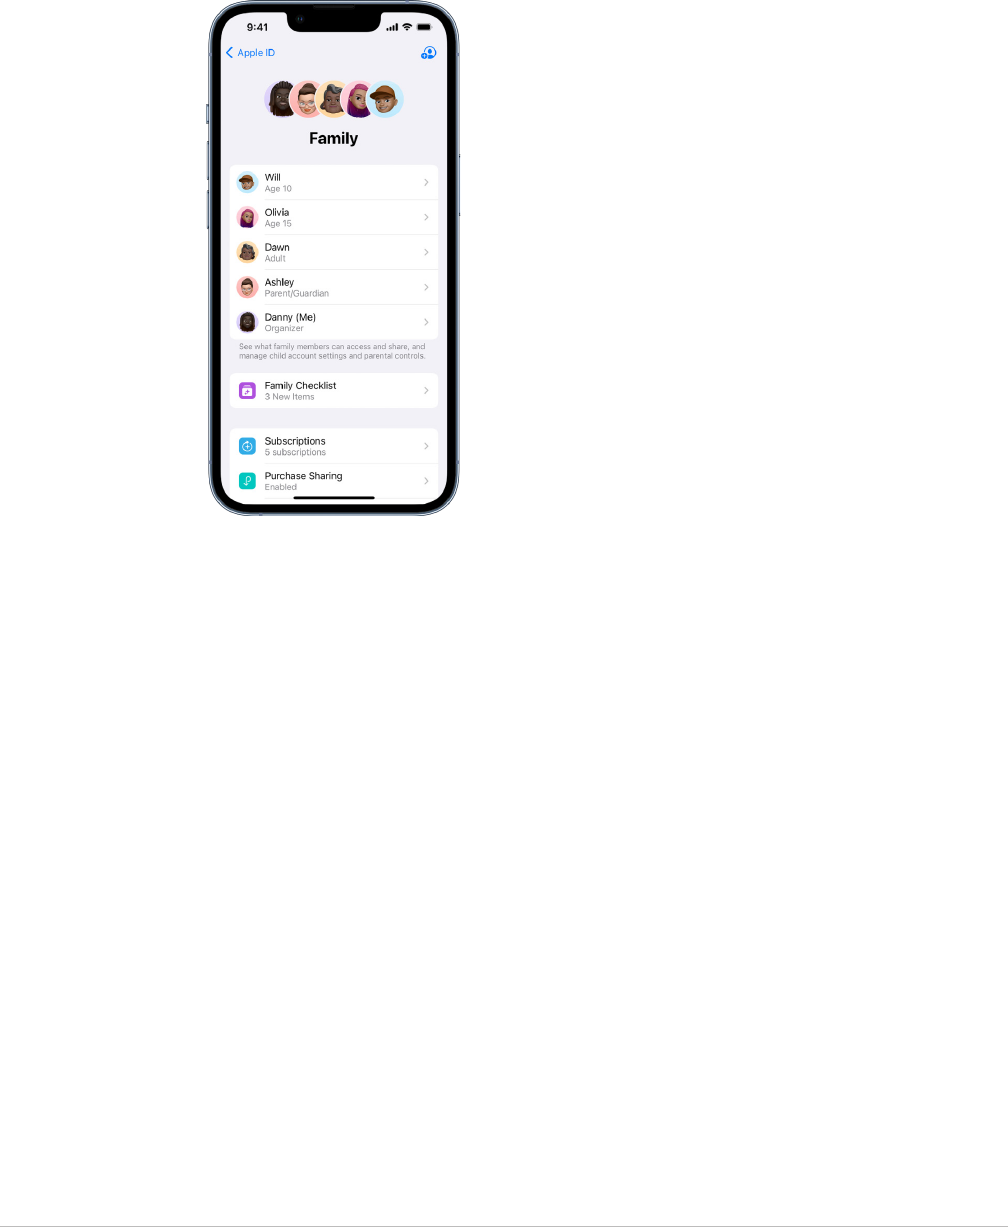
70Apple Personal Safety User Guide
Types of Family Sharing members
Members of a Family Sharing group can have different roles depending on their age.
Note:The age at which someone is considered an adult or child varies by country
or region.
• Organizer: An adult who sets up a Family Sharing group. The organizer can invite family
members, remove family members, and disband the group.
• Adult: A member of the Family Sharing group who’s 18 years or older.
• Parent/Guardian: An adult member of the Family Sharing group who can help manage
parental controls for children in the group. When the organizer adds an adult to the
Family Sharing group, they can designate them as a parent or guardian.
• Child or teen: A member of the Family Sharing group under the age of 18. The organizer,
parent, or guardian can create an AppleID for a child who’s too young to create their
own.
In your household one adult, the family organizer, chooses the features the family shares
and invites up to five additional members to join. After the invitations are accepted,
Family Sharing is set up on everyone’s devices automatically—including a shared calendar
and shared photo album. The organizer can add anyone who has an AppleID to their family
and remove anyone over the age of 13 from the family group.
You can check to see if you’re already part of a family in Settings > [your name]. If you see
Set Up Family Sharing, you aren’t using Family Sharing with this AppleID. If you see an icon
with Family Sharing, you can tap the icon to see your family members and roles.

71Apple Personal Safety User Guide
Removing family members
The organizer of a Family Sharing group can remove other members.
Note:To start removing family members, see the two tasks “Remove members from a
family group on your iPhone or iPad” and “Remove members from a family group on your
Mac” later in this document.
Also, any family member over the age of 13 can remove themselves from a family group
at any time. Just select your name and then select Leave Family. You can also sign in to
theApple ID website(https://appleid.apple.com) and choose Remove Account in the Family
Sharing section.
For security reasons, a child (under 13) account can’t remove themselves from a family
and can’t stop sharing details such as Screen Time without the Screen Time passcode.
The organizer has access to shared family content on your device, such as shared photo
albums and shared calendars, and can view Screen Time activity.
Note:The organizer can’t remove themselves from the Family Sharing group. If you want
to change the organizer, you must disband the group and have another adult create a
new one.
If a member is removed or leaves the Family Sharing group, they keep purchases paid for
using the shared credit card, but they immediately lose access to other things the family
members share:
• Other family members’ items no longer appear in the Purchased section of the iTunes
Store, the App Store, and Apple Books.
• Protected (by copyright) music, movies, TV shows, books, and apps you previously
downloaded are no longer usable if someone else originally purchased them. Other
family members can no longer use this content downloaded from your collection.
• In-app purchases become unavailable if you bought them using an app someone else
originally purchased. You can regain access to the in-app purchases by purchasing
the app.
• Family members’ device locations don’t appear when you use the FindMy app on
iCloud.com or on your iPhone, iPad, or Mac.

72Apple Personal Safety User Guide
If Family Sharing is turned off
If the family organizer turns off Family Sharing, all family members are removed from the
family group at once. If there are children under 13 in the family group, you musttransfer
them to another familybefore you can disband yours.
Remove members from a family group on your iPhone or iPad
If you’re the family organizer:
1. Go to Settings > [yourname]> Family Sharing.
2. Tap [member’s name], then tap Remove [member’sname] from Family.
Note:If you’re the family organizer, you can’t remove yourself from Family Sharing.
Remove members from a family group on your Mac
If you’re the family organizer:
1. Do one of the following:
• On your Mac running macOS13 or later: Choose Apple menu > System Settings,
click Family Sharing , then select Family Sharing in the sidebar.
• On your Mac running macOS12 or earlier: Choose Apple menu > System
Preferences, click Family Sharing , then select Family Sharing.
2. Select the member in the list, then click the Remove button .
Note:If you’re the family organizer, you can’t remove yourself from Family Sharing.
Leave a Family Sharing group on your iPhone or iPad
If you’re over the age of 13 and are a member of a family sharing group:
1. Go to Settings > [yourname]> Family Sharing.
2. Tap [yourname], then tap Stop Using Family Sharing.
Leave a Family Sharing group on your Mac
If you’re over the age of 13 and are a member of a family sharing group:
1. Do one of the following:
• On your Mac running macOS13 or later: Choose Apple menu > System Settings,
click Family Sharing , then select Family Sharing in the sidebar.
• On your Mac running macOS12 or earlier: Choose Apple menu > System
Preferences, click Family Sharing , then select Family Sharing.
2. In the list of family members, click Details next to your name, click Stop Using Family
Sharing, then follow the onscreen instructions.
3. Click Done.

73Apple Personal Safety User Guide
Stop Family Sharing on your iPhone or iPad
You must be the family organizer to turn off Family Sharing.
1. Go to Settings > [yourname]> Family Sharing.
2. Tap your name, then tap Stop Using Family Sharing.
Stop Family Sharing on your Mac
You must be the family organizer to turn off Family Sharing.
1. Do one of the following:
• On your Mac running macOS13 or later: Choose Apple menu > System Settings,
click Family Sharing , then select Family Sharing in the sidebar.
• On your Mac running macOS12 or earlier: Choose Apple menu > System
Preferences, click Family Sharing , then select Family Sharing.
2. Click the Details button next to your name, then click Stop Family Sharing.

74Apple Personal Safety User Guide
Avoid fraudulent requests to share info
Use caution if you receive unsolicited messages prompting you to accept gifts, download
documents, install software, or follow suspicious links. People who want to access your
personal informationuse any means they can—spoofedemails and texts, misleadingpop-
up ads, fake downloads, calendarspam, even phonyphone calls—to trick you into sharing
information, such as your AppleID or password, or to get you to provide a verification code
for two-factor authentication.
For tips on how to avoid being tricked into compromising your accounts or personal
information, see the Apple Support article “Recognize and avoid phishing messages,
phony support calls, and other scams” (https://support.apple.com/102568).
Note:Phishing refers to fraudulent attempts to get personal information from you.

75Apple Personal Safety User Guide
Securely control your Home accessories
If you’re currently a member of a Home, you can easily and securely view and control
your Home accessories by using the Home app on your iPhone, iPad, or Mac, or by using
HomePod.
Note:Home accessories may be Apple products or third-party products. To view a list of
available Home accessories compatible with the Home app and your Apple devices, see
Home accessories (https://www.apple.com/home-app/accessories/).
Stop sharing your home with someone
1. Tapor click the Home app ,then select Home Settings. If you see multiple homes,
choosethe home you want to leave,then select Home Settings.
2. Under People, tap or click the user you want to remove from your home, then tap or
click Remove Person.
Leave a home you were invited to share
If you leave a home, you can no longer view the accessories in that home.
1. Inthe Home app , tap or click the Home icon,then select Home Settings. If you see
multiple homes, choosethe one you want to leave,then select Home Settings.
2. Scroll down, and tap or click Leave Home. Tap or click Leave.
Reset a home
In iOS16, iPadOS16.1, and macOS13, or later, when you remove a home from the Home
app, all HomeKit devices must be added back to a new home. Before you remove a home,
make sure you’ve updated the software on all home accessories to their latest versions.
If you haven’t upgraded your operating systems, make sure you complete step 4 below.
1. Inthe Home app , tap or click the Home icon,then select Home Settings.
2. At the bottom of the dialog, tap or click Remove Home, then tap or click Remove.
3. Close the Home app.
4. Find all home accessories, then reset each one to its factory settings.
5. Open the Home app again and create a new home.
6. Add each accessory to the new home.

76Apple Personal Safety User Guide
How to erase all content and settings
If you’re concerned someone may have had physical access to your device and tampered
with its built-in security, you can restore the device to its factory settings—even if you
aren’t running the latest version of iOS, iPadOS, and macOS. A factory restore erases
the information and settings on your device. This includes removing any apps that were
installed without your knowledge and resetting your privacy settings so you aren’t sharing
location with any people or apps. It also installs the latest version of the operating system.
This process, known as Erase All Content and Settings, requires internet access and can
take some time; however, it helps ensure that your device can be accessed only by you.
Important:When you use Erase All Content and Settings, all your data is erased.
If you want to use Erase All Content and Settings on your Mac, you must be running
macOS12.0.1 or later. Alternatively, you can erase your Mac. See the Apple Support articles
“Use Disk Utility to erase a Mac with Apple silicon” (https://support.apple.com/102506)
and “Use Disk Utility to erase an Intel-based Mac” (https://support.apple.com/HT208496).
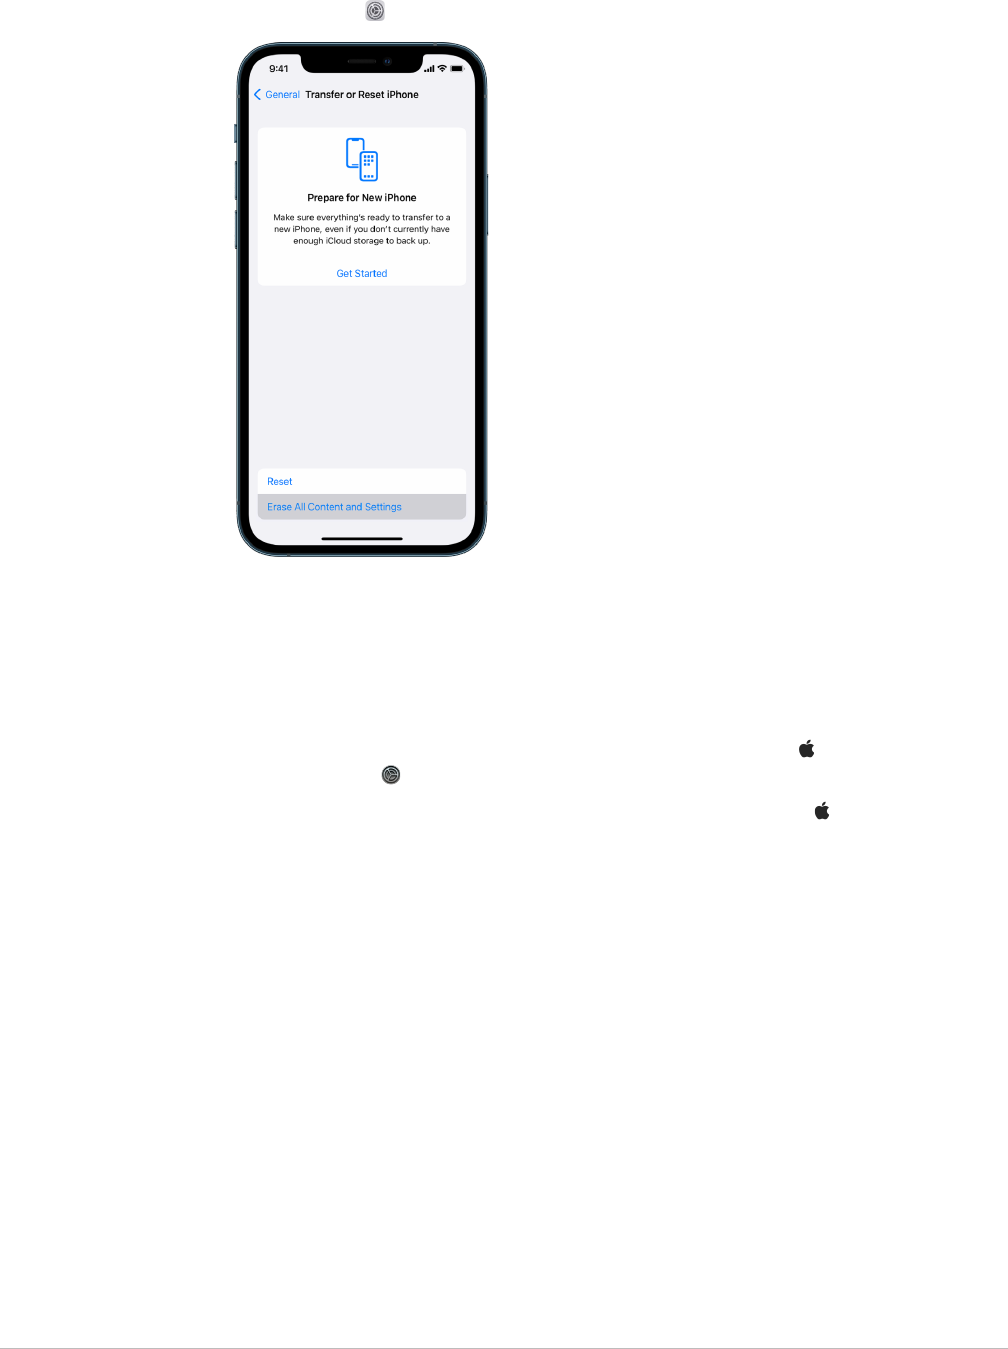
77Apple Personal Safety User Guide
Erase your iPhone or iPad and restore it to factory settings
1. Go to Settings > General > Reset, then tap Erase all Contents and Settings.
2. Enter your passcode or AppleID password.
3. Wait for all content to be safely removed from your device.
Erase your Mac and restore it to factory settings
1. Do one of the following:
• On your Mac running macOS13 or later: Choose Apple menu > System Settings,
click General , click Transfer or Reset, then click Erase All Content and Settings.
• On your Mac running macOS12 or earlier: Choose Apple menu > System
Preferences, then in the menu bar, choose System Preferences > Erase All Content
and Settings.
2. In Erase Assistant, enter your administrator information (the password you use to log in
to your Mac).
3. Review items that will be removed in addition to your content and settings.
On your Mac running multiple user accounts, click the arrow next to your account name
to review the items.
4. Click Continue, then follow the onscreen instructions.

78Apple Personal Safety User Guide
Restore the data you backed up
If you backed up your Apple device before you erased it and before you restored it
to factory settings, you can restore your data from a backup in iCloud or one on your
computer. If you’re concerned your backup may contain configurations or apps that you
don’t want on your device, you can review the App Library and settings after the backup
has been restored. You can restore a Mac using Time Machine, and you can restore an
iPhone or iPad using a computer or iCloud.
Restore your iPhone or iPad from an iCloud backup
1. Turn on your device. You should see a Hello screen. (If you already set up your device,
you need to erase all of its content before you can use these steps to restore from your
backup.)
2. Follow the onscreen setup steps until you reach the Apps & Data screen, then tap
Restore from iCloud Backup.
3. Sign in to iCloud with your AppleID.
4. Choose a backup.
Look at the date and size of each backup and pick the most relevant. After you choose
a backup, the transfer starts. If a message says that a newer version of software is
required, follow the onscreen steps to update.
5. When asked, sign in with your AppleID to restore your apps and purchases.
If you’ve purchased iTunes or App Store content using multiple AppleIDs, you’ll be
asked to sign in to each. If you can’t remember your password, you can tap Skip this
Step and sign in later. You won’t be able to use the apps until you sign in with your
AppleID.
6. Stay connected to Wi-Fi and wait for a progress bar to appear.
Depending on the size of the backup and the network speed, the progress bar might
need a few minutes to an hour to show that the networking process is complete. If you
disconnect from Wi-Fi too soon, the progress pauses until you reconnect.
7. You can now finish setup.
Content like your apps, photos, music, and other information continues to restore in the
background for the next several hours or days, depending on the amount of information.
Try to connect often to Wi-Fi and power to allow the restore to complete.

79Apple Personal Safety User Guide
After the restore is complete:
• Go to the App Library and review the apps installed on your device. If you find any
unknown third-party apps, you can delete them. See “Review and delete apps from your
iPhone or iPad” earlier in this document.
See the Apple Support article “Organize the Home Screen and App Library on your
iPhone” (https://support.apple.com/108324).
• Review and delete any device configuration profiles or mobile device management
(MDM) profiles that you didn’t authorize. (Configuration profiles are used by schools
and businesses to help ensure a consistent setup across devices. Be careful not to
delete profiles installed by your school or workplace.) See “Delete suspicious content”
earlier in this document.
Restore your iPhone or iPad from a backup on your computer
1. On a Mac with macOS10.15 or later, open the Finder . On a Mac with macOS10.14,
or earlier, or on a PC, open iTunes.
2. Connect your device to your computer with a USB cable. If a message asks for your
device passcode or to Trust This Computer, follow the onscreen steps.
3. Select your iPhone or iPad when it appears in the Finder window or iTunes.
4. Select Restore Backup.
5. Look at the date of each backup, and pick the most relevant.
6. Click Restore and wait for the restore to finish. If asked, enter the password for your
encrypted backup.
7. Keep your device connected after it restarts and wait for it to sync with your computer.
You can disconnect after the sync finishes.
After the restore is complete:
• Go to the App Library and review the apps installed on your device. If you find any
unknown third-party apps, you can delete them. See “Review and delete apps from your
iPhone or iPad” earlier in this document.
See the Apple Support article “Organize the Home Screen and App Library on your
iPhone” (https://support.apple.com/108324).
• Review and delete any device configuration profiles or mobile device management
profiles that you didn’t authorize. (Configuration profiles are used by schools and
businesses to help ensure a consistent setup across devices. Be careful not to delete
profiles installed by your school or workplace.) See “Delete suspicious content from
your device” earlier in this document.
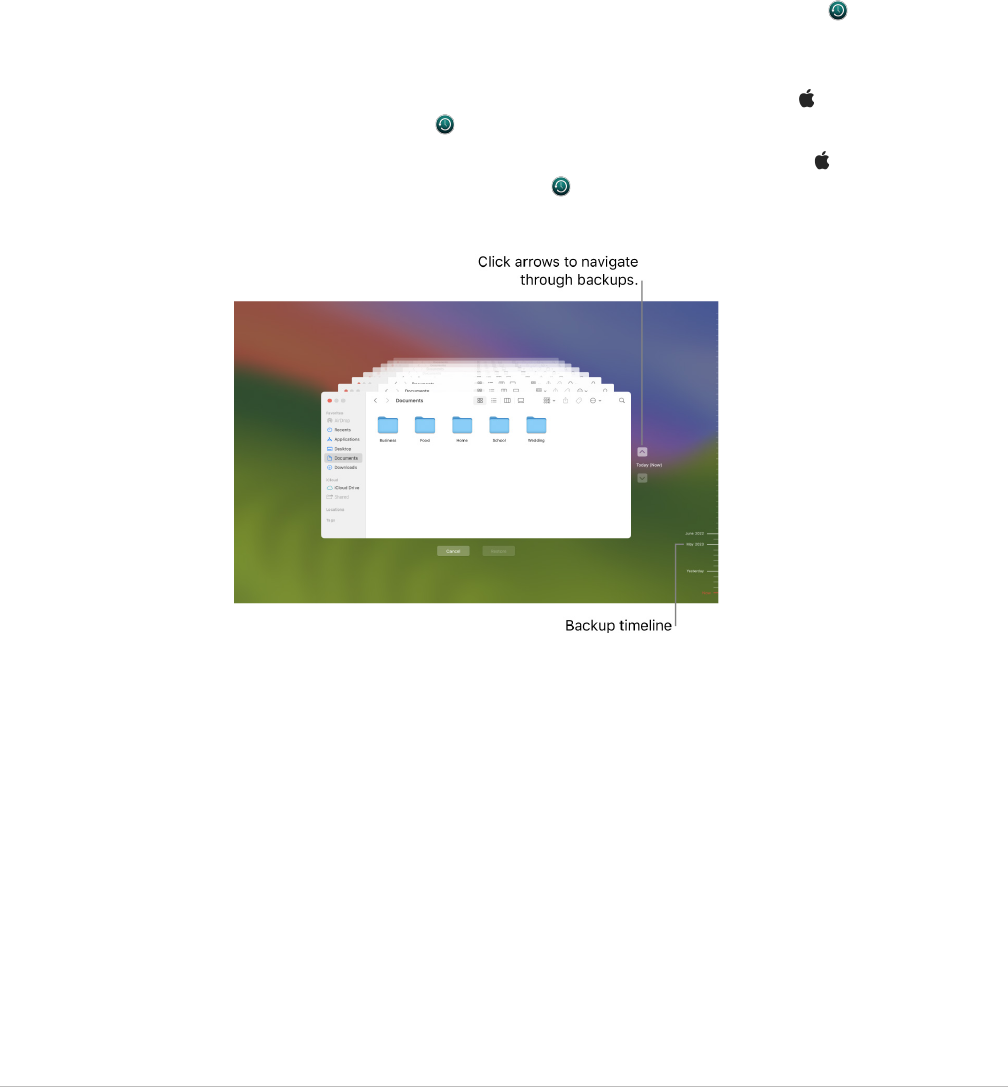
80Apple Personal Safety User Guide
Restore items backed up with Time Machine on Mac
If you use Time Machine to back up the files on your Mac, you can easily get back lost
items or recover older versions of files. You can use Time Machine within many apps.
1. On your Mac, open a window for the item you want to restore.
For example, to recover a file you accidentally deleted from your Documents folder,
open the Documents folder.
If you’re missing an item from the desktop, you don’t need to open a window.
2. Use Launchpad to view and open apps on Mac and open Time Machine. A message may
appear while your Mac connects to the backup disk.
You can also open Time Machine by clicking the Time Machine icon in the menu bar,
then choosing Enter Time Machine. If the Time Machine icon isn’t in the menu bar,
do one of the following:
• On your Mac running macOS13 or later: Choose Apple menu > System Settings,
click Time Machine , then select “Show Time Machine in menu bar.”
• On your Mac running macOS12 or earlier: Choose Apple menu >System
Preferences, click Time Machine , then select “Show Time Machine in menu bar.”
3. Use the arrows and timeline to browse the local snapshots and backups.
If you see a pulsing light to semi-dark gray tick mark, it represents a backup that’s still
loading or validating on the backup disk.
4. Select one or more items you want to restore (these can include folders or your entire
disk), then click Restore.
Restored items return to their original location. For example, if an item was in the
Documents folder, it’s returned to the Documents folder.

81Apple Personal Safety User Guide
After the restore is complete:
• Go to Launchpad and review the apps installed on your Mac. If you find any unknown
third-party apps, delete them by pressing and holding the Option key, then clicking the
X on the app you want to remove.
• Review and delete any device configuration profiles or mobile device management
profiles that you didn’t authorize. (Configuration profiles are used by schools and
businesses to help ensure a consistent setup across devices. Be careful not to delete
profiles installed by your school or workplace.) See “Delete suspicious content from
your device” earlier in this document.

82Apple Personal Safety User Guide
Safety and privacy tools
Update your Apple software
To secure your device and manage access to your personal information, always make sure
you have the latest operating system installed with the latest security and privacy updates.
After your devices are up to date, you can learn how to manage your AppleID. All Apple
devices benefit from software updates.
Updating your operating system software is one of the most important things you can do
to protect your device and your information. Apple makes it easy to download and install
these updates.
To see a list of security updates for Apple devices, see the Apple Support article “Apple
security updates” (https://support.apple.com/HT201222#update).
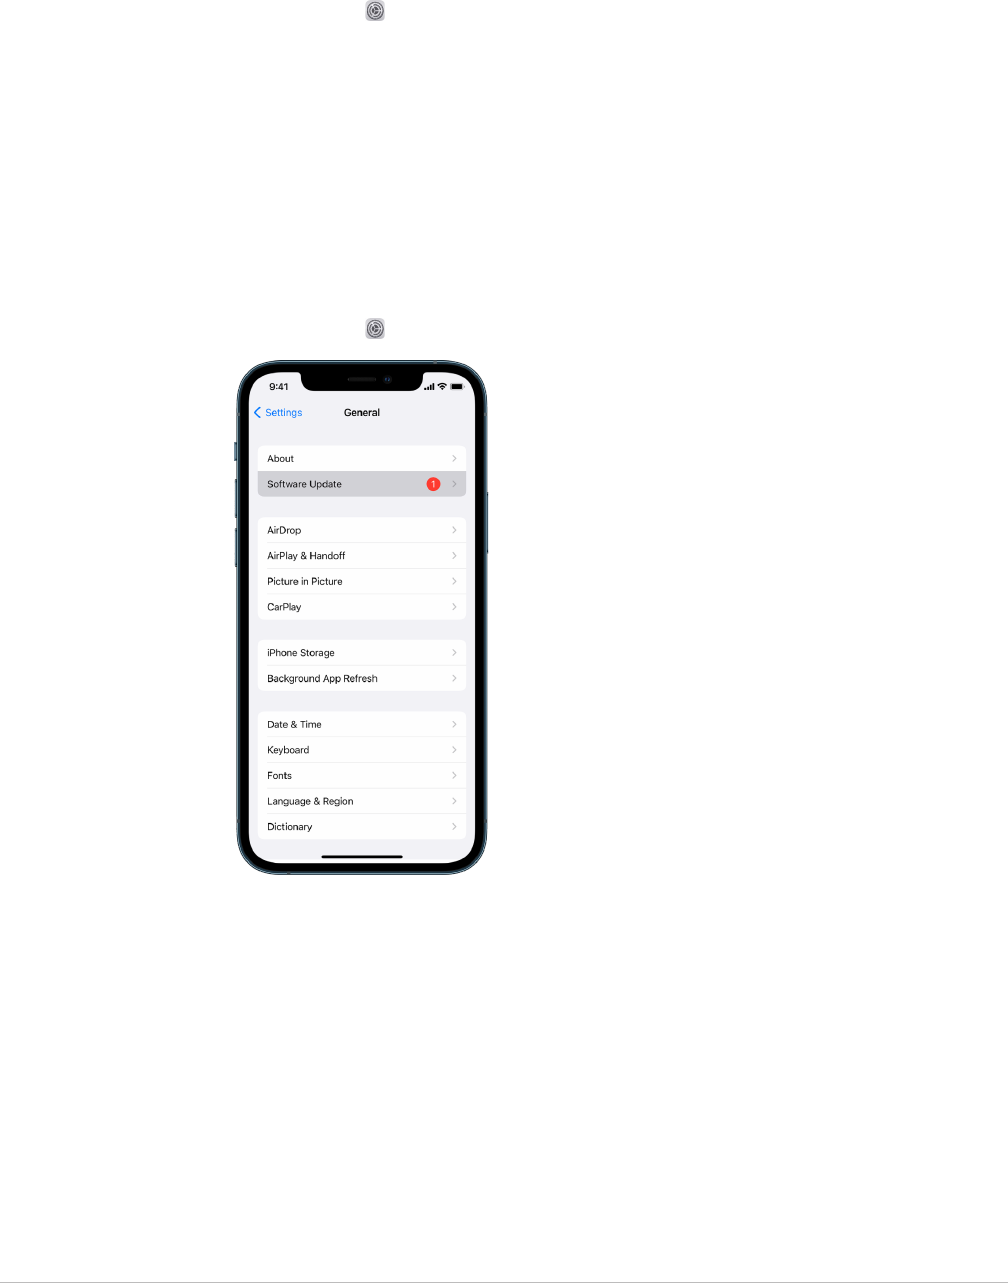
83Apple Personal Safety User Guide
Update iPhone, and iPad automatically
If you didn’t turn on automatic updates when you first set up your device, you can now by
doing the following:
1. Go to Settings > General > Software Update > Automatic Updates.
2. Turn on both options: Download [iOS or iPadOS] Updates and Install [iOS or iPadOS]
Updates.
When an update is available, the device downloads and installs the update overnight while
it’s charging and connected to Wi-Fi. You’re notified before an update is installed.
To turn off automatic updates, go to Settings > General > Software Update > Automatic
Updates, then turn off both options.
Update iPhone and iPad manually
At any time, you can check for and install software updates manually.
• Go to Settings > General > Software Update.
The screen shows the currently installed version of iOS and alerts you if an update
is available.

84Apple Personal Safety User Guide
Update iPhone and iPad using your computer
1. Make sure you have one of the following:
• A Mac with a USB port and OSX10.9 or later
• A PC with a USB port and Windows7 or later
2. Do one of the following:
• Connect your device to your computer using the included Lightning to USB Cable.
If your computer has a USB-C port, use a USB-C to USB Adapter or a USB-C to
Lightning Cable (each sold separately).
• If your device came with a USB-C to Lightning Cable and your computer has a USB
port, use a Lightning to USB Cable (sold separately).
• If your iPad came with a USB-C Charge Cable and your computer has a USB port,
use a USB-C to USB Adapter and a USB-A cable (each sold separately).
• If your iPad came with a Thunderbolt 4/USB-4 charging cable and your computer has
a USB port, use a USB-C to USB Adapter and a USB-A cable (each sold separately).
You can use Thunderbolt or USB cables with Thunderbolt devices like iPadPro
12.9-inch (5th generation) and iPadPro 11-inch (3rd generation).
3. After you’ve successfully connected your device to your computer, do one of the
following:
• In the Finder sidebar on your Mac: Select your device, then click General at the top
of the window.
To use the Finder to update your device to iOS15 or iPadOS15, you must be running
macOS10.15 or later. With earlier versions of macOS, use iTunes to update your
device. See “Update software on iOS devices in iTunes”
(at https://support.apple.com/guide/itunes/itns3235/12.9/mac/10.14).
• In the iTunes app on your Windows PC: Click the iPhone button near the top left of
the iTunes window, then click Summary.
4. Click Check for Update.
5. To install an available update, click Update.

85Apple Personal Safety User Guide
Update your Mac automatically
1. Do one of the following:
• On your Mac running macOS13 or later: Choose Apple menu > System Settings,
click General, then click Software Update.
• On your Mac running macOS12 or earlier: Choose Apple menu > System
Preferences, click Software Update .
2. To automatically install macOS updates, select “Automatically keep my Mac up to date.”
3. To set advanced update options, click Advanced, then do any of the following:
• To have your Mac check for updates automatically: Select “Check for updates.”
• To have your Mac download updates without asking: Select “Download new updates
when available.”
• To have your Mac install macOS updates automatically: Select “Install
macOS updates.”
• To have your Mac install app updates from the App Store automatically:
Select “Install app updates from the App Store.”
• To have your Mac install system files and security updates automatically:
Select “Install Security Responses and system files.”
4. Click OK.
To receive the latest updates automatically, it’s recommended that you select “Check
for updates,” “Download new updates when available,” and “Install system data files and
security updates.”
Note:MacBook, MacBookPro, and MacBookAir must have the power adapter plugged in to
automatically download updates.
Update your Mac manually
You can manually update your Mac’s operating system and any software you’ve gotten from
the App Store.
• Do one of the following:
• On your Mac running macOS13 or later: Choose Apple menu > System Settings,
click General, then click Software Update.
• On your Mac running macOS12 or earlier: Choose Apple menu > System
Preferences, click Software Update .
• To update software downloaded from the App Store, click the Apple menu. The number
of available updates, if any, is shown next to App Store. Choose App Store to continue
in the App Store app .

86Apple Personal Safety User Guide
Set a unique passcode or password on Apple
devices
To prevent anyone except you from using your devices and accessing your information,
use a unique passcode or password that only you know. If you share a device or if others
know your passcode or password, remember that they can see the information on your
device or account and can change the device’s settings.
If you believe someone else knows your device passcode or password and you want to set
one that only you know, you can reset them in Settings or System Preferences, depending
on the device. Your Mac password must have eight or more characters and include upper-
and lowercase letters and at least one number. You can also add extra characters and
punctuation marks to make your password even stronger.
Set a passcode on your iPhone or iPad
For better security, set a passcode that needs to be entered to unlock iPhone or iPad when
you turn it on or wake it. Setting a passcode also turns on data protection, which encrypts
your iPhone and iPad data so that only someone who knows the passcode can access it.
Note:Your device passcode isn’t your AppleIDpassword, which provides access to the
iTunes Store, App Store, Apple Books, iCloud, and other Apple services.
• Go to Settings , then do one of the following:
• On your iPhone or iPad with FaceID: Tap FaceID & Passcode, then tap Turn
Passcode On or Change Passcode.
• On your iPhone or iPad with a Home button: Tap TouchID & Passcode, then tap Turn
Passcode On or Change Passcode.
To view options for creating a password, tap Passcode Options. Passcodes default
to six digits, but options range from the least secure, four-digit, to most
secure (alphanumeric).

87Apple Personal Safety User Guide
Change passcode and expire the previous passcode on iPhone or iPad
If you’re concerned someone has access to your passcode and you want to secure your
iPhone, you can change the passcode to protect your privacy and expire the previous
passcode. To change your passcode, follow the steps below.
1. Go to Settings , then do one of the following:
• On your iPhone or iPad with FaceID: Tap FaceID & Passcode, then enter your
passcode.
• On your iPhone or iPad with a Home button: Tap TouchID & Passcode, then enter
your passcode.
2. Tap Change Passcode, enter your current passcode.
3. If you want extra security, tap Passcode Options to select the format for your future
passcode.
Available formats include a four-digit numeric code, six-digit numeric code,
custom alphanumeric code, or custom numeric code.
4. Enter your new passcode twice.
Important:After changing your passcode in iOS17 or iPadOS17, you can use your old
passcode to reset your passcode for 72 hours. This is to protect against accidentally
forgetting the new passcode. If you’d like to completely deactivate your old passcode
after changing it, tap Expire Previous Passcode Now on the [FaceID][TouchID]
& Passcode page in Settings.
Change the login password on your Mac
If you’re concerned someone has access to your password and you want to secure your
Mac, you can change the user password to protect your privacy.
Note:Your login password is the password you enter to unlock your Mac when you turn
it on or wake it from sleep. Because you created it, it may be the same as your AppleID
password, which provides access to the iTunes Store, App Store, Apple Books, iCloud,
and other Apple services.
1. Do one of the following:
• On your Mac running macOS13 or later: Choose Apple menu > System Settings,
click General, click Users & Groups , then click the Info button .
• On your Mac running macOS12 or earlier: Choose Apple menu > System
Preferences, click Users & Groups , then click Change Password.
2. Click Change Password.
3. Enter your current password in the Old Password field.
4. Enter your new password in the New Password field, then enter it again in the Verify
field.
For help choosing a secure password, click the Key button next to the New Password
field.
5. Enter a hint to help you remember the password.
The hint appears if you enter the wrong password three consecutive times or if you click
the question mark in the password field in the login window.
6. Click Change Password.

88Apple Personal Safety User Guide
Automatically lock your iPhone or iPad
To further increase personal privacy, you can set your device up to automatically lock after
a certain amount of time has passed with no activity.
• Go to Settings > Display & Brightness > Auto-Lock, then set a length of time.
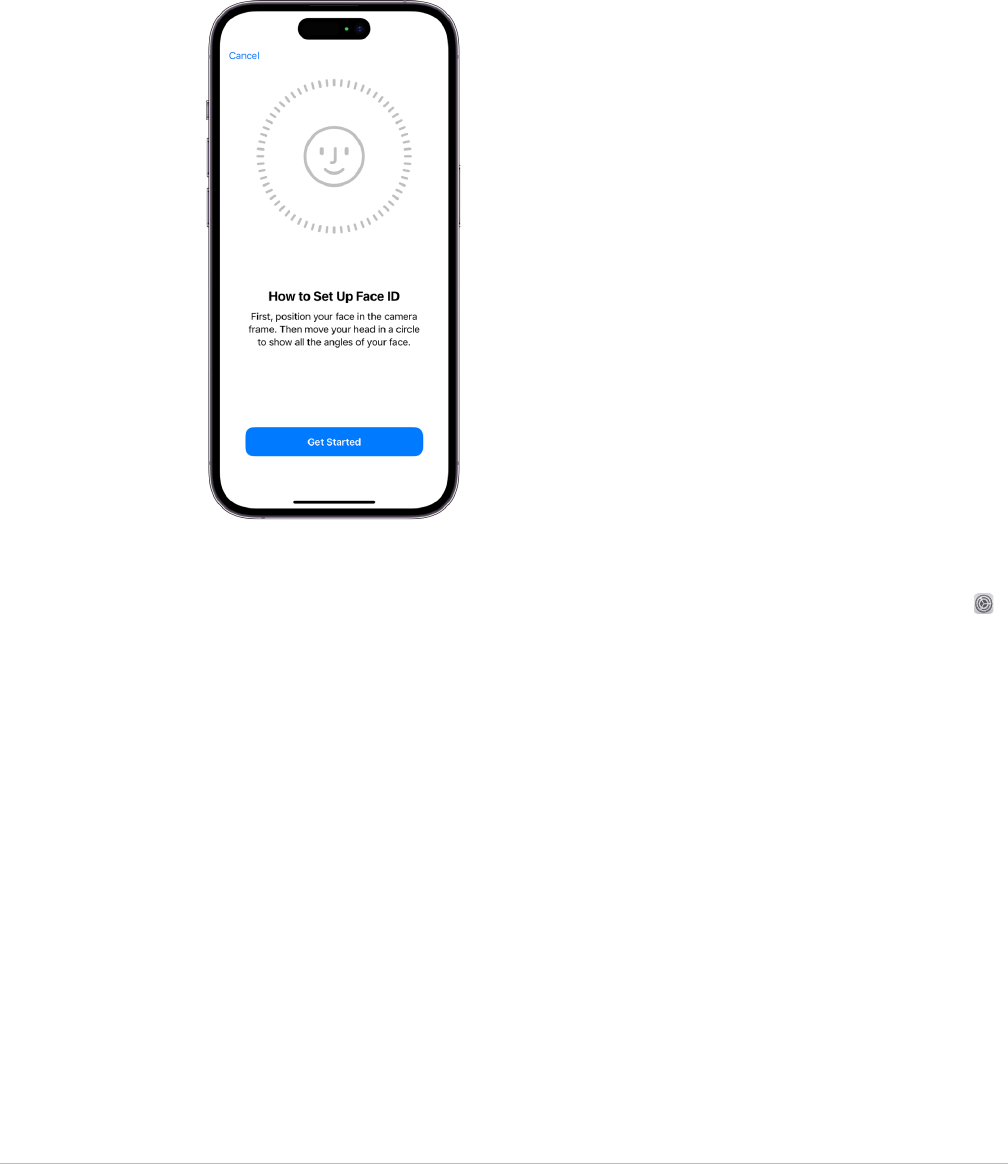
89Apple Personal Safety User Guide
Secure your iPhone or iPad with Face ID
FaceID is for anyone to use who wants to add an extra layer of security to their iPhone
or iPad. It ensures no one else can access the information stored on your device. To use
FaceID, you must first set up a passcode on your iPhone or iPad.
To see a list of supported devices, see the Apple Support article “iPhone and iPad models
that support Face ID” (https://support.apple.com/102854).
Set up FaceID
• If you didn’t set up FaceID when you first set up your iPhone or iPad, go to Settings
> FaceID & Passcode > Set up FaceID, then follow the onscreen instructions.
If you have physical limitations, you can tap Accessibility Options during FaceID set up.
When you do this, setting up facial recognition doesn’t require the full range of head
motion. Using FaceID is still secure, but it requires more consistency in how you look at
iPhone or iPad.
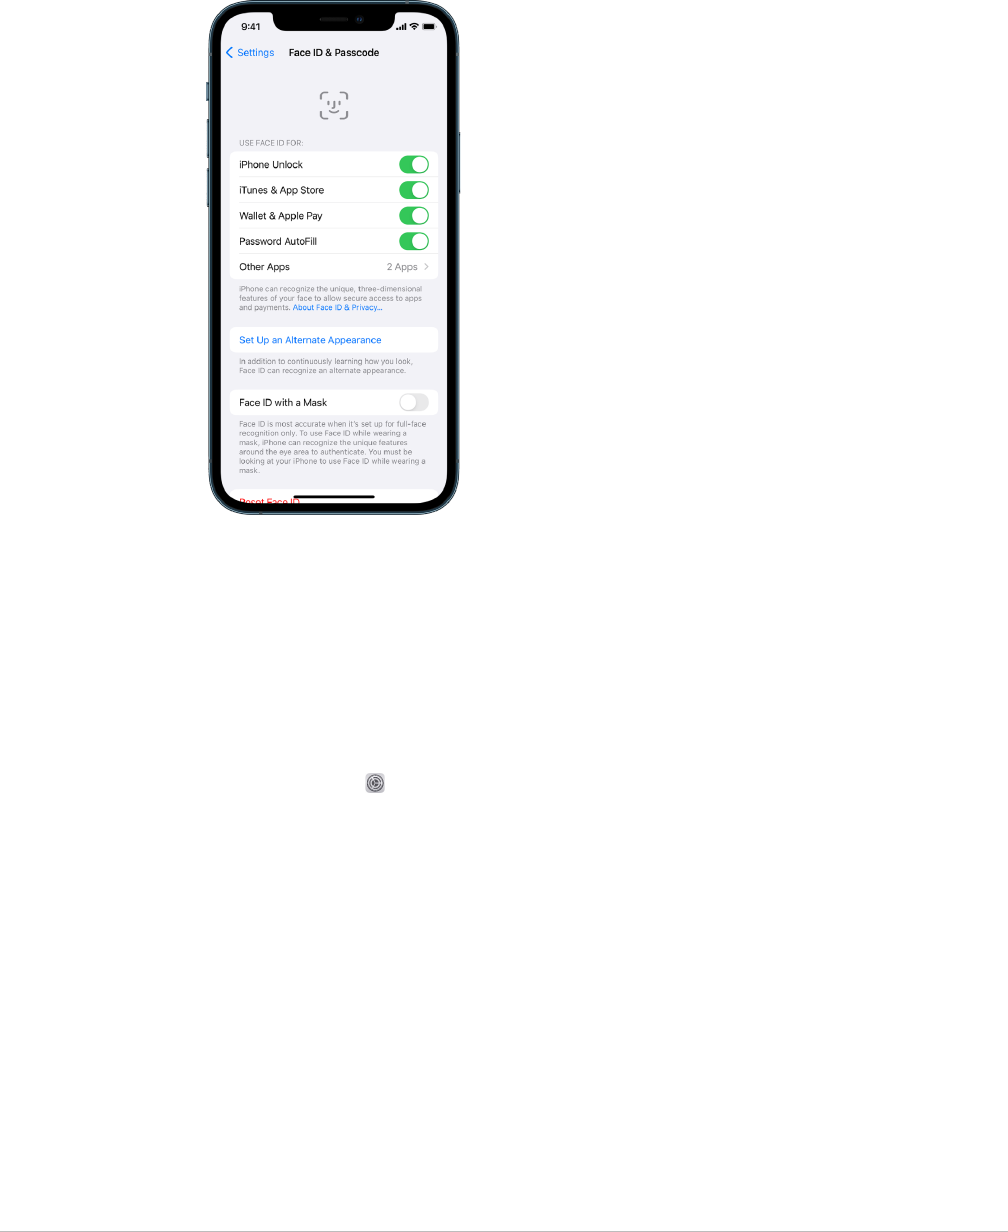
90Apple Personal Safety User Guide
FaceID also has an accessibility feature you can use if you’re blind or have low vision.
If you don’t want FaceID to require that you look at your iPhone or iPad with your eyes
open, go to Settings > Accessibility, then turn off Require Attention for FaceID. This
feature is automatically turned off if you turn on VoiceOver when you first set up your
iPhone or iPad.
See “Change FaceID and attention settings on iPhone” (https://support.apple.com/guide/
iphone/iph646624222) in the iPhone User Guide or “Change FaceID and attention settings
on iPad” in the iPad User Guide (https://support.apple.com/guide/ipad/ipad058b4a31).
Reset FaceID
If there is an alternate appearance that you don’t want to keep or if you believe someone
may have added an alternate appearance on your device without your permission, you can
reset FaceID, then set it up again.
1. Go to Settings > FaceID & Passcode, then tap Reset FaceID.
2. See the above task to set up FaceID again.

91Apple Personal Safety User Guide
Secure your devices with Touch ID
Use TouchID to securely and conveniently unlock iPhone or iPad, authorize purchases and
payments, and sign in to many third-party apps by pressing the Home button with your
finger or thumb.
To use TouchID, you must first set up a passcode on your iPhone or iPad.
Set up TouchID on your iPhone or iPad
1. If you didn’t turn on fingerprint recognition when you first set up your iPhone or iPad,
go to Settings > TouchID & Passcode.
2. Turn on any of the options, then follow the onscreen instructions.
If you see existing fingerprints you don’t recall adding, see “Delete unknown
fingerprints from iPhone or iPad” later in this document.
Note:If you can’t add a fingerprint or unlock your iPhone or iPad using TouchID, see the
Apple Support article “If Touch ID isn't working on your iPhone or iPad”
(https://support.apple.com/101612).

92Apple Personal Safety User Guide
Set up TouchID on your Mac or Magic Keyboard
To use TouchID, you must first set up a password on your Mac.
1. Do one of the following:
• On your Mac running macOS13 or later: Choose Apple menu > System Settings,
then click TouchID .
• On your Mac running macOS12 or earlier: Choose Apple menu > System
Preferences, then click TouchID .
2. Click “Add Fingerprint,” enter your password, then follow the onscreen instructions.
If your Mac or Magic Keyboard has TouchID, the sensor is located at the top right of
your keyboard. You can add up to three fingerprints to your user account (and you can
save up to five fingerprints total on your Mac).
3. Click the checkboxes to select how you want to use TouchID:
• Unlocking your Mac: Use Touch ID to unlock this Mac when you wake it from sleep.
• Apple Pay: Use TouchID to complete purchases you make on this Mac using Apple
Pay.
• iTunes Store, App Store & Apple Books: Use TouchID to complete purchases you
make on this Mac from the Apple online stores.
• Password AutoFill: Use TouchID to automatically fill in user names and passwords
and to automatically fill in credit card information when requested while using Safari
and other apps.
• Use TouchID sensor for fast user switching: Use TouchID to switch
Mac user accounts.
93Apple Personal Safety User Guide
Delete unknown fingerprints from iPhone or iPad
If there are multiple fingerprints on your iPhone or iPad and you want to remove the
possibility that someone else can access your device using an additional fingerprint,
you can reset fingerprints so that only your fingerprint is available on the device.
1. Go to Settings > TouchID & Passcode.
2. If more than one fingerprint is available, place a finger on the Home button to identify
its print.
3. Tap the fingerprint, then do any of the following:
• Enter a name (such as “Thumb”).
• Tap Delete Fingerprint.

94Apple Personal Safety User Guide
Add or delete fingerprints on your Mac
If there are multiple fingerprints on your Mac or Magic Keyboard with TouchID and you’re
concerned one or more may not be yours, you can delete the fingerprints and then add
back your own fingerprint.
1. Do one of the following:
• On your Mac running macOS13 or later: Choose Apple menu > System Settings,
then click TouchID .
• On your Mac running macOS12 or earlier: Choose Apple menu > System
Preferences, then click TouchID .
2. Do any of the following:
• Add a fingerprint: Click Add Fingerprint to add new fingerprint, then choose which
options you’d like to use with TouchID.
• Delete a fingerprint: Click a fingerprint, enter your password, click OK, then click
Delete.

95Apple Personal Safety User Guide
Keep your Apple ID secure
Your AppleID is the personal account you use to sign in to your devices and access Apple
services, like the App Store, iCloud, Messages, FaceTime, and FindMy. It also includes
personal information that you store with Apple and share across devices, like contacts,
payment info, photos, device backups, and much more. If someone else has access to your
AppleID, they can view information that is synced across devices, which may include such
things as Messages and location. Learn here how to secure your AppleID on iPad, iPhone,
and Mac.
Below are a few important things you can do to secure your AppleID and protect your
privacy.
Secure your AppleID
1. Don’t share your AppleID with anyone, even family members, partners, and close
friends. If you share an AppleID, you’re giving someone else access to all your personal
data and your content. If someone else set up your AppleID and password for you,
or has had access to your password, you should change your password.
2. Use two-factor authentication for your AppleID. Two-factor authentication is designed
to ensure that you’re the only person who can access your account, even if someone
else knows your password. With two-factor authentication, you’ll need to provide both
your password and a six-digit verification code that automatically appears on your
trusted devices when you want to sign in to a new device for the first time.
You must verify at least one trusted phone number—a number where you can receive
verification codes by text message or automated phone call—to enroll in two-factor
authentication.
3. Pay attention to notifications about your AppleID. Apple notifies you by email, text,
or push notification when changes are made to your account, such as when there is
a sign in for the first time on a new device or when your password is changed, so it’s
important to keep your contact information up to date.
See “Reject unknown sign-in attempts” earlier in this document.
4. If you receive a notification that there was a sign-in attempt or that changes were made
to your account that you didn’t authorize, this could mean someone has accessed or is
trying to access your account.
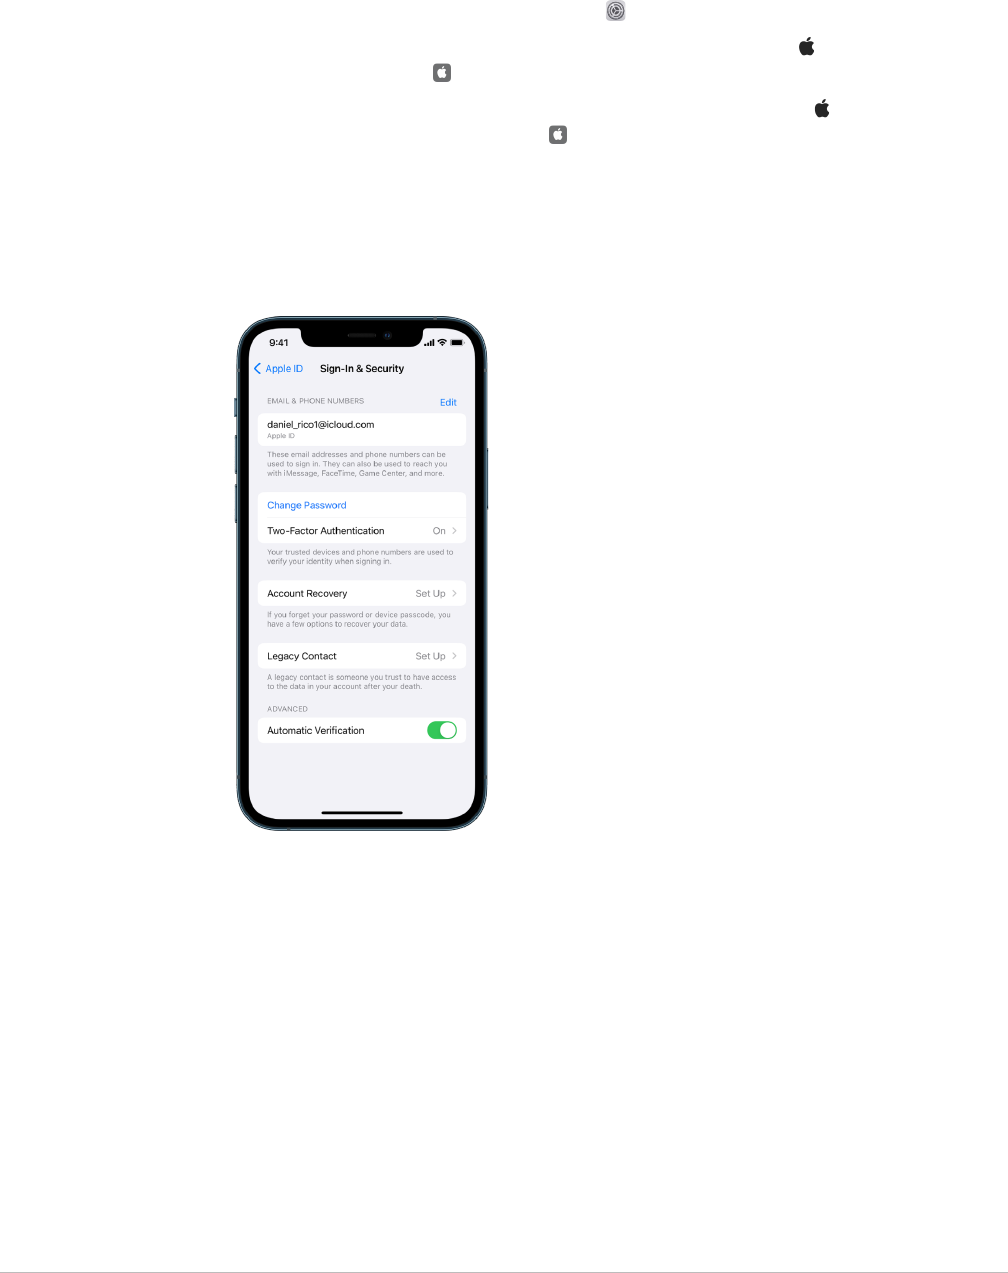
96Apple Personal Safety User Guide
Check and update your AppleID security information
To help ensure that the personal information connected to your AppleID is yours:
1. Do one of the following:
• On your iPhone or iPad: Go to Settings > [your name].
• On your Mac running macOS13 or later: Choose Apple menu > System Settings,
then click AppleID .
• On your Mac running macOS12 or earlier: Choose Apple menu > System
Preferences, then click AppleID .
• In a web browser on your Mac or PC: Go to theApple ID website(https://appleid.
apple.com).
2. In the Name, Phone Numbers, Email section, update any information that isn’t correct
or that you don’t recognize, including your name, and the phone numbers and email
addresses where you’re reachable.
3. Do one of the following:
• If you have two-factor authentication turned on, review your trusted devices. If you
see devices that you want to remove from your account, follow the directions in the
next section to remove them from your account.
• If you haven’t yet set up two-factor authentication, see “Use two-factor
authentication” later in this document.

97Apple Personal Safety User Guide
Secure your account and remove unknown devices
If there are devices connected to your AppleID that you don’t recognize or haven’t
authorized to use your account, you can secure your account and remove them using
the steps below. Removing an unknown device helps ensure that it can no longer display
verification codes and that access to iCloud (and other Apple services on the device) is
blocked until you sign in again with two-factor authentication.
You may also want to take a screenshot of the devices for documentation before securing
your account.
Follow these steps to review your account information and protect your account:
1. If you want to change your password:
• On your iPhone or iPad: Go to Settings > [your name] > Password & Security >
Change Password. Choose a strong password (eight or more characters, including
upper and lowercase letters, and at least one number).
• On your Mac running macOS13 or later: Choose Apple menu > System Settings,
then click AppleID > Password & Security > Change Password. Choose a strong
password (eight or more characters, including upper and lowercase letters, and at
least one number).
• On your Mac running macOS12 or earlier: Choose Apple menu > System
Preferences, then click AppleID > Password & Security > Change Password.
Choose a strong password (eight or more characters, including upper and lowercase
letters, and at least one number).
• If you want to remove the devices you don’t want connected to your account, go to
Settings > AppleID. Scroll down to the list of devices, tap the device you want to
remove, then tap Remove from Account.
2. If you want to change the email address associated with your AppleID for added safety,
open Safari and sign in to theApple ID website(https://appleid.apple.com).
Select Account, and under your current AppleID, select Change AppleID, then enter
the new email address you would like to use.
3. If you want to remove the devices you don’t want connected to your account:
• On your iPhone or iPad: Go to Settings > [your name], scroll down to the list of
devices, tap the device you want to remove, then tap Remove from Account.
• On your Mac running macOS13 or later: Choose Apple menu > System Settings,
click AppleID , scroll down to the list of devices, click the device you want to
remove, then click Remove from Account.
• On your Mac running macOS12 or earlier: Choose Apple menu > System
Preferences, click AppleID , scroll down to the list of devices, click the device you
want to remove, then click Remove from Account.

98Apple Personal Safety User Guide
Use two-factor authentication
Two-factor authentication is an extra layer of security for your AppleID designed to ensure
that you’re the only person who can access your account, even if someone knows your
password. You can set up two-factor authentication on your iPhone, iPad, and Mac.
Set up two-factor authentication on your iPhone or iPad
1. Go to Settings > [your name] > Password & Security.
2. Tap Turn on two-factor authentication, then tap Continue.
3. Enter a trusted phone number, a phone number where you want to receive verification
codes for two-factor authentication (it can be the number for your iPhone).
You can choose to receive the codes by text message or automated phone call.
4. Tap Next.
5. Enter the verification code sent to your trusted phone number.
To send or resend a verification code, tap “Didn’t get a verification code?”
You won’t be asked for a verification code again on your iPhone unless you sign out
completely, erase your iPhone, sign in to your AppleID account page in a web browser,
or need to change your AppleID password for security reasons.
After you turn on two-factor authentication, you have a two-week period during which you
can turn it off. After that period, you can’t turn off two-factor authentication. To turn it off,
open your confirmation email and click the link to return to your previous security settings.
Keep in mind that turning off two-factor authentication makes your account less secure
and means you can’t use features that require a higher level of security.

99Apple Personal Safety User Guide
Set up two-factor authentication on your Mac
1. Do one of the following:
• On your Mac running macOS13 or later: Choose Apple menu > System Settings,
click AppleID , then select Password & Security in the sidebar.
• On your Mac running macOS12 or earlier: Choose Apple menu > System
Preferences, click AppleID , then select Password & Security.
2. Click Set Up Two-Factor Authentication, then click Continue.
3. Answer the verification questions, then click Verify.
4. Enter your phone number for verification, select a verification method, then click
Continue.
5. When asked, verify your identity with the six-digit verification code sent to your trusted
phone. You won’t be asked for a verification code again on your Mac unless you sign out
your AppleID completely, erase your Mac, or need to change your password for security
reasons.
Security keys for AppleID
A security key is a small external device that looks like a thumb drive or tag, and that can
be used for verification when signing in with your AppleID using two-factor authentication.
Security Keys for AppleID is an optional advanced security feature designed for people
who want extra protection from targeted attacks, such as phishing or social engineering
scams. Because you use a physical key instead of the six-digit code, security keys
strengthen the two-factor authentication process and help prevent your second
authentication factor from being intercepted or requested by an attacker.
To learn more about security keys, see the Apple Support article “About Security Keys for
AppleID” (https://support.apple.com/HT213154).

100Apple Personal Safety User Guide
Help prevent being locked out of your Apple device
Account recovery contacts are trusted people who can help you regain access to your
account if you forget your password or device passcode, or if your password or passcode
was changed without your permission. Account recovery contacts don’t have access to
your account; they only have the ability to send you an account recovery code if you need
one. Set up an account recovery contact on your iPhone, iPad, or Mac so that you can
regain access to your data if you ever get locked out.
Note:In addition to a recovery contact, a Legacy Contact is the easiest, most secure way
to give someone you trust access to the data stored in your Apple account after your
death. See the Apple Support article “How to add a Legacy Contact for your AppleID”
(https://support.apple.com/102631).
To be an account recovery contact, the person must be over the age of 13, have a device
running iOS15, iPadOS15, or macOS12, or later, have two-factor authentication turned on
for their AppleID, and have a passcode set up on their device.

101Apple Personal Safety User Guide
Set up an account recovery contact
If you’re concerned that someone may use access to your account to change your
password and lock you out of your account, you can set a trusted account recovery contact
to help you regain access.
1. Do one of the following:
• On your iPhone or iPad: Go to Settings > [your name], then tap Password &
Security.
• On your Mac running macOS13 or later: Choose Apple menu > System Settings,
click AppleID , then select Password & Security in the sidebar.
• On your Mac running macOS12 or earlier: Choose Apple menu > System
Preferences, click AppleID , then select Password & Security.
2. Select Account Recovery, add a recovery contact, then authenticate with FaceID,
TouchID, a passcode or password.
3. If you’re in a Family Sharing group, the members of the group are recommended.
Or you can choose one of your contacts.
4. If you select a family member, they’re added automatically. If you select a contact,
they must accept the request.
5. After they accept your request, you see a message that they have been added as your
account recovery contact.
View and remove a recovery contact
If you want to view or remove your recovery contact.
1. Do one of the following:
• On your iPhone or iPad: Go to Settings > [your name], then tap Password &
Security.
• On your Mac running macOS13 or later: Choose Apple menu > System Settings,
click AppleID , then select Password & Security in the sidebar.
• On your Mac running macOS12 or earlier: Choose Apple menu > System
Preferences, click AppleID , then select Password & Security.
2. Under Recovery Assistance, you see a list of your recovery contacts.
3. Choose the Recovery Contact you would like to remove, then remove the contact.
102Apple Personal Safety User Guide
Keep your device, app, and website passwords
secure on iPhone and iPad
On your iPhone or iPad, you can manage your passwords in Settings, in Spotlight Search,
or using Siri. You can also use the Password Security Recommendations feature to
identify any weak or vulnerable passwords. Saved passwords appear in alphabetical order
organized by the website or platform they’re saved on.
Manage passwords
You can manage your passwords in Settings, in Spotlight Search, or using Siri.
1. Go to Settings > Passwords, then do any of the following:
• To add a new password manually, tap Add in the top-right corner.
• To edit or delete a password, tap Edit in the top-right corner, tap “Select saved
passwords,” then tap Edit or Delete.
Important:After you’ve deleted a password, you can no longer recover it.
2. If you added a new password, test it to make sure you entered it correctly.

103Apple Personal Safety User Guide
Use Password Security Recommendations
If you create and store your own passwords for websites and apps, you can use the
Password Security Recommendations feature to identify any weak or vulnerable passwords
(for example, if they’re easily guessed or used multiple times). You can also use the feature
to securely monitor your passwords and to alert you if any have been compromised through
a known data leak.
1. Go to Settings > Passwords > Security Recommendations.
2. Turn on the Detect Compromised Passwords to let iPhone securely monitor your
passwords and to alert you if any passwords have appeared in known data leaks.
3. Review these recommendations for the passwords you’ve created:
• Passwords marked as reused have been used across different domains. Using the
same password for more than one service may leave the account vulnerable to an
attacker who has discovered your credentials.
• Passwords marked as weak may be easily guessed by an attacker.
• Passwords are marked as leaked if the Password Monitoring feature has identified
them in a known data leak.
4. To make an update to a reused, weak, or leaked password, tap the item and follow the
onscreen instructions.
Turn on detection of compromised passwords
iPhone and iPad (running iOS17, iPadOS17, or later) can monitor your passwords and alert
you if they appear in known data leaks.
• Go to Settings > Passwords> Security Recommendations, then turn on Detect
Compromised Passwords.
Automatically delete one-time verification codes
In iOS17, iPadOS17, and macOSSonoma14, or later, one-time verification codes are filled
in automatically, so you don’t need to leave the app or website you’re signing into. You can
choose to automatically delete the verification codes after entering them with Autofill,
or keep them.
• Do one of the following:
• On your iPhone or iPad: Go to Settings > Password, select Password Options,
then turn on Clean Up Automatically.
• On your Mac: Choose Apple menu > System Settings > Password in the sidebar,
select Password Options, then turn on Clean Up Automatically.
104Apple Personal Safety User Guide
Manage shared password and passkeys
In iOS17, iPadOS17, and macOSSonoma14, or later, you can create or join a group of
trusted contacts to share passwords and passkeys across devices. There are two distinct
user roles in Shared Password groups: Group Owner and Group Member. Each user role
determines the kind of tasks you can perform.
• Group Owner: The Group Owner is the group member who created the group.
The owner is the only person who can add or remove other members.
• Group Member: Each person who has received and accepted an invitation from the
owner is a group member. All group members can add, view, edit, or delete passwords
at any time. Group members can leave a group at anytime they choose.
Note:If you delete a password or passkey that you shared with a group, you have 30 days
to recover it. If you delete a password or passkey that someone else shared with the group,
they receive a notification to recover it within 30 days. See “Recover a recently deleted
password or passkey on Mac” (https://support.apple.com/guide/mac-help/mchlee73013a)
in the macOS User Guide.
Determine your role in a shared password group
• Do one of the following:
• On your iPhone or iPad: Go to Settings > Password, look for a shared password
group , select the group, then see if you’re the group owner or a member.
• On your Mac: Choose Apple menu > System Settings > Password in the sidebar,
look for a shared password group , select the group, click Manage, then see if
you’re the group owner or a member.

105Apple Personal Safety User Guide
Remove someone from a shared password group that you own
If you remove someone else from a shared password group, that person may still have
access to the accounts and passwords you shared while they were in the group. After
removing someone, you should also change passwords for the accounts you own that you
no longer want them to have access to.
• Do one of the following:
• On your iPhone or iPad: Go to Settings > Password, look for a shared password
group , select the group, then remove a member.
• On your Mac: Choose Apple menu > System Settings > Password in the sidebar,
look for a shared password group , select the group, click Manage, then remove a
member.
Leave a shared password group you are a member of
If you remove yourself from a shared password group, previous group members may still
have access to the accounts and passwords or passkeys you shared while you were in
the group. After leaving the group, you should also change passwords or passkeys for the
accounts you own that you no longer want group members to have access to.
• Do one of the following:
• On your iPhone or iPad: Go to Settings > Password, look for a shared password
group , select the group, then remove yourself from the group.
• On your Mac: Choose Apple menu > System Settings > Password in the sidebar,
look for a shared password group , select the group, click Manage, then remove
yourself from the group.
Delete a password or passkey from a shared password group
If you decide to delete passwords or passkeys from a shared password group, group
members may still have access to the accounts and passwords or passkeys you shared
with the group. After deleting the them, you should also change passwords or passkeys for
the accounts you own that you no longer want group members to have access to.
Note:If you delete a password or passkey that you shared with a group, you have 30 days
to recover it. If you delete a password or passkey that someone else shared with the group,
they receive a notification to recover it within 30 days. See “Recover a recently deleted
password or passkey on Mac” in the macOS User Guide (https://support.apple.com/guide/
mac-help/mchlee73013a).
• Do one of the following:
• On your iPhone or iPad: Go to Settings > Password in the sidebar, look for a
shared password group , select the group, then see if you’re the group owner or
a member.
• On your Mac: Choose Apple menu > System Settings, click Passwords in the
sidebar, click the Info button next to the account with the password or passkey
you want to delete, click Delete Password or Delete Passkey, then click Delete
Password or Delete Passkey (again).
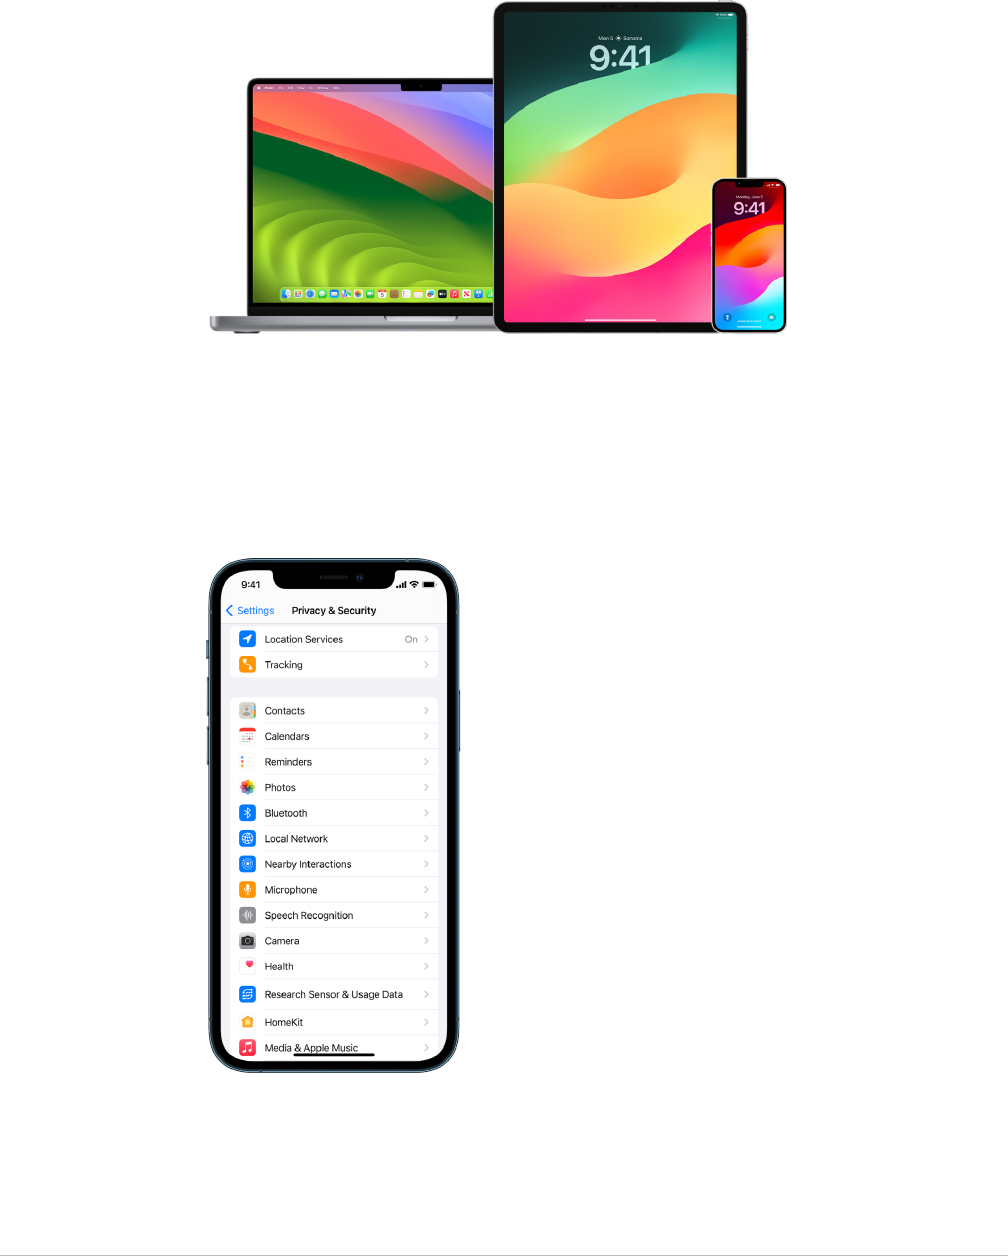
106Apple Personal Safety User Guide
App privacy features in Apple products
Apple provides settings, features, and controls to help you review and manage the data
you share with apps.
Review and update app privacy settings on Apple devices
Privacy settings on your device have been carefully designed to put you in control of your
data. For example, you can allow a social networking app to use your camera so you can
take and upload pictures to that app. One reason to review these settings is if someone
else set up your device or had access to it and knows your passcode. You want to make
sure they haven’t changed your settings.

107Apple Personal Safety User Guide
1. Do one of the following:
• On your iPhone or iPad: Go to Settings > Privacy & Security .
• On your Mac running macOS13 or later: Choose Apple menu > System Settings,
select Password & Security in the sidebar, then click Privacy.
• On your Mac running macOS12 or earlier: Choose Apple menu > System
Preferences, select Password & Security, then click Privacy.
2. Review the list of data types (for example, Calendars, Contacts, Photos, Reminders,
and so on).
3. Select a data type from the list to see which apps on your device have access to it.
An app doesn’t appear on the list until it asks for permission, and you can grant or
remove permission from any app that has asked for access. For photos you can also
change access given to apps. An app can use the data type in the setting only if you
have given the app permission.
Note:Changing the privacy settings on your Apple device changes only how those
apps can access your data. If you want to change the Privacy & Security settings for a
third-party app (apps created by companies other than Apple), you must sign in to the
third-party account (through its app or through a browser) and update the settings from
there.
Use App Tracking Transparency
App Tracking Transparency allows you to decide whether an app can track your activity
across other companies’ apps and websites. You can withdraw permissions to track your
activity anytime. If you turn off “Allow Apps to Request to Track,” you won’t get prompts
from apps that want to track your activity. Each app that asks for permission to track while
this setting is turned off is treated as if you selected Ask App Not to Track.
• Do one of the following:
• On your iPhone or iPad: Go to Settings > Privacy & Security > Tracking, then turn
off Allow Apps to Request to Track.
• On your AppleTV: Go to Settings > General > Privacy & Security > Tracking,
then turn off Allow Apps to Request to Track.

108Apple Personal Safety User Guide
See how apps are accessing your data with App Privacy Report
If you’re concerned that someone close to you installed apps on your iPhone or iPad
without your permission—or that they changed the settings of apps you installed—you can
turn on App Privacy Report.
You’ll find details about how often each app accesses your data (for example, your
location, camera, and microphone).
1. Go to Settings > Privacy.
2. Scroll down and tap App Privacy Report.
3. Turn on App Privacy Report.
You can turn off App Privacy Report at any time by going to Settings > Privacy &
Security > App Privacy Report. Doing so also clears the report data from your device.
Note:App Privacy Report starts gathering information only after you turn it on, so it
may take a while for details to appear. You’ll see more info as you continue using apps
on your device. The data in your App Privacy Report is encrypted and stored only on
your device. The report shows how many times—and when—an app accessed privacy-
sensitive data or device sensors in the past 7 days. You can tap each app and data type
to learn more.

109Apple Personal Safety User Guide
Harden your devices against mercenary spyware
with Lockdown Mode
Lockdown Mode is an extreme, optional protection for iPhone, iPad, and Mac (running
iOS16, iPadOS16.1, macOS13, or later) that should be used only if you believe you may be
targeted by a highly sophisticated cyberattack, such as by a private company developing
state-sponsored mercenary spyware.
Note:Most people are never targeted by this type of attack.
When a device is in Lockdown Mode, it won’t function as it typically does. Apps, websites,
and features are strictly limited for security, and some experiences aren’t available.
Lockdown Mode includes the following protections:
• Messages: Most message attachment types other than images are blocked. Some
features, like link previews, are disabled.
• Web browsing: Certain complex web technologies, like just-in-time (JIT) JavaScript
compilation, are disabled unless the user excludes a trusted site from Lockdown Mode.
• Apple services: Incoming invitations and service requests, including FaceTime calls,
are blocked if the user has not previously sent the initiator a call or request.
• Tethered connections: Connections with a computer or accessory are blocked when the
device is locked.
• Configuration profiles: Configuration profiles can’t be installed, and the device is unable
to enroll into mobile device management (MDM) while Lockdown Mode is turned on.
However, any MDM profiles that were enabled prior to Lockdown Mode remain on the
device.

110Apple Personal Safety User Guide
Turn Lockdown Mode on or off
Lockdown Mode must be turned on separately for iPhone, iPad, and Mac. When you turn
on Lockdown Mode on iPhone, it automatically turns on Lockdown Mode for any paired
AppleWatch running watchOS10 or later. You can’t turn Lockdown Mode on or off directly
on an AppleWatch.
• Do one of the following:
• On your iPhone or iPad: Go to Settings > Privacy & Security > Lockdown Mode,
tap Turn On Lockdown Mode, tap Turn On & Restart, then enter your device
passcode.
• On your Mac: Choose Apple menu > System Settings, Privacy & Security >
Lockdown Mode, tap Turn On, then enter password if prompted and tap Turn On &
Restart.
111Apple Personal Safety User Guide
Manage safety settings in Messages
In the Messages app , you can send text messages in two different ways:
• Over Wi-Fi or cellular service, using iMessage with others who also use iMessage on an
iPhone, iPad, or Mac. Your iMessage texts appear in blue bubbles.
• With SMS/MMS messages forwarded from your iPhone to other devices. Your SMS/MMS
messages appear in green bubbles.
You can use iMessage to send messages, photos, or videos to another iPhone, iPad, or Mac
over Wi-Fi or cellular networks. These messages are always encrypted and appear in blue
text bubbles on your iPhone, iPad, and Mac.
Limit Messages to one device
If you want to limit Messages to one device, you must sign the account out of Messages on
the devices you no longer want to receive messages on, and turn off Messages in iCloud.
1. Do one of the following:
• On your iPhone or iPad: Go to Settings > Messages, then turn iMessage on or off.
• On your Mac: In the Messages app , choose Messages > Settings, click iMessage,
then click Sign out. Confirm you want to sign out, then click Sign out again.
Turn off Messages in iCloud from iPhone or iPad
When you use Messages in iCloud, all the messages you send, receive, and delete are
updated on all your Apple devices automatically.
1. On your iPhone or iPad: Go to Settings > [your name], then tap iCloud.
2. Under Apps using iCloud, tap Show All.
3. Tap Messages, then turn off Sync this [iPhone][iPad].
4. Repeat this task on each device to remove the messages from iCloud.

112Apple Personal Safety User Guide
Turn off Messages in iCloud from Mac
When you use Messages in iCloud, all the messages you send, receive, and delete are
updated on all your Apple devices automatically.
1. In the Messages app on your Mac, choose Messages > Settings, then click iMessage.
2. Click Settings, then deselect Enable Messages in iCloud.
3. Choose one of the following:
• Disable All: Turns off Messages in iCloud on all your devices. Messages are no longer
stored in iCloud and are instead stored on each device.
• Disable This Device: Turns off Messages in iCloud on your Mac only. Messages on
your Mac are no longer stored in iCloud; on any other device where Messages in
iCloud is turned on, messages continue to be stored in iCloud.
Turn iMessage on and off
iMessage uses end-to-end encryption, protecting your messages across all of your devices
so they can’t be accessed without your passcode by anyone, including Apple. Because
iMessage conversations take place over Wi-Fi and cellular networks, information related to
the person you message doesn’t appear on your phone bill. iMessages can be backed up,
so that if your device is lost or stolen, you can still reproduce important message threads.
Important:For Messages to be saved to iCloud, you must have enabled backup. If
you haven’t, your messages won’t be restored. See “Set up iCloud for Messages on
all your devices” in the iCloud User Guide (https://support.apple.com/guide/icloud/
mm0de0d4528d).
When iMessage is on
You can send an iMessage using a Wi-Fi connection when you don’t have access to cellular
service. The Recently Deleted feature saves deleted messages for up to 30 days, so if
you’re concerned someone may have deleted messages from your device, those messages
may still be in this tab.
When iMessage is off
When iMessage is turned off, features like message editing, message unsend, and read
receipts aren’t available. Messages are sent using SMS/MMS instead.
Important:When using SMS/MMS, records of these messages may appear in your phone
bill and those message records may be released through the cellular provider to the
account owner for that phone number.
• On your iPhone or iPad: Go to Settings > Messages, then turn iMessage on or off.
• On your Mac running macOS13 or later: Open Messages choose Messages >
Settings, click iMessage, then click Sign out. Confirm you want to sign out, then click
Sign out again.
• On your Mac running macOS12 or earlier: Open Messages choose Messages >
Settings, click iMessage, then click Sign out. Confirm you want to sign out, then click
Sign out again.

113Apple Personal Safety User Guide
Turn read receipts on and off
iMessage read receipts let iMessage users know when their messages have been read.
With read receipts on, the person who sent you the iMessage gets a Read indicator below
the message after you’ve read it. With read receipts off, they see only that the message
has been delivered.
You have the option to send read receipts for all conversations, or only for individual
ones. If you’ve turned on read receipts for all conversations, you can still turn them off for
individual ones—and vice versa.
Note:Read receipts aren’t supported with SMS messaging and with group texts.
• On your iPhone or iPad: Go to Settings > Messages, then turn Read Receipts on or
off.
• On your Mac running macOS13 or later: Open Messages , go to Messages > Settings,
click the iMessage tab, then select or deselect Send Read Receipts.
• On your Mac running macOS12 or earlier: Open Messages , go to Messages >
Preferences, click the iMessage tab, then select or deselect Send Read Receipts.
Edit a sent message
In iOS16, iPadOS16.1, and macOS13, or later, you can edit a recently sent message up
to five times within 15 minutes of sending it. This allows you the opportunity to fix a typo.
Recipients see that a message was edited and are able to view the edit history.
Note:SMS messages can’t be edited.
If your recipients have Apple devices with earlier versions of iOS, iPadOS or macOS,
they receive follow-up messages with the preface “Edited to” and your new message in
quotation marks.
• On your iPhone or iPad: Tap Messages , touch and hold the message bubble, tap Edit,
then edit the message and send it again.
• On your Mac running macOS13: Open Messages , Control-click the message bubble,
select Edit, then edit the message and send it again.
Unsend a message
In iOS16, iPadOS16.1, and macOS13, or later, you can unsend a recently sent message for
up to 2 minutes after sending it. This allows you the opportunity to pull back a message
that was accidentally sent to the wrong person. Recipients see that a message was unsent.
Note:SMS messages can’t be unsent.
• On your iPhone or iPad: Tap Messages , touch and hold the message bubble, then tap
Undo Send.
A note confirming that you unsent the message appears in both conversation
transcripts—yours and your recipient’s.
• On your Mac running macOS13 or later: Open Messages , Control-click the message
bubble, then select Undo Send.
A note confirming that you unsent the message appears in both conversation
transcripts—yours and your recipient’s.

114Apple Personal Safety User Guide
Use Check In for Messages
You can use Check In on iPhone to automatically notify a friend that your iPhone has
arrived, and choose what details they can see if you don’t successfully complete your
Check In.
Similarly, if a friend sends you a Check In but their iPhone hasn’t arrived as expected,
you can view their location, battery percentage, cellular signal, and more.
Note:Check In requires iOS17 or later for both the sender and the recipient. Location
sharing isn’t supported in South Korea and might be unavailable in other regions due to
local laws.
When you start a travel-based Check In, your contact is informed about:
• Your destination and approximate arrival time
• What they can expect if you don’t respond to prompts, if you place an Emergency SOS
call during Check In, or if your phone doesn’t arrive at the destination as expected
When you start a timer-based Check In, your contact is informed about:
• What time you started the timer
• What time the timer ends
• What they can expect if you don’t respond to prompts about the timer or if you place an
Emergency SOS call during Check In
What information is shared, and when?
While setting up Check In, you can choose the amount of information you’d like to share
with your contact when the Check In doesn’t end as expected. After setting up Check In,
you can change the type of data you’re sending in Settings > Messages > Check In > Data.
Your information level choices are:
• Limited data: Includes your current location and details about your battery and network
signal for iPhone and AppleWatch.
• Full data: Includes all data from Limited plus your route traveled and the location of your
last iPhone unlock and AppleWatch removal.
Your contact is automatically sent a link to view the information you chose to share with
them in the following circumstances:
• Your phone doesn’t arrive at your destination.
• You are significantly delayed during travel and don’t respond to the prompt to add time.
• You place an Emergency SOS call and don’t respond to the follow up Check In prompt.
• You don’t respond to the prompt at the end of your timer-based Check In.
Important:If your phone is lost while Check In is running, your contact receives
notifications as if you weren’t responding.

115Apple Personal Safety User Guide
While Check In is running
When a travel-based Check In is running, the following message appears on your Lock
Screen: “Check In Unlock to view details.” If you tap this message and unlock the device,
you see the destination you set, your current ETA which is updated automatically based on
traffic and driving conditions, and the type of data shared with your contact if the Check
In is not successfully completed (Limited or Full). You also have the ability to cancel the
Check In.
Start timer-based Check In
If you aren’t feeling safe in your current location and want a trusted contact to support you
using Check In, you can start a timer-based Check In. The timer-based Check In notifies
your trusted contact if you don’t respond to the prompt at the end of the timer.
When the timer-based Check In is running, the following message appears on your Lock
Screen: “Check In: Unlock to view details.” If you tap this message and unlock the device,
you can see the following:
• The time remaining on your Check In
• The contact you’ve chosen to receive your Check-In
• The type of data shared with your contact:
• Limited or Full
To start a timer-based Check In:
1. Open Messages , then select the person who you want notify.
2. Tap New Message at the top of the screen and add a recipient, or select an existing
conversation.
3. Tap , tap Check In, then tap Edit.
You may need to tap More to find Check In.
4. Select “After a timer.”
5. Select the amount of time you’d like to put on the timer.
When the timer-based Check In ends, you receive a prompt to tap End the Check In or Add
More Time. When ending the Check In, your contact is notified it has successfully ended.
You can also choose to Add Time, which allows you to add 15, 30, or 60 more minutes to
your Check In. Your contact receives the updated end time.

116Apple Personal Safety User Guide
Start travel-based Check In
If you’re traveling by car, transit, or walking, you can start a Check In to automatically
notify a friend after you’ve arrived at your intended destination.
When a travel-based Check In is running, the following message appears on your Lock
Screen: “Check In Unlock to view details.” If you tap this message and unlock the device,
you see the destination you set, your current ETA (which is updated automatically based on
traffic and driving conditions), and the type of data shared with your contact if the Check
In isn’t successfully completed. You also have the ability to cancel the Check In.
1. Open Messages , then select the person who you want notify.
2. Tap New Message at the top of the screen and add a recipient, or select an existing
conversation.
3. Tap , tap Check In, then tap Edit.
You may need to tap More to find Check In.
4. Select “When I arrive.”
5. Tap Change and then enter your intended location in the Search bar.
6. To set your location arrival radius, tap Small, Medium, or Large at the bottom of the
screen. Your friend receives an Arrival notification once you’ve entered that radius.
7. Tap Done.
8. Tap Driving, Transit, or Walking, then tap Add Time if needed.
If your device isn’t progressing toward your intended destination, you’ll receive a
prompt and have 15 minutes to respond. If there is no response, your loved one is
automatically notified.
When your iPhone arrives at the destination set for a travel-based Check In, Check In ends
and your contact receives an alert indicating that you arrived.
117Apple Personal Safety User Guide
Block calls and messages from certain people
If you’re receiving calls, FaceTime calls, messages, or emails from someone you don’t want
to hear from, you can block them from contacting you in the future. If you block someone
on one device, they’re blocked on all Apple devices signed in with the same AppleID.
Important:The person you block won’t receive a notification that they’ve been blocked,
and you can still call, message, or email a blocked contact without unblocking them.
However, if you were sharing your location with them, they do receive a notification that
you have stopped sharing your location after you block them.
Blocking a contact in Phone, FaceTime, Messages, or Mail blocks them across all four apps.
Block voice calls, FaceTime calls, Messages, and Mail from certain people
• Phone app on your iPhone: In the Phone app, tap Favorites, Recents, or Voicemail,
tap the Info button next to the name, phone number, or email address of the contact
you want to block, scroll down, tap Block this Caller, then tap Block Contact.
• FaceTime app on your iPhone or iPad: In your FaceTime call history, tap the Info button
next to the name, phone number, or email address of the contact you want to block,
scroll down, tap Block this Caller, then tap Block Contact.
• FaceTime app on your Mac: In your FaceTime call history, Control-click on the name,
phone number, or email address of the contact you want to block, then select Block this
Caller.
• Messages app on your iPhone or iPad: In Messages, tap a conversation, tap the name
or number at the top of the conversation, tap the Info button , scroll down, then tap
Block this Caller.
• Messages app on your Mac: In your Messages history, select the name, phone number,
or email address of the person you want to block. From the Conversations menu,
select Block Person, then click Block.
• Mail app on your iPhone or iPad: Tap Mail , select an email message from the sender,
tap their name at the top of the email, select Block this Contact, then tap Block this
Contact.
• Mail app on your Mac: Open Mail, select an email message from the sender, click their
name at the top of the email, then from the dropdown select Block this Contact.

118Apple Personal Safety User Guide
The Blocked icon appears next to the sender’s name in the message list and a banner
is added to their messages to indicate they’re blocked. The banner also provides a link
to the Blocked pane of Mail settings, where you can manage blocked senders.
Note:If the sender has previously been marked as a VIP in mail, you must first tap Remove
from VIP before you can block them.
Manage your blocked contacts
You can manage your blocked contacts through any of the four apps that allow blocking—
Phone, FaceTime, Messages, and Mail. Unblocking in one app unblocks across all four
apps. Do any of the following to see the list of numbers you have blocked:
• iPhone: Go to Settings > Phone, then tap Blocked Contacts.
• FaceTime on your iPhone or iPad: Go to Settings > FaceTime, then under Calls, tap
Blocked Contacts.
• FaceTime on your Mac: Open FaceTime, go to FaceTime > Settings (or FaceTime >
Preferences), then click Blocked.
• Messages app on your iPhone or iPad: Go to Settings > Messages, then under SMS/
MMS, tap Blocked Contacts.
• Messages app on your Mac: Open Messages, go to Messages > Settings (or Messages
> Preferences), click iMessage, then click Blocked.
• Mail app on your iPhone or iPad: Go to Settings > Mail, then under Threading,
tap Blocked.
• Mail app on your Mac: Open Mail, go to Mail > Settings (or Mail > Preferences),
click Junk Mail, then click Blocked.
119Apple Personal Safety User Guide
Receive warnings about sensitive images and
videos on iPhone, iPad, and Mac
Sensitive Content Warning helps adult users avoid seeing unwanted nude images and
videos when receiving them in Messages, an AirDrop, a FaceTime video message, and
the Phone app when receiving a Contact Poster, all using the same privacy-preserving
technology at the core of Communication Safety. The feature is optional and can be turned
on by the user in Privacy & Security settings.
You (or a family member) receive a warning before receiving or sending sexually explicit
photos. In Screen Time, you can also block inappropriate content and set restrictions on
purchases. See Allow or block communication on a family member’s device in the iPhone
User Guide.
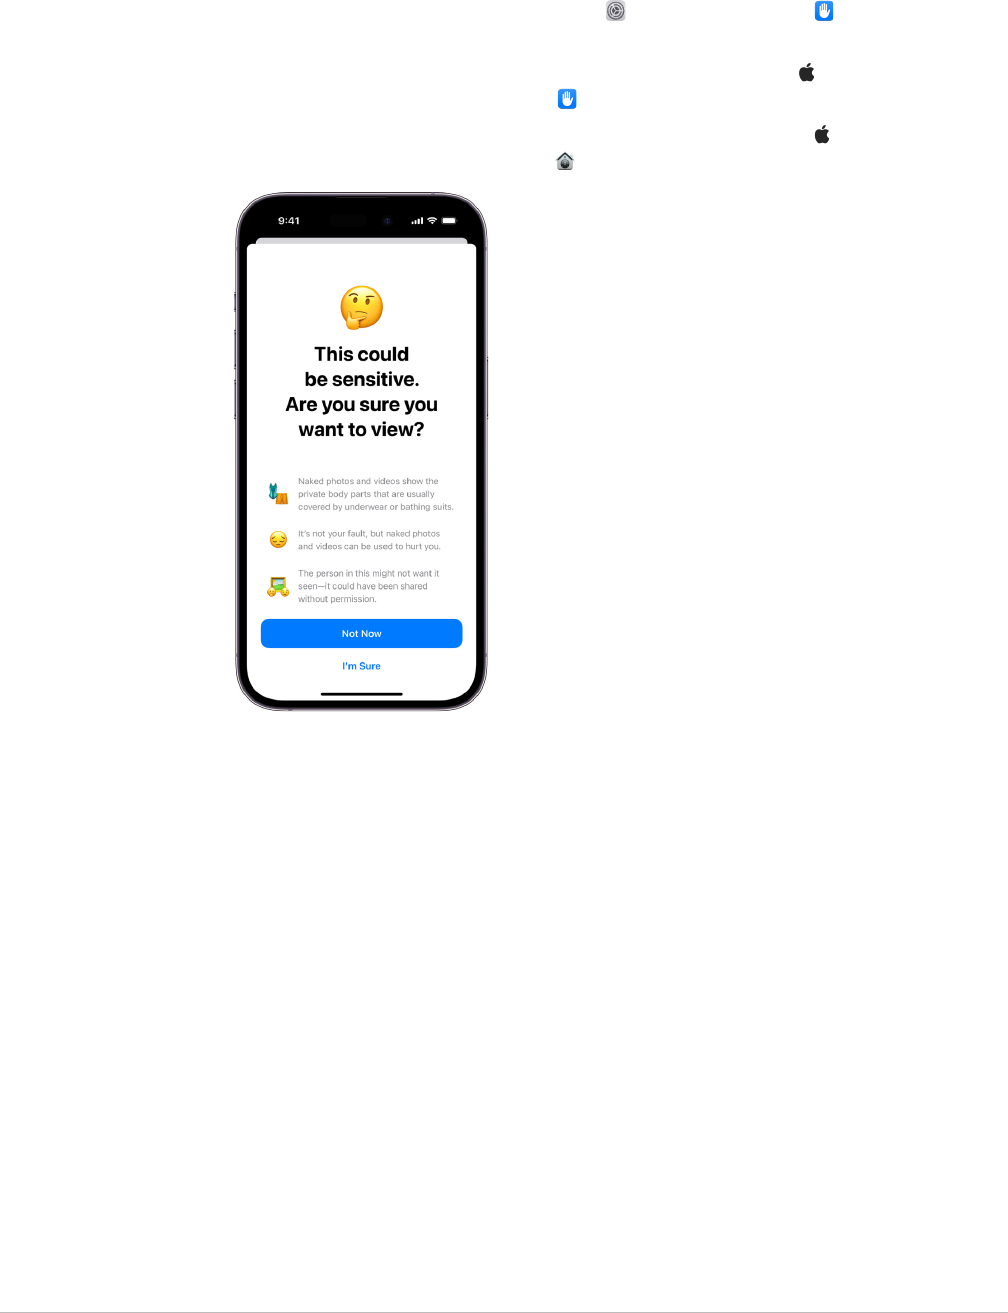
120Apple Personal Safety User Guide
Set up Sensitive Content Warning on iPhone, iPad, or Mac
1. Do one of the following:
• On your iPhone or iPad: Go to Settings > Privacy & Security , then tap Sensitive
Content Warning.
• On your Mac running macOS13 or later: Choose Apple menu , click System
Settings, click Privacy & Security , then click Sensitive Content Warning.
• On your Mac running macOS12 or earlier: Choose Apple menu > System
Preferences > Security & Privacy , then click Sensitive Content Warning.
2. Scroll down and tap Sensitive Content Warning, then turn on Sensitive Content Warning.
3. Select to turn off or turn on permission to detect sensitive content before it can be
viewed and to receive guidance to help make a safe choice.

121Apple Personal Safety User Guide
Keep your browsing history private in Safari
and Maps
Reviewing and clearing search history and caches for browsers and other apps may be a
good practice if you’re concerned someone has access to your device. Many apps store
information about what you’ve searched for and what you’ve looked at so that it’s easy
for you to rediscover it in the future. For example, when you use the Maps app, having a
history of locations you’ve searched for or navigated to can make it easier to navigate back
to a place you recently visited.
If you’re in an unsafe personal situation and need to look up safety strategies online
but don’t want Safari to keep a record of what you’ve viewed, you can open a Private
Browsing window on iPhone, iPad, and Mac. When you use Private Browsing, the details
of your browsing aren’t saved, and they aren’t shared across your devices. Additionally,
if you’ve updated your devices to iOS17, iPadOS17, or macOSSonoma14, Safari locks
Private Browsing tabs after a period of inactivity so that they can be opened only with your
password, passcode, FaceID or TouchID, protecting your privacy when you’re away from
your device. You can clear your browsing history and open a Private Browsing window on
iPhone, iPad, and Mac.
See how to open a Privacy window on an iPhone, iPad, or Mac later in this document.

122Apple Personal Safety User Guide
Clear your browsing history in Safari
If you’ve been looking up information about safety strategies online and are concerned
someone may see your browsing history, you can remove all records that Safari keeps
about where you’ve browsed.
• On your iPhone or iPad: Go to Settings > Safari > Clear History and Website Data.
• On your Mac: Open the Safari app , choose History> Clear History, click the pop-up
menu, then choose how far back you want your browsing history cleared.
When you clear your history, Safari removes data it saves as a result of your browsing,
including:
• A history of the webpages you visited
• The back and forward list for open webpages
• A list of frequently visited sites
• Recent searches
• Icons for webpages
• Snapshots saved for open webpages
• A list of items you downloaded (downloaded files aren’t removed)
• Websites you added for a Quick Website Search
• Websites that asked to use your location
• Websites that asked to send you notifications
Clear recent directions and favorites in Maps on iPhone and iPad
1. Open the Maps app , then scroll down in the search field to Recents.
2. Do one of the following:
• Swipe a recent route left.
• Tap More directly above the list, then swipe a recent route left; or to delete a group
of routes, tap Clear above the group.
3. If you want to remove a Favorite location, scroll to Favorites, then tap More. Swipe from
right to left on the Favorite location you want to delete, or tap Edit and tap the Remove
button to remove multiple Favorites.
Clear recent directions and favorites in Maps on Mac
1. Open the Maps app , the scroll to Recents in the sidebar.
2. Below Recents, click Clear Recents.
3. If you want to remove a Favorite location, Control-click a location (in the sidebar below
Favorites), then choose Remove from Favorites.
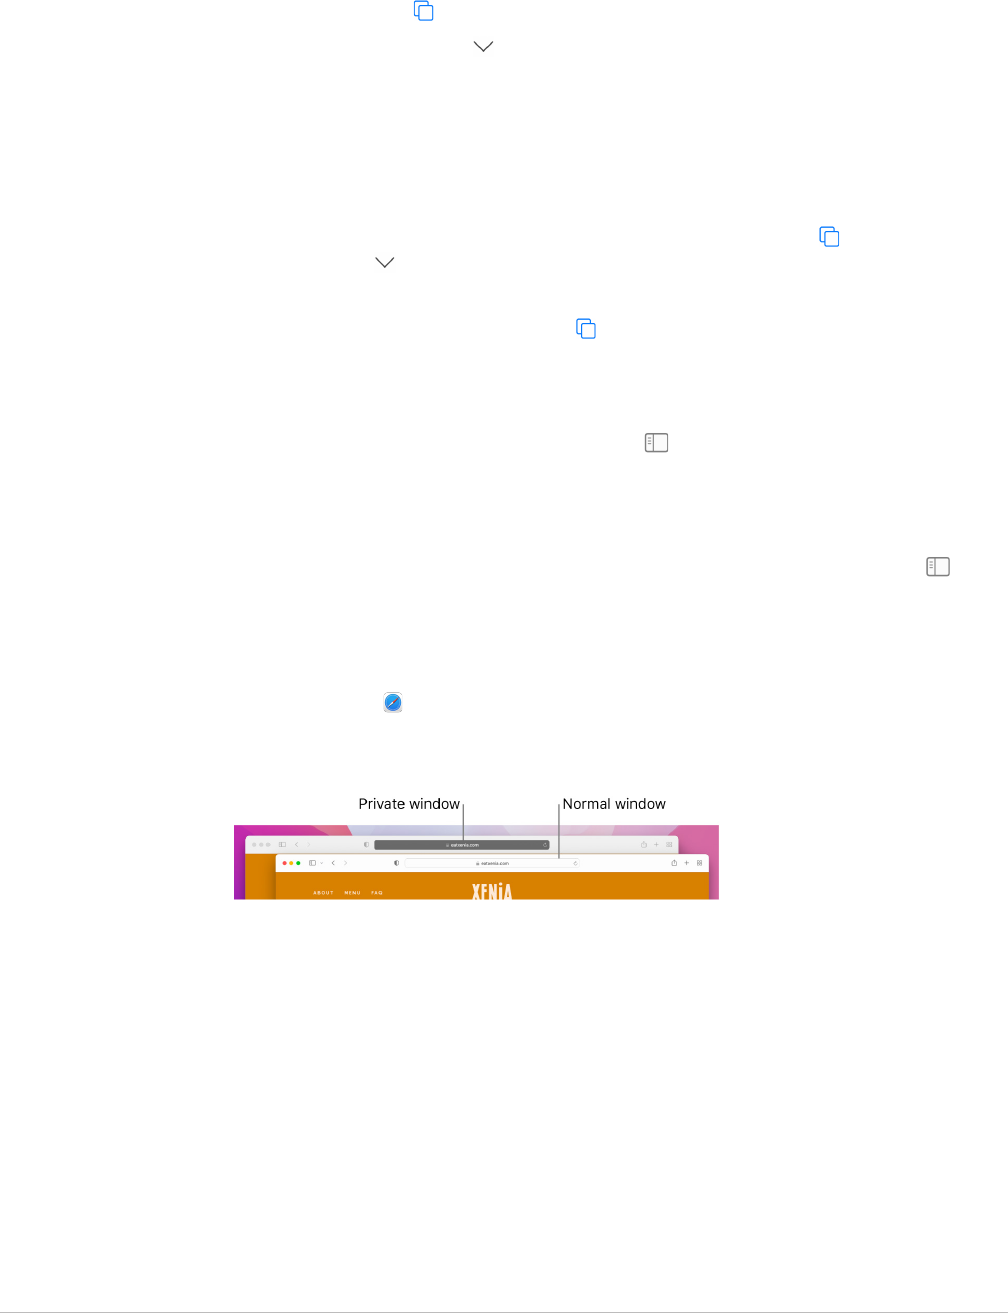
123Apple Personal Safety User Guide
Open a Private Browsing window on iPhone
1. Open the Safari app.
2. Tap the Tabs button .
3. Tap the TabGroups button in the bottom center of the Tab bar at the bottom of the
screen, then tap Private.
The tab is automatically added to a TabGroup called Private. You can open multiple
private tabs in the group.
You can easily confirm that you’re in Private Browsing Mode by checking that the search
field bar is gray or that it displays the word Private.
To hide the sites and exit Private Browsing Mode, tap the Tabs button , then tap the
TabGroups button to open a different TabGroup from the menu at the bottom of your
screen. The private sites reappear the next time you use Private Browsing Mode.
To close private tabs, tap the Tabs button , then swipe left each of the tabs you want to
close.
Open a Private Browsing window on iPad
• In the Safari app, tap the Show Sidebar button , then tap Private.
While Private Browsing Mode is on, the search field background is black instead of
white and sites you visit don’t appear in History on iPad or in the list of tabs on your
other devices. You can open multiple private tabs in the Private Tab Group.
To hide the sites and exit Private Browsing Mode, tap the Show Sidebar button ,
then switch to a different tab group. The tabs reappear the next time you use Private
Browsing Mode.
Open a Private Browsing window on Mac
1. In the Safari app , choose File> New Private Window, or switch to a Safari window
that’s already using Private Browsing.
A window using Private Browsing has a dark Smart Search field with white text.
2. Browse as you normally would.

124Apple Personal Safety User Guide
If you want to always open windows with Private Browsing on Mac
1. In the Safari app , choose Safari> Preferences, then click General.
2. Click the “Safari opens with” pop-up menu, then choose “A new private window.”
If you don’t see this option, do one of the following:
• On your Mac running macOS13 or later: Choose Apple menu > System Settings,
click Desktop & Dock , then make sure “Close windows when quitting an app” is
selected.
• On your Mac running macOS12 or earlier: Choose Apple menu > System
Preferences, click General , then make sure “Close windows when quitting an app”
is selected.
To further enhance Safari privacy
• In your Downloads folder, delete any items that were downloaded while you were using
Private Browsing windows.
• Close any other Private Browsing windows that are still open, to prevent other people
from using the Back and Forward buttons to see pages you visited.
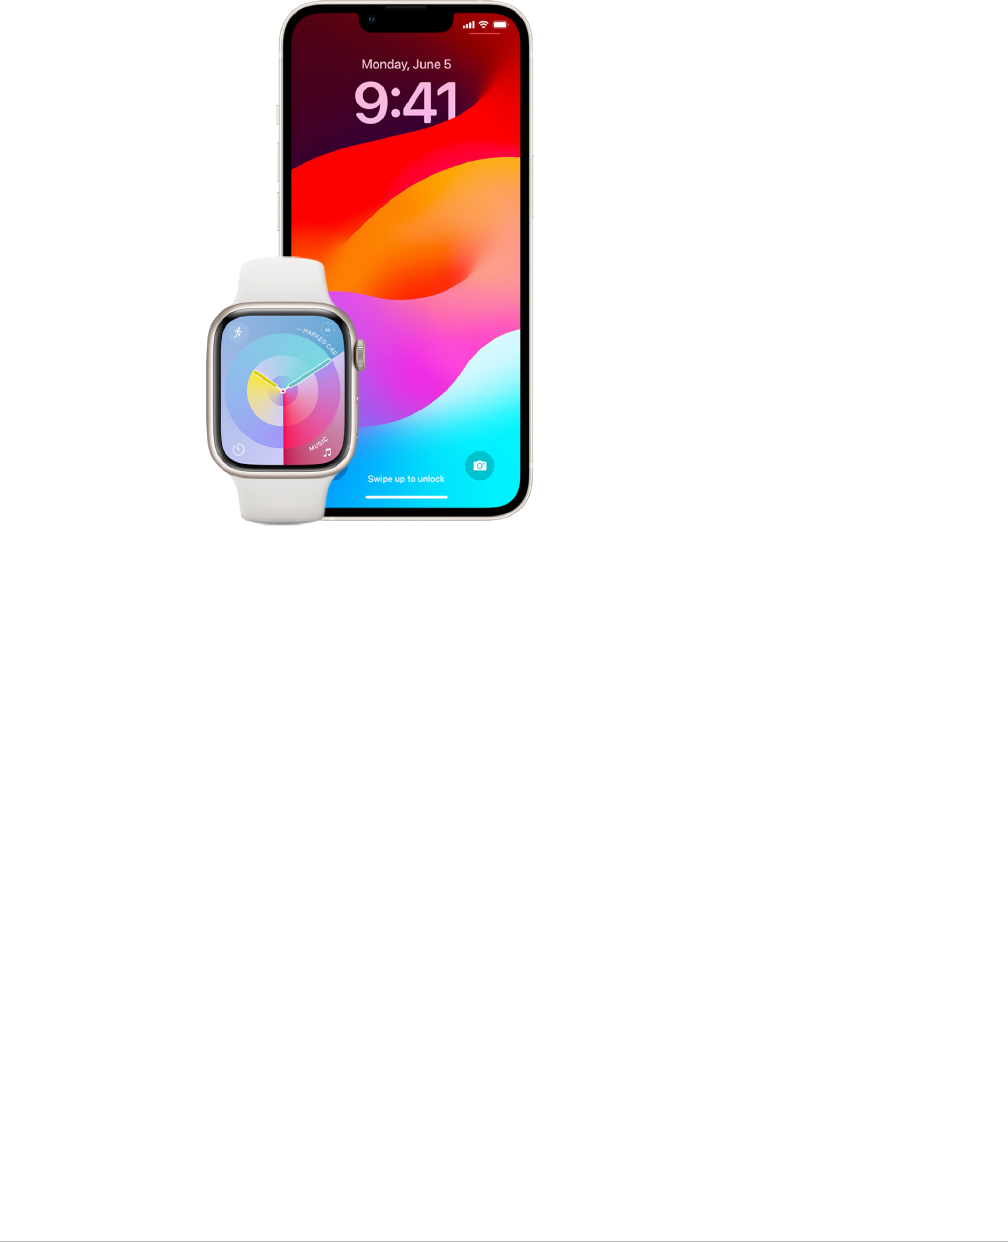
125Apple Personal Safety User Guide
Make an emergency call or text on iPhone or Apple
Watch
In case of emergency, you can use iPhone or Apple Watch to quickly call or text for help.
If you choose to share your Medical ID, iPhone can send your medical information to
emergency services when you call or text 911 or use Emergency SOS (U.S. only).
To learn more about Medical ID, see “Create a Medical ID” in the iPhone User Guide
(https://support.apple.com/guide/iphone/iph08022b194/#iphbcea12902).
Note:For emergency help in some areas, you can also send a text message to 911.
In places that don’t offer this, you might receive a “bounce-back” message indicating
that the text didn’t go through. See the Apple Support article “Text 911 on iPhone or
AppleWatch” (https://support.apple.com/101996).
With Emergency SOS, you can quickly and easily call for help and alert your emergency
contacts. Because of this, it’s important to make sure that the person or people assigned
as emergency contacts are people you trust.

126Apple Personal Safety User Guide
Change your Emergency SOS settings on iPhone
1. Go to Settings > Emergency SOS.
2. Do any of the following:
• Turn Call with Hold on or off: Press and hold the side and volume buttons to start a
countdown to call emergency services.
• Turn Call with 5 presses on or off: Rapidly press the side button five times to start a
countdown to call emergency services.
• Manage your emergency contacts: In Health, tap Set Up Emergency Contacts or
Edit Emergency Contacts. See “Set up and view your Medical ID” in the iPhone User
Guide (https://support.apple.com/guide/iphone/iph08022b192).
Set up or change emergency contacts on iPhone
Emergency contacts can be set up so that if you call an emergency number, iPhone
sends those contacts a notice that you’ve called for help, shares your location with those
contacts, and notifies them if your location changes. If you previously added someone as
an emergency contact and want to remove them, you can delete them.
To add or delete emergency contacts:
1. Open the Healthapp , then tap your profile picture.
2. Tap Medical ID.
3. Tap Edit, then scroll to EmergencyContacts.
4. Add or delete a contact.
• Add a contact: Tap the Add button toadd an emergency contact (You can’t set
emergency services as an SOScontact).
• Delete a contact: Tap the Delete button next to the contact you want to delete,
then tap Delete.
5. Tap Done to save your changes.
Make an Emergency call when iPhone is locked
1. On the Passcode screen, tap Emergency.
2. Dial the emergency number (for example, 911 in the U.S.), then tap the Call button .
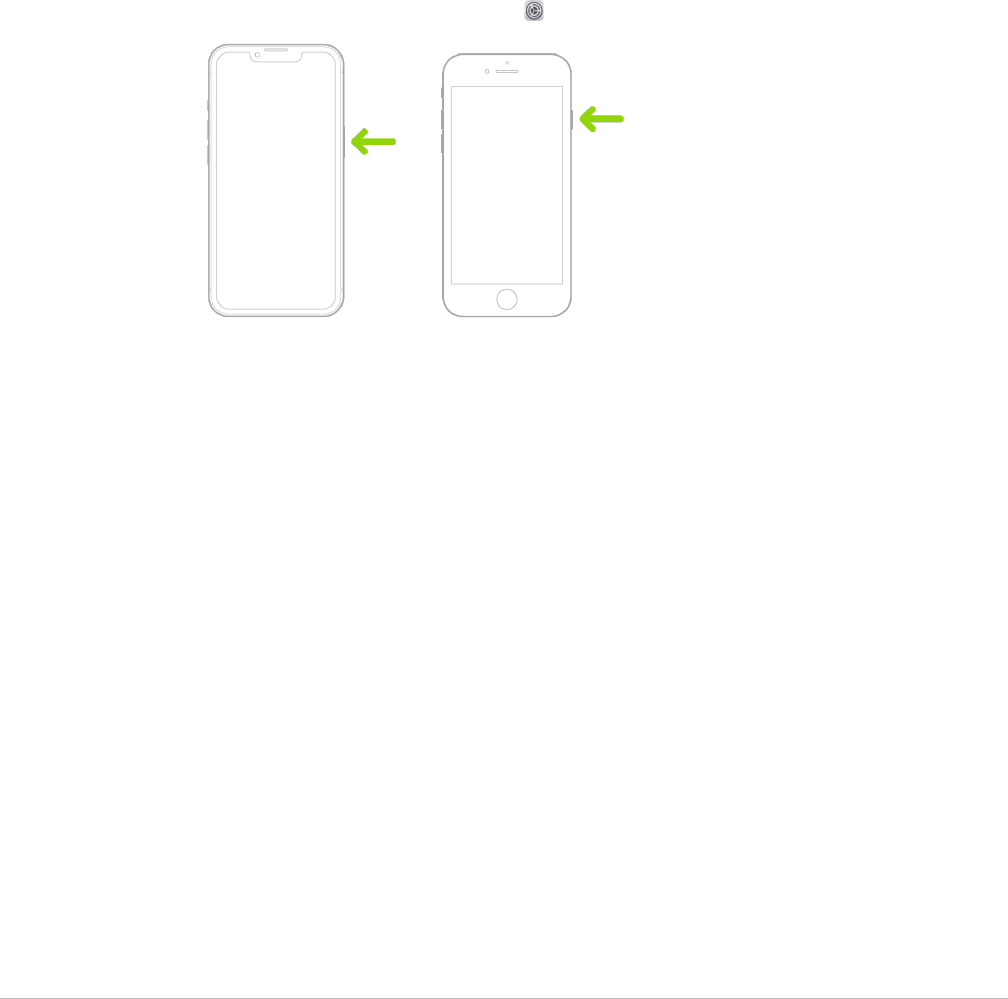
127Apple Personal Safety User Guide
Use Emergency SOS with iPhone (all countries or regions except India)
In case of emergency, use your iPhone to quickly and easily call for help and alert your
emergency contacts (provided that cellular service is available). After an emergency call
ends, your iPhone alerts your emergency contacts with a text message, unless you choose
to cancel. Your iPhone sends your current location (if available) and—for a period of time
after you enter SOS mode—your emergency contacts receive updates when your location
changes.
Note:If you have iPhone14 or later (any model), you may be able to contact emergency
services through satellite if cell service isn’t available. See “Use Emergency SOS via
satellite on your iPhone” later in this document.
• Simultaneously press and hold the side button and either volume button until the sliders
appear and the countdown on Emergency SOS ends, then release the buttons.
Or, you can enable iPhone to start Emergency SOS when you quickly press the side
button five times. Go to Settings > Emergency SOS, then turn on Call with 5 Presses.
Use Emergency SOS with iPhone (India)
• Quickly press the side button three times until the sliders appear and the countdown on
Emergency SOS ends.
• If you’ve turned on Accessibility Shortcut, simultaneously press and hold the side
button and either volume button until the sliders appear and the countdown on
Emergency SOS ends, then release the buttons.
By default, iPhone plays a warning sound, starts a countdown, and then calls the
emergency services.
After an emergency call ends, your iPhone alerts your emergency contacts with a text
message, unless you choose to cancel. Your iPhone sends your current location
(if available) and—for a period of time after you enter SOS mode—your emergency
contacts receive updates when your location changes.

128Apple Personal Safety User Guide
Contact emergency services with AppleWatch
• Do one of the following:
• Press and hold the side button until the sliders appear, then drag the Emergency Call
slider to the right.
Your AppleWatch calls the emergency services in your region—for example, 911.
(In some regions, you may be required to press a keypad number to complete
the call.)
• Press and keep holding the side button until your AppleWatch issues a warning
sound and starts a countdown. When the countdown ends, your AppleWatch calls
emergency services. The AppleWatch makes the warning sound even if it’s in silent
mode, so if you’re in an emergency situation where you don’t want to make noise,
use the Emergency Call slider to call emergency services without a countdown.
If you don’t want your AppleWatch to automatically start the emergency countdown
when you press and hold the side button, turn off Automatic Dialing. Open the
Settings app on your AppleWatch, tap SOS, tap Hold Side Button, then turn off
Hold Side Button. (Or open the AppleWatch app on your iPhone, tap My Watch,
tap Emergency SOS, then turn off Hold Side Button to Dial.) You can still make an
emergency call with the Emergency Call slider.
• Say “Hey Siri, call 911.”
Text Emergency Services from your iPhone (not available in all countries or
regions)
1. Open the Messages app , then type 911 or your local emergency services number in
the To field.
2. In the Text Message field, type your emergency.
3. Tap the Send button .
Important:After you text 911, your iPhone enters emergency mode for 30 minutes.
To get out of emergency mode, restart your iPhone.
Text Emergency Services from your AppleWatch (not available in all
countries or regions)
1. Open the Messages app , then tap New Message.
2. Tap Add Contact.
3. Tap the Number Pad button , type 911, then tap OK.
4. Tap Create Message, then tap SMS.
5. Write a message with your finger, tap the Microphone button to dictate a message,
or type a message with the keyboard.
6. Tap Done, then tap Send.
Important:After you text 911, your AppleWatch enters emergency mode for
30 minutes. To get out of emergency mode, restart your AppleWatch.

129Apple Personal Safety User Guide
Use Emergency SOS via satellite on your iPhone
On iPhone14 and later (any model) with iOS16.1 or later, you can use Emergency SOS via
satellite to text emergency services when you’re outside of cellular and Wi-Fi coverage.
To learn more, see the Apple Support article “Use Emergency SOS via satellite on your
iPhone14” (https://support.apple.com/HT213426).
You can also use the FindMy app to share your location with people via satellite.
See “Send your location via satellite in Find My on iPhone” in the iPhone User Guide
(https://support.apple.com/guide/iphone/iph2aac8ae20).
Important information about emergency calls on iPhone
• Some cellular networks may not accept an emergency call from iPhone if iPhone isn’t
activated, if iPhone isn’t compatible with or configured to operate on a particular
cellular network, or (when applicable) if iPhone doesn’t have a SIM card or the SIM card
is PIN locked.
• In certain countries or regions, your location information (if determinable) may be
accessed by emergency service providers when you make an emergency call.
• Review your carrier’s emergency calling information to understand the limits of
emergency calling over Wi-Fi.
• With CDMA, when an emergency call ends, iPhone enters emergency call mode for a
few minutes to allow a callback from emergency services. During this time,
data transmission and text messages are blocked.
• After making an emergency call, certain call features that block or silence incoming
calls may be disabled for a short period of time to allow a callback from emergency
services. These include Do Not Disturb, Silence Unknown Callers, and Screen Time.
• On an iPhone with Dual SIM (iPhoneSE 2nd generation or later and iPhoneX models or
later), if you don’t turn on Wi-Fi Calling for a line, any incoming phone calls on that line
(including calls from emergency services) go directly to voicemail (if available from your
carrier) when the other line is in use; you don’t receive missed call notifications.
If you set up conditional call forwarding (if available from your carrier) from one line
to another when a line is busy or not in service, the calls don’t go to voicemail;
contact your carrier for setup information.

130Apple Personal Safety User Guide
Know how to obtain evidence related to another
person’s account
Apple is committed to protecting the security and privacy of our users. If you’re
experiencing technology-enabled abuse, stalking, or harassment and want to request
evidence related to another person’s account, you should partner with local law
enforcement or courts to submit the request. In recognizing the ongoing digital evidence
needs of law enforcement agencies, we have a team of dedicated professionals within
our legal department who manage and respond to all legal requests received from law
enforcement agencies globally.
All other requests for information regarding Apple customers, including
customer questions about information disclosure, should be directed to
https://www.apple.com/privacy/contact/.
Apple’s guidelines for law enforcement requests
See the following guidelines for law enforcement requests, for inside and outside the
United States:
• Inside the United States: The Legal Process Guidelines
(https://www.apple.com/legal/privacy/law-enforcement-guidelines-us.pdf)
• Outside the United States: The Legal Process Guidelines
(https://www.apple.com/legal/privacy/law-enforcement-guidelines-outside-us.pdf)

131Apple Personal Safety User Guide
© 2024 Apple Inc. All rights reserved.
Use of the “keyboard” Apple logo (Option-Shift-K) for commercial purposes without the prior written consent of
Apple may constitute trademark infringement and unfair competition in violation of federal and state laws.
Apple, the Apple logo, AirDrop, AirPods, AirTag, AppleBooks, Apple Music, ApplePay, AppleTV, AppleWatch,
Digital Crown, FaceID, FaceTime, FileVault, Finder, FindMy, HomeKit, HomePod, iMac, iMessage, iPad, iPadOS,
iPadPro, iPhone, iTunes, Launchpad, Lightning, Mac, MacBookAir, MacBookPro, macOS, Magic Keyboard, OSX,
Safari, Siri, Time Machine, and TouchID are trademarks of Apple Inc., registered in the U.S. and other countries
and regions.
App Store, iCloud, and iTunes Store are service marks of Apple Inc., registered in the U.S. and other countries and
regions.
Apple
One Apple Park Way
Cupertino, CA 95014
apple.com
IOS is a trademark or registered trademark of Cisco in the U.S. and other countries and is used under license.
The Bluetooth® word mark and logos are registered trademarks owned by Bluetooth SIG, Inc. and any use of such
marks by Apple is under license.
Other company and product names mentioned herein may be trademarks of their respective companies.
Every effort has been made to ensure that the information in this manual is accurate. Apple is not responsible for
printing or clerical errors.
Some apps are not available in all areas. App availability is subject to change.
028-00788
